Vermicomposting Indoors: The Complete Worm Bin Guide for Apartment Dwellers
Learn vermicomposting indoors step by step — from setting up your first worm bin to harvesting rich castings. A practical, no-nonsense guide for apartment dwellers ready to start composting with worms.
INDOOR TINY PLOTS: FRESH FOOD & GREENERY ALL YEAR
Introduction
Here's something that genuinely blew my mind when I first read it: worm castings contain anywhere from four to eleven times more nutrients than the surrounding soil or organic matter the worms consumed. Four to eleven times. That means the humble red wiggler worm is essentially a biological nutrient-concentrating machine, taking your banana peels and coffee grounds and transforming them into one of the most potent natural fertilizers on the planet. And it's doing this work quietly, in a bin, in your apartment, while you sleep.
I know — the idea of keeping worms indoors sounds weird. I thought it sounded weird too, the first time someone suggested it to me. I pictured worms crawling across my kitchen floor in the middle of the night, a bin that smelled like a swamp, fruit flies everywhere. None of that happened. What actually happened was that I set up a small worm bin in the corner of my kitchen, fed it my food scraps for a few months, and harvested the most extraordinary dark, earthy, crumbly material I'd ever seen — and then watched my struggling houseplants transform into lush, thriving versions of themselves within weeks. I was completely converted.
Vermicomposting indoors is one of those things that sounds more complicated and more unpleasant than it actually is. Once your bin is set up correctly — and I'm going to walk you through exactly how to do that — it requires maybe ten minutes of attention per week. It produces zero odor when maintained properly. It takes up less space than a kitchen trash can. And it turns what would have been landfill-bound food waste into something genuinely valuable. This guide covers everything: choosing a bin, sourcing worms, setting up, feeding, maintaining, troubleshooting, harvesting, and using your castings. Let's get into it.
What Is Vermicomposting and Why It's Perfect for Apartments
Vermicomposting is the process of using worms — specifically composting worm species like red wigglers — to break down organic material into a nutrient-rich end product called vermicompost or worm castings. It's distinct from traditional composting in some important ways. Regular composting relies on heat generated by microbial activity in a large pile of organic material — which is why traditional compost piles need to be fairly big and are typically outdoor systems. Vermicomposting works at room temperature, in a contained bin, through the biological activity of the worms themselves working alongside the microorganisms in the bedding. No heat required. No large pile required. No outdoor space required.
The science behind what makes worm castings so extraordinary is genuinely interesting. As organic material passes through a worm's digestive system, it undergoes a transformation that makes nutrients far more bioavailable to plants than they were in the original material. The worm's gut also introduces beneficial microorganisms, enzymes, and plant growth hormones into the castings. The resulting material has a complex biological profile that synthetic fertilizers simply cannot replicate — it's not just about NPK numbers, it's about the whole ecosystem of microbial life that worm castings introduce to your soil.
For apartment dwellers specifically, vermicomposting ticks boxes that no other composting method quite matches. The bin can be as small as a single plastic storage container — compact enough to fit under a kitchen counter, in a closet, or on a balcony in warmer months. It works entirely at room temperature, so you're not dealing with the heat management required for outdoor hot composting. It's a sealed or semi-sealed system, so odor is minimal to nonexistent when run properly. And the inputs — food scraps — are something you're generating every day anyway, which means the "feeding" part requires no extra effort beyond redirecting what would have gone into the trash.
The environmental case is straightforward but worth stating. In a landfill, food scraps decompose anaerobically and produce methane, a potent greenhouse gas. In a worm bin, those same scraps are transformed aerobically into stable, nutrient-rich organic material that improves soil health wherever it's applied. One pound of red wigglers can process roughly half a pound of food scraps per day under good conditions — meaning a modest home worm bin can divert hundreds of pounds of organic material from landfill over the course of a year. That's a meaningful impact from a container that fits under your kitchen sink.
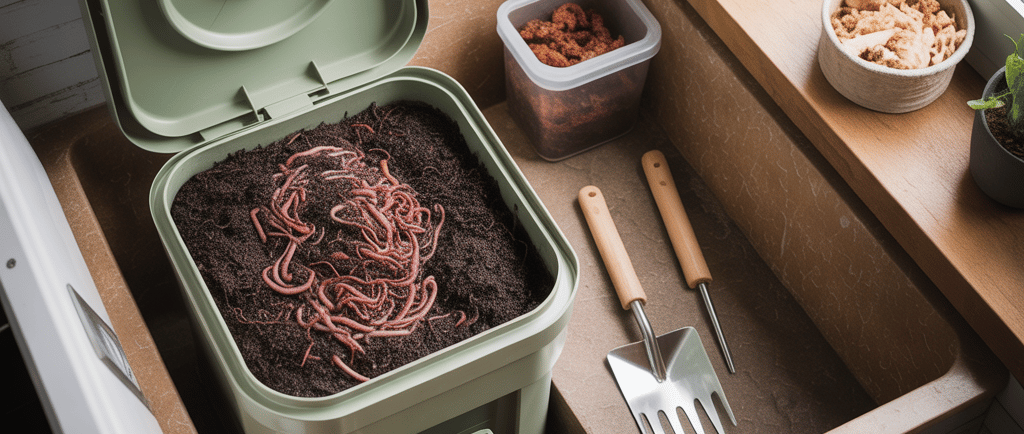
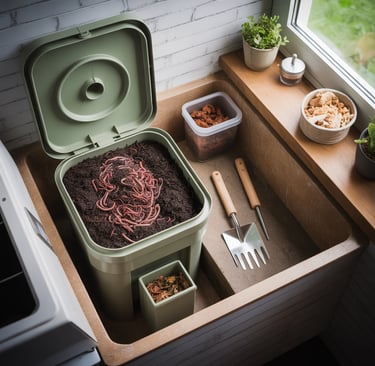
Choosing the Right Worm Bin for Your Space
The first decision you'll make as a new vermicomposter is what kind of bin to use, and there are genuinely good options across a range of prices, sizes, and designs. I've used several different systems over the years and they all work — the best one is the one that fits your space, your budget, and your level of patience for setup and maintenance.
DIY worm bins are the cheapest entry point and work just as well as commercial options when done right. The classic approach is a plastic storage bin — ten to eighteen gallons is a good size for one to two people — with ventilation holes drilled in the lid and sides and drainage holes in the bottom. Nest it inside a second bin to catch any drainage liquid. Total cost: maybe fifteen to twenty dollars if you buy the bins, essentially free if you have suitable containers already. The limitation of a single DIY bin is that harvesting castings requires more manual sorting because worms and finished castings are all mixed together.
Stacking tray systems are the most popular commercial option for good reason — they're clever, they make harvesting much easier, and they're tidy and purpose-designed for indoor use. The concept is simple: multiple trays stack vertically, with mesh bottoms that allow worms to migrate upward. You start with the bottom tray, and when it's nearly full, add a new tray on top with fresh bedding and food. The worms naturally migrate upward toward the fresh food, leaving the lower tray increasingly full of finished castings and relatively free of worms. When the bottom tray is done, you harvest it and move it to the top of the stack. The Worm Factory 360 has been a reliable standard in this category for years, and in 2026 there are several excellent competitors at similar price points, typically ranging from sixty to ninety dollars.
Flow-through systems are the premium option, designed for higher-volume composting with minimal hands-on management. The worms live in a deep bed of material and castings fall through a mesh bottom as they're produced, harvested by breaking them off with a horizontal bar or rod. These systems are excellent for serious vermicomposters or people generating significant food waste, but they're larger and more expensive than most apartment dwellers need. The Urban Worm Bag is a popular fabric flow-through option that's more compact than rigid flow-through systems and works well in apartment settings.
For sizing, a general guideline is one square foot of bin surface area per pound of food scraps generated per week. A single person or couple generating about three to four pounds of food scraps weekly — a realistic estimate — does well with a bin that has eight to twelve square feet of surface area total across trays, or a single bin of similar footprint. When in doubt, start smaller rather than larger — a smaller, well-maintained bin is healthier and easier to manage than an oversized one that's underloaded and risks becoming too wet.
The Best Worms for Indoor Vermicomposting
This is where a lot of beginners make a mistake that dooms their worm bin before it even gets started: using the wrong kind of worms. Not all worms are created equal for composting purposes, and the type matters enormously. I learned this the hard way when a well-meaning family member dug up earthworms from their garden and gave them to me to start my first bin. Those worms did not thrive. They're not supposed to — garden earthworms are soil-dwelling species that process mineral soil, not surface-level organic material. They need different conditions than a composting bin provides.
Red wigglers — scientifically known as Eisenia fetida — are the gold standard for vermicomposting and the species you want. They're also sometimes called brandling worms or tiger worms. Unlike common earthworms, red wigglers are epigeic species — meaning they naturally live in the top layer of soil and organic debris, exactly the environment your worm bin replicates. They reproduce quickly, tolerate a wide range of conditions, process organic material rapidly, and thrive in the confined environment of a bin. They're genuinely well-suited to the job in a way that no other widely available worm species quite matches.
A closely related species, Eisenia andrei, is sometimes sold alongside or instead of Eisenia fetida and works equally well — the two are often found together in commercial worm supplies and are functionally interchangeable for composting purposes. European nightcrawlers (Eisenia hortensis) are another legitimate composting worm that some people prefer because they're larger and also make excellent fishing worms as a bonus, though they process material somewhat more slowly than red wigglers.
For sourcing, local is always better than shipping if you have the option. Check local fishing bait shops — red wigglers are sold as fishing bait and a bait shop pound of worms is often cheaper than the same amount from an online composting supplier. Local composting groups, community gardens, and online platforms like Craigslist or Facebook Marketplace often have established vermicomposter selling worm splits at very reasonable prices. If you buy online, choose a reputable supplier who ships with appropriate insulation and moisture, and plan your delivery for a moderate-temperature day — worms don't ship well in extreme heat or cold.
For quantity, one pound of red wigglers — roughly 800 to 1,000 worms — is the standard starting amount for a household bin. That sounds like a lot but they fit in a surprisingly small space and will grow their population to match their food supply over time. Under good conditions, red wigglers can double their population every two to three months, so a modest starting population will establish itself into a thriving colony relatively quickly. Don't start with less than half a pound — too small a population struggles to establish and can collapse.
Setting Up Your Worm Bin Step by Step
Setup day is exciting — this is where your vermicomposting system comes to life — but it's also where mistakes get made that cause problems weeks later. I've set up worm bins several times now and the process I'm going to describe is the result of learning from those early errors. Follow this carefully and your worms will be comfortable and productive from day one.
Location matters more than most beginners realize. Red wigglers are happiest between 55°F and 77°F (13°C to 25°C), with their sweet spot around 65°F to 75°F. This means most climate-controlled apartments are perfectly suitable year-round. Avoid locations near heat vents, radiators, or appliances that generate heat. Avoid cold exterior walls or drafty spots in winter. Under the kitchen sink is a classic location — convenient for adding scraps, out of sight, and at stable room temperature. A closet works well too. Avoid direct sunlight — worms are photosensitive and strongly dislike light, which is actually useful because it keeps them from trying to escape.
Bedding is the foundation of a healthy worm bin and getting it right is critical. Worms need to breathe, move, and process material in a medium that holds moisture without becoming waterlogged and provides carbon to balance the nitrogen in food scraps. Shredded newspaper is the classic bedding material — it's free, absorbent, and worms love it. Tear or shred it into strips about an inch wide. Cardboard torn into small pieces works similarly. Coco coir — compressed coconut fiber — is my personal favorite because it holds moisture beautifully and has a great texture for worms. It's available in compressed bricks that expand dramatically when hydrated. Plain peat moss also works, though it's less environmentally sustainable than coco coir.
Moisture level is the single most important thing to get right in bedding preparation. Your bedding should feel like a wrung-out sponge — damp throughout but not dripping when you squeeze it. Too dry and worms can't move or breathe properly. Too wet and you'll get anaerobic conditions, smell, and stressed worms. I dampen my bedding material in a bucket before adding it to the bin, mixing and squeezing to get even moisture distribution throughout. Fill the bin with bedding to about two-thirds full — this gives worms plenty of material to work through and move around in.
When your worms arrive, don't just dump them straight into a dark bin and immediately pile food on top. Give them a gentle transition. Place them on top of the prepared bedding and leave the lid off or shine a light on the bin for an hour or so — their natural light aversion will drive them down into the bedding on their own, which is a much less stressful introduction than being buried immediately. Wait two to three days before adding any food. Let them settle, explore, and acclimate to their new environment. Your first feeding should be small — a cup or two of food scraps buried under the bedding — to let the population establish before you start loading the bin.
Feeding Your Worms — What, When, and How Much
Feeding is the part of vermicomposting that most directly affects how well your system runs, how your worms thrive, and whether you get odor or pest problems. I've fed worm bins wrong in several different ways — too much, too little, wrong materials, wrong technique — and the feeding approach I'm describing now is what actually works consistently.
Red wigglers are enthusiastic eaters of most plant-based kitchen scraps. The safe and welcome list includes vegetable and fruit peels and scraps of all kinds, coffee grounds and paper filters, loose tea and paper tea bags, crushed eggshells (these don't break down quickly but add grit that helps worm digestion and neutralize acidity), bread and plain cooked grains in small amounts, paper napkins and paper towels, shredded cardboard and newspaper, and plain cooked vegetables. These form the core of a healthy worm diet and the worms will process them eagerly. Coffee grounds deserve special mention — worms are genuinely attracted to them, they break down quickly, and they add nitrogen. Just don't make them more than about a quarter of your inputs because their acidity adds up.
The foods to absolutely never add to a worm bin include meat, fish, and seafood of any kind — these create foul odors almost immediately and attract pests that can devastate a worm population. Dairy products have the same problem. Oily and fatty foods slow decomposition and create anaerobic pockets. Citrus peels in large quantities are too acidic for worms — a piece or two is fine, but regular large additions will drive the bin's pH too low and stress the worms. Onions, garlic, and other strong alliums are similarly problematic in quantity — the compounds that make them pungent to us are genuinely irritating to worms. Spicy foods, anything heavily salted, and pet waste are all hard no's. Diseased or chemically treated plant material should also stay out.
For feeding frequency and quantity, a general guideline is that a pound of red wigglers can process roughly half a pound of food scraps per day when the bin is well-established and conditions are optimal. In practice, especially with a new bin, feed more conservatively — maybe one to two cups of scraps every two to three days — and watch how quickly the worms are processing food before increasing. If you're adding scraps faster than the worms can process them, food starts piling up, anaerobic conditions develop, and you get smell and pest problems. If scraps are disappearing quickly and the worms look active and healthy, you can feed more frequently.
Technique matters as much as what you feed. Always bury food scraps under bedding rather than leaving them on the surface. Surface food attracts fruit flies and other pests. I use a small trowel to dig a pocket in the bedding, add the scraps, and cover them back over. I vary the location of feeding spots around the bin so I'm not always adding to the same corner — this encourages the worms to move throughout the bin and process material more evenly. Chopping or blending food scraps before adding them dramatically speeds up processing — smaller pieces have more surface area for microbial activity and worms to access. I keep a small cutting board near my bin for this purpose.
Maintaining Your Indoor Worm Bin Week to Week
One of the things I love most about vermicomposting is how low-maintenance it is once the system is established. I'm talking maybe five to ten minutes a week — a quick check of moisture levels, adding scraps, covering them with bedding, and a general look to make sure everything seems healthy. It's genuinely one of the least demanding ongoing tasks in my kitchen routine. But those weekly checks do matter, because catching a problem early is much easier than fixing one that's been developing for weeks.
Moisture management is the most critical ongoing task. The bin should maintain that wrung-out-sponge moisture level throughout — not too wet, not too dry. Every time you add food scraps, you're adding moisture (food is mostly water), which means bins can trend toward too wet over time. If you notice the material becoming soupy or waterlogged, add more dry bedding material — shredded newspaper or cardboard — and hold off on watering if you've been adding any. If the bin seems dry — material pulling away from the walls, worms clustered near the bottom — lightly mist with a spray bottle and add some moistened bedding. I check moisture by just pressing my hand into the material and feeling it. After a few weeks of doing this regularly, you develop an intuitive sense of what the moisture level should feel like.
Temperature monitoring matters most in seasonal extremes. In summer, if your apartment gets very warm — above 85°F consistently — your worms will be stressed. They'll slow down, try to escape, and can die if temperatures climb above 95°F. If you don't have air conditioning or live in a hot climate, keep your bin in the coolest spot in your home, consider putting frozen water bottles on top of the bedding during heat waves, and check more frequently. In winter near cold exterior walls, make sure the bin isn't getting too cold — below 50°F slows worms down significantly, and below 40°F they'll go nearly dormant.
Adding bedding regularly keeps the system balanced and prevents smell. I add a handful of shredded paper every time I add food scraps — it's automatic at this point. This maintains the carbon-to-nitrogen ratio that keeps decomposition aerobic and odor-free. It also prevents the bin from becoming a dense, compacted mass that restricts airflow. If you notice the material in your bin is dark, dense, and uniform-looking throughout, it may be getting close to harvest time — a sign that the worms have processed most of the available material and the bin needs either harvesting or fresh bedding added.
A healthy, thriving worm bin looks and smells like fresh earth — dark, crumbly, alive-feeling. You should see worms moving when you dig into the material, and the population should feel robust rather than sparse. Red wigglers are social animals and naturally cluster together, so finding dense masses of worms in certain areas is completely normal. What you don't want to see: large numbers of worms piling up at the edges or trying to climb out of the bin (stress response), a sour or rotten smell (anaerobic conditions), large amounts of uneaten food sitting on the surface (overfeeding or wrong food), or the material looking extremely pale and dry with few visible worms (too dry, possible population problem).
Troubleshooting Your Worm Bin — Common Problems Solved
Every vermicomposter deals with problems at some point — I certainly have. The good news is that worm bin problems almost always have identifiable causes and straightforward fixes. Once you've been through a troubleshooting cycle or two, you develop a kind of diagnostic instinct that makes subsequent issues much easier to handle.
Worms trying to escape is probably the most alarming thing a new vermicomposter experiences. You open the bin and find worms clustering at the edges and lid, or worse, you find a few escapees on the floor. This is a stress response — worms are trying to leave an environment that's become uncomfortable for them. The most common causes are: bin too wet (add dry bedding, improve drainage), bin too acidic (from too many citrus scraps, coffee grounds, or too much protein — add crushed eggshells or a small amount of garden lime to buffer pH), too much food added at once creating heat or anaerobic conditions (remove excess food, aerate the material), or very recently set up bin where worms haven't yet settled in (keep a light on near the bin for a few days — their light aversion keeps them inside). Check the moisture and smell first — those clues usually point to the cause.
Foul smell is always a sign that something is wrong, because a healthy worm bin should smell like earth at worst and like nothing at best. A rotten, sulfurous smell means anaerobic conditions — the bin is too wet and airflow is insufficient. Remove any obvious excess wet material, add lots of dry bedding, aerate by gently turning the material, and hold off on feeding for a week. A sour, fermented smell usually means the bin is too acidic — add crushed eggshells and reduce acidic inputs. A fishy or putrid smell means something that shouldn't be in the bin got in — check for meat, dairy, or other problem materials and remove them. After fixing the underlying cause, smell typically resolves within a week.
Fruit flies are the most common pest issue and they're almost entirely preventable with good technique. They appear when food scraps are left exposed on the surface rather than buried under bedding. The fix going forward is always burying food deeply and covering completely. For an existing infestation, stop adding food for a week, keep the bin covered with a layer of damp newspaper directly on the surface of the material (this denies flies access while worms can still breathe), and use apple cider vinegar traps nearby to catch adults. Fungus gnats are similar and respond to the same treatment. If neither of those seems to be working, try freezing all food scraps before adding them — freezing kills eggs and larvae that might have been on fresh produce.
Declining worm population can be subtle and alarming when you first notice it. If you're seeing fewer worms than when you started, or if the population seems to have stopped growing, the most common causes are: protein poisoning from too much high-nitrogen input like coffee grounds or citrus (reduce these), conditions too extreme in temperature or moisture (review and adjust), a pH problem (add eggshells), or the worms have simply processed most of the available food and need more feeding. Occasionally a new bin just takes time to establish — give it six to eight weeks before worrying about slow population growth.
Harvesting Worm Castings and Worm Tea
Harvest time is genuinely one of the most satisfying moments in vermicomposting. Opening a bin that's been running well for a few months and seeing that dark, crumbly, incredible-smelling material throughout — knowing that your worms made that from banana peels and coffee grounds — is a feeling I still enjoy after years of doing this. The process of separating worms from finished castings takes a little patience but it's not difficult.
Knowing when to harvest is the first question. A bin is ready to harvest when most of the material looks dark, uniform, and earthy — more like finished compost than like recognizable food scraps or bedding. You'll notice that it's becoming harder to find clean spots to bury new food scraps because the bin is full of processed material. Most indoor bins reach this point every two to four months depending on feeding volume and worm population size. Don't wait too long after this point — a bin packed entirely with finished castings with no fresh material becomes inhospitable for worms over time.
The migration method is the easiest and most hands-off harvesting approach, and it's what I use most of the time. Stop adding food to the bin for about a week before you plan to harvest. Then push all the existing material to one side of the bin, add fresh damp bedding and a good amount of food to the empty side, and wait two to three weeks. The worms will gradually migrate toward the food, leaving the other side increasingly free of worms. Scoop out the worm-sparse side and spread it on a tarp or large sheet to dry slightly — any remaining worms will burrow away from the light, making it easy to pick them out and return them to the bin.
The light method works on the same principle but more actively. Spread the entire bin contents in a thin layer on a tarp or large surface under bright light. Worms burrow away from light immediately. Wait a few minutes, remove the top layer of casting material (now largely worm-free), and repeat — the worms will keep retreating downward with each removal. After several rounds, you'll have a pile of worms and a much larger pile of clean castings. This takes more active time but works quickly and is very thorough.
Worm tea — technically worm leachate — is the liquid that drains from the bottom of your bin and collects in the catch tray below. It's dark, rich-looking liquid that contains water-soluble nutrients and microorganisms. Dilute it about ten to one with water (it should look like weak tea) before using it on plants — undiluted it can be too concentrated. True aerated worm casting tea is different: you steep finished castings in water with an airstone bubbling through it for twenty-four to forty-eight hours, which dramatically increases the microbial activity in the liquid. Both are useful plant fertilizers, with aerated tea being somewhat more potent and biologically active.
Using Worm Castings to Supercharge Your Plants
This is the payoff for everything — the reason the worm bin is worth setting up and maintaining. Worm castings are extraordinary plant food, and I say that having tried a lot of different fertilizers over the years. The difference they make to plant health, growth rate, and vigor is noticeable in a way that many fertilizers just aren't. Part of it is nutrients — worm castings are rich in plant-available nitrogen, phosphorus, and potassium in forms that plants can absorb immediately. But the bigger part is biology — the complex community of beneficial microorganisms, enzymes, humic acids, and plant growth hormones that synthetic fertilizers simply cannot replicate.
One thing worth understanding about worm castings is that they're incredibly gentle — almost impossible to over-apply in ways that burn roots the way synthetic fertilizers can. You can mix up to twenty to thirty percent worm castings into your potting soil without any risk of fertilizer burn. For established container plants, a top dressing of a half inch to an inch of castings applied to the soil surface and watered in releases nutrients slowly and consistently. For seed starting, mixing a small amount of castings into your seed starting mix gives seedlings a gentle nutritional boost right from germination — though use a light hand, maybe ten percent castings, because seedlings are sensitive.
For liquid feeding, worm casting tea is excellent. The diluted leachate I described earlier — ten parts water to one part leachate — can be used as a regular liquid feed every two to four weeks. Aerated casting tea, made by steeping finished castings in oxygenated water, is more potent and can be used at a similar frequency. Either way, water at the base of the plant rather than over the leaves. The results are typically visible within two to four weeks of starting regular casting applications — new growth that's more vigorous, deeper color in leaves, improved overall plant health and resilience.
For seedlings and transplants, a small amount of castings in the planting hole provides an establishment boost that's particularly noticeable. I mix a tablespoon or two of castings into the soil at the base of the planting hole whenever I'm starting or repotting a plant, and I'm consistently impressed by how quickly plants establish and push new growth when I do this versus when I don't. The microorganisms in castings help with nutrient uptake and also appear to improve plant resistance to stress and disease — research consistently supports this, though the mechanisms are still being fully understood.
The beautiful circularity of the whole system is something I find genuinely satisfying. Food scraps from cooking go into the worm bin. Worms transform them into castings over weeks. Castings go into container plants and the balcony garden. Plants grow more food. More food means more scraps. Those scraps go back into the worm bin. Nothing is wasted and everything feeds something else. In an apartment kitchen, that closed loop might be small — but it's real, it works, and it makes every bowl of vegetable peels feel like something worth saving rather than something to throw away.
Conclusion
Vermicomposting indoors is one of those things that seems intimidating right up until you actually try it — and then it quickly becomes one of those background systems in your life that just quietly works, requiring almost nothing from you and giving back something genuinely valuable. A small bin, a pound of worms, a bag of shredded newspaper, and your kitchen scraps: that's really all it takes to get started. The worms do the rest.
Start with one bin, one pound of worms, and realistic expectations. Your first few weeks will involve some learning — figuring out your bin's moisture balance, dialing in your feeding routine, getting a feel for what a healthy bin looks and smells like. That's normal and that's fine. Every experienced vermicomposter you've ever talked to killed some worms or dealt with a fruit fly situation or had a bin that smelled weird for a week. You learn, you adjust, and the system settles into a reliable rhythm that runs itself with minimal input from you.
Now I want to hear from you — are you setting up your first worm bin, or have you been vermicomposting for years and have tips to share? Drop your setup, your questions, your harvest photos, or your best worm-related story in the comments below. This is genuinely one of those topics where the community knowledge is as valuable as any guide, and I'd love to know what's working (and what isn't) in your specific setup. Go get your worms. 🪱