How to Start a Balcony Garden for Beginners: Complete 2026 Step-by-Step Guide
Start your balcony garden in 2026 with this complete beginner's guide! Learn setup, plant choices, container selection, and maintenance for a thriving balcony garden in any space.
TINY PLOT BEGINNERS: YOUR FIRST HARVEST STARTS HERE
Introduction
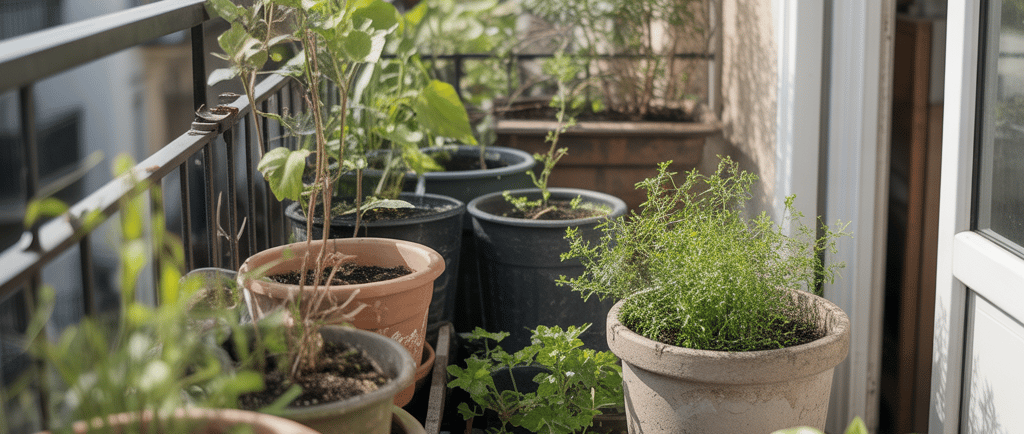
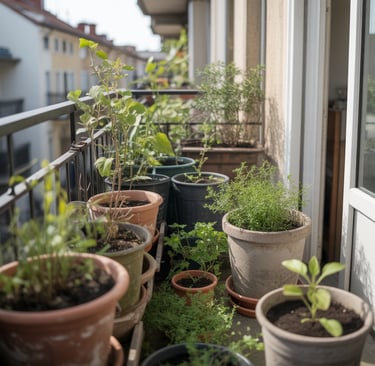
I'll never forget standing on my bare concrete balcony three years ago, staring at the empty 6x8 foot space and thinking "I want to grow something here, but I have no idea where to start." I'd killed every houseplant I'd ever owned. I knew nothing about gardening. My balcony faced north (not ideal for sun), was on the 7th floor (windy), and I was renting (no permanent modifications allowed). Every obstacle seemed insurmountable.
But I was determined. I started with three containers—one cherry tomato, one basil, one pot of lettuce. I made every beginner mistake possible: wrong soil, wrong watering, wrong container sizes, wrong expectations. The lettuce bolted within three weeks. The basil got leggy and weak. But that cherry tomato plant—despite my incompetence—produced 15 small tomatoes that tasted better than any I'd ever bought. I was hooked.
Fast forward to today, and my balcony is a productive garden that provides fresh herbs year-round, vegetables all summer, and more joy than I ever imagined a small concrete slab could create. I grow 30-40% of the fresh produce I eat from May through October. My grocery bill has dropped noticeably. My mental health has improved dramatically. And I've learned that balcony gardening isn't about having the perfect space—it's about working with what you have.
Here's what convinced me to write this guide: balcony gardening is more accessible than ever in 2026. The supplies are better and more affordable. The information is clearer (though sometimes overwhelming). The community support is incredible. And the need—both for fresh food and for the mental health benefits of growing things—has never been more recognized. If I could transform from a serial plant-killer to a successful balcony gardener, absolutely anyone can.
This guide is specifically designed for complete beginners starting their first balcony garden in 2026. I'm not going to assume you know anything about plants or gardening. I'm going to walk you through every single step, from assessing your empty balcony to harvesting your first homegrown vegetables. I'll share exactly what worked for me, what failed spectacularly, and what I wish someone had told me before I started.
You don't need a green thumb (I certainly didn't have one). You don't need a big balcony or perfect conditions. You don't need to spend hundreds of dollars. You just need to start. Let's transform your balcony together!
Why 2026 Is the Perfect Year to Start Your Balcony Garden
If you've been thinking about balcony gardening, this is genuinely the best time to start. Here's why:
Growing interest in food security and self-sufficiency has exploded over the past few years. More people than ever are thinking about where their food comes from and wanting to produce at least some of it themselves. Balcony gardening offers this without needing a yard. I've noticed this shift in my own community—five years ago, I was the only person on my floor with a balcony garden. Now there are at least six of us, and we share tips and surplus produce.
Rising grocery costs make homegrown produce valuable in ways beyond just the food itself. Fresh herbs at the store cost $3-5 for a tiny package that goes bad in days. I grow basil, cilantro, and parsley continuously for the cost of seeds ($3 total) and a few containers. One cherry tomato plant produces $30-50 worth of tomatoes over a season. The economics of balcony gardening have become genuinely compelling, especially for expensive fresh produce like herbs, tomatoes, and salad greens.
Mental health benefits of gardening are gaining recognition, and for good reason. Gardening reduces stress, provides purpose and routine, connects you to natural cycles, gives you tangible accomplishments, and gets you outside (even if just on a balcony). I started balcony gardening during a difficult period and the daily ritual of checking plants, watering, observing growth—it became meditative and healing. In 2026, with ongoing mental health awareness, people understand that gardening isn't just a hobby—it's wellness practice.
New beginner-friendly products and resources available make starting easier than ever. Self-watering containers that prevent the #1 beginner killer (inconsistent watering) are affordable and widely available. Compact varieties bred specifically for containers are everywhere. Potting mixes are better formulated. YouTube has thousands of balcony gardening tutorials. When I started, I struggled to find specific balcony gardening advice. Now it's everywhere, and the quality has improved dramatically.
Community and online support is stronger than ever—there are massive Reddit communities, Facebook groups, Discord servers, and local meetups specifically for balcony and container gardeners. I've learned as much from online communities as from any book or video. The ability to ask questions, share photos, troubleshoot problems with experienced balcony gardeners worldwide is invaluable for beginners. This support network didn't exist at this scale even five years ago.
Climate awareness driving sustainable food choices makes balcony gardening align with values many people hold. Growing food locally (can't get more local than your balcony) reduces transportation emissions, packaging waste, and chemical inputs. Even a small balcony garden is a tiny act of sustainability. For people who want to live more sustainably but are limited by apartment living, balcony gardening is accessible climate action.
Work-from-home culture creating more time for hobbies is a post-pandemic shift that benefits balcony gardeners. If you're working from home even part-time, you can check plants during the day, water during lunch, harvest fresh herbs for dinner. I found balcony gardening way more manageable when I started working from home—I could give plants the attention they needed without it feeling like a chore. The flexibility of hybrid/remote work makes balcony gardening more viable for busy people.
Small space gardening techniques are more refined than ever before. The last decade has seen explosion in container gardening innovation: vertical growing systems, compact plant varieties, intensive planting methods, succession planting strategies. The collective knowledge about maximizing small spaces has grown exponentially. Beginners in 2026 benefit from all this accumulated wisdom. When I started, I reinvented wheels constantly. Now you can learn from proven methods immediately.
Assessing Your Balcony: What You're Working With
Before buying a single thing, you need to understand your specific balcony. Every balcony is different, and success starts with honest assessment.
Measuring your actual usable space means getting specific numbers. Measure length, width, and importantly—identify how much of that space is actually usable. My balcony is technically 6x8 feet (48 square feet), but after accounting for the door swing, walkway space, and my small bistro table, I have maybe 25 square feet for containers. Measure your dimensions, subtract unusable space, and know your real growing area. This prevents overbuying and overcrowding.
Determining sun exposure is the most critical assessment you'll make. Spend a full sunny day tracking sun on your balcony. Go out every hour from 8am to 7pm and note which areas have direct sun versus shade. Full sun = 6-8+ hours of direct sun. Partial sun = 4-6 hours. Shade = less than 4 hours. I made charts for different times of year because sun angles change seasonally. This assessment determines what you can grow more than any other factor. Don't guess—actually measure.
Checking weight restrictions and building codes is essential for safety and legality. Most balconies support 40-60 pounds per square foot, but verify with your building management or lease documents. Large containers with wet soil are heavy—a 7-gallon container can weigh 60-80 pounds. I calculated my total weight (all containers filled, saturated) to ensure I stayed under limits. I distributed weight around the perimeter where structural support is strongest. Don't skip this—overloading balconies is a real safety issue.
Assessing wind exposure changes what you can grow and how you'll set up. High-rise balconies can have fierce wind. I'm on the 7th floor and wind is significant. Strong wind desiccates plants (they dry out faster), can knock over containers, and breaks stems. I installed a bamboo privacy screen on the windiest side and it reduced wind dramatically. Plants behind the screen thrive while exposed areas struggle. Test wind on different days and note patterns. Wind solutions exist, but you need to know the problem first.
Evaluating water access and drainage determines your watering setup. Where's the nearest water? Do you have an outdoor spigot, or are you carrying water from inside? How far is the walk? I carry water from my kitchen—a 30-foot walk with a watering can. This is manageable for my setup but wouldn't work for 30 containers. Consider drainage too: where does water go when it drains from containers? My balcony has a drain but some don't. If yours doesn't, you'll need aggressive saucer management or other solutions.
Understanding privacy and visibility considerations affects plant choices and layout. Is your balcony visible from neighboring balconies or from the street? Do you want privacy screening? I used tall plants and trellises to create privacy from adjacent balconies while keeping my setup attractive from the street. Consider whether you want decorative (flowers) or productive (vegetables) if the balcony is highly visible. No judgment either way—just factor visibility into your planning.
Identifying microclimates on your balcony reveals that different areas have different conditions. Even on my small balcony, there are microclimates: the corner near the building wall is sheltered and warm, the opposite corner is windy and cooler, the area near the railing gets more sun. I use these microclimates strategically—heat-loving plants in the warm corner, cooler-weather greens in the cooler area. Spend time on your balcony observing these variations.
Landlord permissions and rental restrictions must be checked before starting. Review your lease for restrictions on balcony modifications, weight limits, drainage, or aesthetics. Many leases prohibit drilling into railings or permanent modifications. Mine does, so I use freestanding everything—no permanent installations. Some buildings have aesthetic requirements (container colors, plant types). Check before investing money in something you'll be forced to remove. Most landlords are fine with container gardens, but confirm first.
Setting Realistic Goals for Your First Season
This is where many beginners go wrong—they set themselves up for failure through unrealistic expectations.
Starting small with the 3-5 container rule for beginners is my strongest recommendation. Your first season, start with just three to five containers. Yes, really. Just three. This feels too small, but it's not. Three containers allow you to learn watering, fertilizing, plant care, and seasonal rhythms without being overwhelmed. I started with three (should have been my first three, but I actually started with eight and was overwhelmed). The restraint of starting small sets you up for success rather than burnout.
Choosing between decorative versus productive focus helps clarify your plant choices. Decorative: beautiful flowers, attractive foliage, aesthetic appeal. Productive: vegetables, herbs, food harvest. Both are valid. I focused on productive (tomatoes, herbs, lettuce) because I cared more about food than flowers. My friend focused on decorative (petunias, geraniums, trailing plants) because she wanted beauty. Knowing your priority guides plant selection. You can do both, but in a first season with limited space, picking a focus helps.
Understanding seasonal limitations is critical for realistic expectations. Unless you live somewhere with year-round growing, you'll have an off-season. I'm in Zone 6—my growing season is roughly April through October. November through March is dormant or indoor-only growing. First-year beginners often don't realize this and get discouraged when plants die in fall. Understanding that annual plants are supposed to die at season's end prevents discouragement. Plan for your actual growing season, not year-round production (that comes later).
Setting harvest expectations realistically prevents disappointment. One tomato plant won't feed you all summer. It'll produce maybe 10-50 tomatoes depending on variety and size. That's great—that's $15-30 worth of tomatoes—but it's not "all the tomatoes you'll eat." I started expecting massive harvests and was disappointed. Now I'm thrilled with what I get because my expectations are calibrated. Fresh herbs, some tomatoes, salad greens for a few weeks—these are realistic first-season harvests and they're absolutely worth it.
Balancing ambition with available time is essential. How much time can you realistically spend on balcony gardening? Be honest. I have 1-2 hours per week. That supports about 25 containers comfortably. If you have 30 minutes per week, keep it to 5-8 containers. If you have 5 hours per week, you could manage 40+ containers. Underestimating time requirements leads to neglect and failure. Most beginners need 5-10 minutes per container per week on average (some weeks more, some less). Calculate accordingly.
Planning for learning curve and failures is realistic and healthy. You will kill plants. I killed probably 40% of my plants the first season. This is normal. Budget for it emotionally and financially. Don't buy expensive rare plants your first season—buy cheap common plants you can afford to kill while learning. The learning curve is real and you'll improve dramatically from season one to season two. Accept that failure is how you learn gardening.
Defining success for your situation is personal and important. Success for me was: growing anything that produced edible food, learning basic skills, not giving up despite failures, and enjoying the process. Success was NOT: Instagram-perfect aesthetic, massive harvests, zero plant deaths, or expertise in one season. Define what success means to you. Maybe it's just having living plants all season. Maybe it's harvesting one homegrown tomato. Maybe it's learning what works on your specific balcony. Personal success definitions prevent comparing yourself to unrealistic standards.
Creating a simple vision for your space helps guide decisions. Close your eyes and imagine your balcony garden. What do you see? Lush green plants? Colorful flowers? Vegetables ready to harvest? Herbs by the door? I envisioned a productive food garden with herbs right by my kitchen door for easy access. This vision guided my layout and plant choices. Your vision might be completely different—a meditation space with ornamental plants, a privacy screen of greenery, a cottage garden aesthetic. Having a vision (even rough) creates coherence in your decisions.
Essential Supplies: Your Beginner Shopping List
Let's talk about what you actually need versus what's nice to have. I'll save you money and confusion.
Containers are your foundation. For a first season with 3-5 containers, I recommend: two 5-7 gallon containers (roughly 12-14 inches diameter) for tomatoes or peppers, one 10-12 inch container for herbs, one 8-10 inch container for lettuce or greens, and one hanging basket or railing planter for trailing plants or extra herbs. Mix of sizes gives you flexibility. Materials: plastic or resin for budget/weight, glazed ceramic for aesthetics if budget allows. Terracotta is beautiful but dries out very fast. Budget: $30-60 for 5 quality containers.
Potting mix is non-negotiable—do NOT use garden soil. Buy quality potting mix designed for containers. For 5 containers (3-7 gallons each), you'll need roughly 2-3 cubic feet of potting mix. That's 1-2 large bags (typically 2 cubic feet per bag). Budget: $15-30 for quality mix. Don't cheap out here—the difference between cheap mix and quality mix is plant success versus failure. Look for mixes with peat or coir, perlite, and slow-release fertilizer included.
Basic hand tools you actually need are minimal. A hand trowel (for moving soil), pruning shears (for harvesting and trimming), a watering can with a rose (shower-head style spout), and that's really it for starting. Don't buy full tool sets—you don't need them yet. Budget: $20-30 for these three essentials. I use these three tools constantly and rarely need anything else. Add tools as you discover specific needs.
Watering equipment essentials are a good watering can (2 gallons capacity is versatile) and potentially a hose if you have outdoor water access. I started with just a watering can because I carry water from inside. If you have a balcony spigot, a hose with a gentle spray nozzle makes life easier. Budget: $15-25 for a good watering can, $25-40 for a hose setup. Self-watering containers (mentioned earlier) might reduce watering equipment needs but cost more upfront.
Fertilizer for beginners should be simple. I recommend liquid all-purpose fertilizer (something like 10-10-10 NPK) that you dilute and use every 2-4 weeks. Buy a small bottle to start. Or slow-release granular fertilizer (Osmocote or similar) that you mix into soil at planting and forget for months. I use both—slow-release as baseline, liquid for extra feeding. Budget: $10-15 for fertilizer that'll last all season. Don't overthink fertilizer initially—basic balanced fertilizer works for almost everything.
Support structures and stakes are needed for tomatoes, peppers, and any vining plants. For 3-5 containers, budget for: 2-3 tomato cages or 4-6 bamboo stakes, and some soft plant ties (or just use strips of cloth). Tomatoes and peppers need support or they'll fall over when fruiting. Budget: $15-25 for basic support supplies. You can often reuse these year after year, so it's a one-time investment.
Optional but helpful items include: plant labels (know what you planted!), a moisture meter (helps beginners learn watering), gloves (if you prefer them), a small bucket or trug for harvesting/collecting debris, and a spray bottle for misting or pest control. These aren't essential but they're nice. Budget: $20-30 if you want these extras. I'd skip them initially and add them as you discover needs.
Budget breakdown for starting: containers $30-60, potting mix $15-30, hand tools $20-30, watering equipment $15-25, fertilizer $10-15, support structures $15-25. Total: $105-185 for absolute basics. Add plants ($20-40 for 3-5 plants/seed packets) and you're at $125-225 total. You can definitely start a balcony garden for $100-300 depending on choices. This is very affordable for a hobby that provides food and mental health benefits for months.
Choosing Your First Plants (The Foolproof Approach)
Plant selection makes or breaks beginner success. Choose wisely and you'll have confidence-building wins.
Easiest vegetables for balcony beginners include: cherry or grape tomatoes (they produce prolifically in containers and taste amazing—way better than store-bought), lettuce (fast-growing, cut-and-come-again harvest, almost foolproof), bush beans (compact, productive, nitrogen-fixing), and radishes (ready in 3-4 weeks, instant gratification). These vegetables tolerate beginner mistakes, grow well in containers, and provide actual harvests. I grew tomatoes, lettuce, and radishes my first season—all succeeded despite my incompetence.
Foolproof herbs that tolerate mistakes are basil (grows fast, loves sun, produces abundantly, survives minor neglect), parsley (hardy, produces continuously, forgives most mistakes), cilantro (fast-growing, flavorful, good for succession planting), and chives (perennial, nearly indestructible, comes back yearly). These herbs are way easier than Mediterranean herbs (rosemary, lavender) that are fussier. I keep basil and parsley constantly—they're the most useful in my cooking and the most reliable growers.
Hardy flowers for instant gratification include marigolds (bright, pest-deterrent, nearly indestructible), petunias (prolific bloomers, container-friendly), zinnias (easy from seed, continuous blooms, attract pollinators), and nasturtiums (edible flowers and leaves, trailing habit, vibrant colors). If you want beauty over food, these flowers deliver with minimal skill required. My friend started with petunias and marigolds and had a gorgeous balcony despite being a complete beginner.
Plants to avoid in your first season: anything labeled "challenging" or requiring specific conditions, Mediterranean herbs (rosemary, lavender, thyme—they're drought-adapted and tricky in containers), large vining plants (winter squash, melons—they're space hogs and need expertise), finicky houseplants moved outside (they often struggle with transition), and expensive rare varieties (save these until you have skills to keep them alive). Stick to proven easy plants your first season.
Buying seedlings versus starting from seed is a strategic decision for beginners. Seedlings (starter plants) cost more ($3-5 per plant) but give you a head start and higher success rate. Seeds are cheaper ($2-4 per packet, dozens of plants) but require more skill and time. My recommendation for first season: buy seedlings for tomatoes, peppers, and some herbs. Start lettuce, radishes, and beans from seed (these are easy from seed). This mix gives you confidence-building early success (seedlings) while learning seed-starting (easy seeds).
How many plants to start with depends on container count. If you have 3-5 containers as I recommended: one tomato plant, one pepper plant, one container with 3-4 lettuce plants or mixed greens, one container with 2-3 herbs, and one container with flowers or another vegetable. That's roughly 8-12 individual plants total. This sounds small but it's appropriate for learning. You can always add more mid-season if you're succeeding. Starting with 20+ plants as a beginner is a setup for overwhelm and failure.
Companion planting basics are simple: plant things that grow well together and have similar needs. Tomatoes and basil (classic pairing, similar water/sun needs), lettuce and radishes (quick radishes fill space while lettuce grows), beans and just about anything (they're nitrogen-fixers that benefit neighbors). Avoid planting things with incompatible needs—succulents and ferns, sun-lovers and shade-lovers, drought-tolerant and water-loving. For beginners, the rule is simply: plant things with similar water and light requirements together.
Where to buy quality plants: local nurseries (best advice and plant quality, support local), big box stores (cheaper, acceptable quality, convenient), farmers markets (often have locally-grown starts, can ask questions), or online (huge selection but shipping stress, higher cost). I prefer local nurseries for first plants—yes, they're more expensive, but the advice and quality are worth it. Once you know what you're doing, big box stores are fine for cheap plants. Avoid buying plants in bad condition (yellowing, root-bound, diseased) even if they're on sale—you're setting yourself up for failure.
Container Selection Strategy for Beginners
Choosing the right containers is more important than beginners realize.
Size requirements by plant type are non-negotiable minimums. Tomatoes: 5-7 gallons minimum (12-14 inch diameter, 12-14 inches deep). Peppers: 3-5 gallons (10-12 inches diameter/deep). Herbs: 6-8 inches diameter and depth works for most. Lettuce/greens: 8-10 inches wide, 6-8 inches deep. These are minimums—larger is often better, but smaller leads to problems. I tried growing tomatoes in 3-gallon containers and got terrible results. In 7-gallon containers, huge success. Size matters enormously.
Material options each have tradeoffs. Plastic/resin: cheap, lightweight, retain moisture well, not always attractive, can degrade in UV over time. Terracotta: beautiful, breathable (good for some plants), dries out very fast (requires more frequent watering), heavy, expensive. Fabric grow bags: excellent drainage, lightweight, collapsible for storage, less attractive, dry faster than plastic. Glazed ceramic: beautiful, retain moisture like plastic, very heavy, expensive. For beginners, I recommend starting with plastic or resin—they're forgiving, affordable, and functional.
Drainage requirements are absolutely non-negotiable. Every container must have drainage holes. Multiple holes. Large holes. I cannot stress this enough—containers without drainage kill plants through root rot. If you fall in love with a container without holes, drill holes before planting. I use a drill with a masonry bit for ceramic, regular bit for plastic. Minimum: 3-5 holes of 1/2 inch diameter for a 12-inch container. More holes is better. Don't skip this.
Self-watering containers for beginners are worth considering if you're worried about watering consistency (the #1 beginner challenge). Self-watering containers have a reservoir that wicks water up as needed. You fill the reservoir every 3-7 days instead of watering daily. They cost 2-3x more than regular containers but dramatically reduce watering stress. I converted my tomatoes and herbs to self-watering containers in season two and wish I'd started with them. For forgetful or busy beginners, the investment is worthwhile.
Vertical growing options for small spaces include: wall-mounted pocket planters (fabric pockets that hang on walls, good for herbs and lettuce), stacking planters (containers that stack vertically, tripling growing space), railing planters (hook over balcony railings, save floor space), and trellises with containers (beans, peas, cucumbers grow up while container stays small). I use railing planters for herbs and save floor space for larger vegetables. Vertical growing is essential for maximizing small balconies.
Aesthetic versus functional containers is a choice based on priorities. Functional: cheap plastic pots, nursery containers, utilitarian but practical. Aesthetic: decorative ceramic, matching color schemes, design-conscious choices. I'm 80% functional, 20% aesthetic—I use cheap plastic for most things but have a few nice ceramic pots in visible locations. First season, I recommend prioritizing functional unless aesthetics are very important to you. You can upgrade aesthetics later once you know what you're doing.
Budget container solutions include: 5-gallon buckets from hardware stores ($3-5 each, drill drainage holes), repurposed storage bins (drill holes, works fine), thrifted pots from garage sales or thrift stores (I've found beautiful pots for $2-5), fabric grow bags (cheap online, $3-8 each, lightweight and effective), and reusing containers from previous plants (nursery pots, yogurt containers). I've furnished half my container collection through thrifting and repurposing for under $50.
Containers to avoid as a beginner: anything without drainage holes (unless you're willing to drill), extremely small containers (under 6 inches—they dry out in hours), very large containers (over 20 gallons—they're expensive, heavy, unwieldy for beginners), novelty containers that prioritize form over function (cute but impractical shapes), and terracotta if you're worried about watering (beautiful but dry out too fast for forgetful waterers). Start with functional standard containers and get fancy later.
The Right Soil: Why Potting Mix Matters
Soil is literally the foundation of your garden. Get this right and everything else is easier.
Why garden soil kills container plants is physics and biology. Garden soil compacts in containers (eliminating air spaces roots need), drains poorly (causes waterlogging and root rot), is too heavy (weight issues), and often contains pests, diseases, and weed seeds. I killed several plants before learning this—I thought "soil is soil." Wrong. Garden soil is designed to work in the ground with natural aeration from worms and roots. In containers, it becomes cement-like and plants suffocate. Never use garden soil in containers.
What makes good potting mix: a combination of peat moss or coconut coir (moisture retention), perlite or vermiculite (drainage and aeration), and some organic matter or nutrients (initial fertility). Quality potting mix is light, fluffy, drains well but retains appropriate moisture, and doesn't compact over time. I can squeeze a handful of good moist potting mix and it holds shape but isn't muddy. When I release it, it doesn't stay in a tight ball—it's loose and crumbly. This texture is what roots need.
Buying pre-made versus mixing your own is a beginner decision. Pre-made: convenient, consistent, proven formulas, slightly more expensive per volume. DIY: cheaper in bulk, customizable, requires knowledge and storage space. For beginners, I strongly recommend buying pre-made potting mix. The convenience and reliability are worth slightly higher cost. Once you have experience and understand what plants need, consider mixing your own. I still buy pre-made because I don't have space to store bulk ingredients.
How much soil you'll actually need is more than you think. A 5-gallon container holds roughly 0.67 cubic feet of soil. A 3-gallon container holds about 0.4 cubic feet. For 5 containers (mixed sizes averaging 4 gallons each), you need about 2.5-3 cubic feet total. Potting mix typically comes in 1, 1.5, or 2 cubic feet bags. Buy two large bags (2 cubic feet each) to start 3-5 containers with some leftover for topping up. Better to have extra than run out mid-planting.
Soil amendments for beginners are mostly unnecessary if you buy quality potting mix. Good mix comes pre-amended with nutrients, perlite, etc. The only amendment I sometimes add is extra perlite (10-20% by volume) if the mix seems dense or for plants that really need excellent drainage. Some people add compost or worm castings for extra fertility. For first season, I'd skip amendments and just use quality mix as-is. Add complexity later once you understand basics.
Reusing versus replacing potting mix is a year-to-year decision. Potting mix breaks down over a season—it compacts, nutrients deplete, structure degrades. I reuse mix for one more season if it still looks fluffy and loose (I add fresh perlite and nutrients). If it's compacted or degraded, I replace it. Used mix can be added to compost or spread on gardens (just not reused in containers). Many beginners reuse mix multiple years and wonder why plants decline—fresh mix every 1-2 years is part of container success.
Avoiding common soil mistakes: using garden soil (fatal), buying the cheapest possible mix (usually too dense or breaks down fast), not adding drainage material like perlite to dense mixes, filling containers to the brim (leave 1-2 inches for watering space), not pre-moistening soil before planting (dry potting mix can be hydrophobic), and expecting old compacted mix to work like new. These mistakes are all preventable with knowledge.
Budget-friendly soil options include: buying bulk potting mix (cheaper per cubic foot but requires storage), buying store-brand mix instead of premium brands (often fine for beginners), buying end-of-season clearance (I've gotten 50% off in late fall), splitting bulk purchases with friends/neighbors (shared cost), or mixing your own if you have space (bulk peat/coir, perlite, compost—cheaper but requires effort). I've bought store-brand potting mix successfully many times. You don't need the most expensive mix, just decent quality.
Setting Up Your Balcony Garden (Step-by-Step)
Before planting anything, do the physical setup right. This prevents problems later.
Planning layout before buying anything saves money and prevents mistakes. I sketch my balcony on graph paper (1 square = 1 foot) and arrange containers on paper before buying. This reveals: how many containers actually fit, where sun/shade areas are, traffic flow patterns, and whether my vision is realistic for my space. I've changed my plans multiple times during paper planning—way better than buying containers that don't fit. Spend 30 minutes planning on paper to save hours of rearranging and money on wrong purchases.
Weight distribution considerations are safety-critical. Balconies are strongest around the perimeter (where they attach to building). The center is weakest. I place my heaviest containers (large pots with saturated soil) around the edges. Lighter containers can go anywhere. I calculated total weight (containers + soil + water + plants) and ensured I stayed well under my balcony's weight limit. For high-rise balconies especially, this isn't optional—overloading is dangerous.
Creating levels and vertical interest makes small spaces feel bigger and more interesting. I use: tiered plant stands (create multiple levels from one footprint), railing planters (add height variation), hanging planters (use overhead space), and different height containers (tall, medium, short creates visual rhythm). My balcony went from flat and boring to dynamic and lush just by adding vertical elements. Levels also maximize growing space—three small pots on a tiered stand use the same floor space as one large pot.
Ensuring proper drainage solutions means water doesn't pool on your balcony or leak onto balconies below. I use pot feet or tiles under containers to allow air circulation and drainage. I have saucers under containers that could drip, and I empty saucers after watering so containers don't sit in water. If your balcony doesn't have a drain, this is critical—you need to manage drainage so water doesn't accumulate. I've never had drainage complaints from neighbors below because I'm careful about this.
Installing windbreaks if needed protects plants and makes the space more comfortable. My bamboo privacy screen (6 feet tall, mounted to freestanding frame—no drilling) cut wind by about 60% on my windiest side. Plants behind the screen don't dry out as fast and don't get wind-damaged. Other windbreak options: shade cloth attached to railings with zip ties, trellises with vining plants (create natural windbreak), or tall containers with sturdy plants arranged as a barrier. If wind is significant, address it before planting tender plants.
Organizing watering access means making watering convenient and efficient. I positioned containers so I can reach all of them with a watering can without moving furniture. I have a small table near the door where I stage my watering can and fertilizer. If you have an outdoor spigot, consider installing a hose reel or hooks for hose storage. Watering is daily during summer—make it as easy as possible or you'll start to resent it. Convenience directly impacts consistent care.
Setting up work/potting area is helpful even on small balconies. I use a folding table I bring out when planting/repotting, or I just use a large tarp on the floor to catch spilled soil. Having a designated "messy zone" prevents soil everywhere and makes cleanup easier. Some people use a large plastic storage bin as a potting surface (fill it with soil, work over it, spills stay contained). For tiny balconies, accepting that work happens in place and having a dustpan handy is fine.
Making the space functional and beautiful balances practicality with aesthetics. Yes, you're growing food or plants. But you also want to enjoy being on your balcony. I kept one corner for a chair and small table—a place to sit among the plants. I chose containers in a cohesive color scheme (mostly terracotta and white) so it looks intentional. I added string lights for ambiance. The balcony is productive but also a pleasant space to spend time. Don't sacrifice all enjoyment for maximum production—find balance.
Planting Your First Containers (The Right Way)
Getting plants in the ground (or containers) correctly sets them up for success.
When to plant depends on seasonal timing and your climate. In most regions: start cool-season crops (lettuce, peas, cool-weather greens) in early spring (March-April) or fall (September-October). Start warm-season crops (tomatoes, peppers, basil) after last frost (typically May-June). I check my local frost dates (easily googled—"last frost date [my city]") and plant accordingly. Planting too early risks frost kill. Planting too late shortens growing season. Timing matters. For total beginners, I'd recommend starting in late spring (May) with warm-season crops—it's forgiving timing.
Pre-planting container preparation includes: ensuring drainage holes are clear, cleaning containers if reused (prevents disease carryover), and having all supplies ready (soil, plants, supports, watering can). I stage everything before starting so I'm not running around mid-planting. This seems obvious but I've absolutely started planting and realized I didn't have enough soil or forgot plant supports. Five minutes of prep prevents interruptions.
Proper planting depth and spacing is plant-specific. Tomatoes: plant deep, burying stem up to first true leaves (they root along the buried stem for stronger plants). Most other plants: plant at same depth they were in nursery pot—don't bury stems that aren't meant to be buried. Spacing: follow plant tag recommendations. In containers, you can cheat slightly closer than in-ground recommendations but not by much. I've planted too densely and had weak crowded plants. Proper spacing gives each plant room for roots and airflow.
Initial watering techniques: water thoroughly after planting until water drains from bottom holes. This settles soil around roots and ensures good soil-to-root contact. I water from the top initially even if using self-watering containers—you need to establish that connection between soil and roots. Then I water gently over the next few days, keeping soil moist but not soggy while plants establish. The first week is critical for root establishment. Under-watering during establishment can set plants back, but overwatering can cause rot. I aim for consistently moist (not wet, not dry).
Supporting plants from day one is important for tomatoes, peppers, and anything that will need support later. I install tomato cages or stakes at planting time, not later. Why? Installing supports after plants are established risks damaging roots and stems. I've broken branches trying to cage already-grown tomatoes. Install supports when you plant—it's easier and safer. Push stakes/cages firmly into soil so they're stable. I've had cages tip over mid-season from inadequate installation—very frustrating.
Labeling and tracking what you planted prevents the "what is this plant?" problem later. I use plastic plant labels (10 for $2) or popsicle sticks with permanent marker. Write: plant name, variety, and planting date. I also keep a simple notebook or phone note with more details: where I bought it, when I planted it, any observations. This seems unnecessary until you have 10 containers and can't remember which tomato is which variety. Labels degrade in sun/rain—I replace them mid-season as needed.
First-week care essentials: check soil moisture daily (newly planted containers often need more frequent watering as roots aren't established yet), protect from extreme weather (if a heat wave or cold snap hits, provide temporary shade or bring inside), don't fertilize yet (wait 2-3 weeks for roots to establish), and observe daily for stress signs (wilting, yellowing). I'm extra attentive the first week or two. Once plants show signs of establishment (new growth, perking up), I relax into normal care routine.
Common planting mistakes to avoid: planting too early and losing plants to late frost (patience!), using too-small containers (I've harped on this but it bears repeating), planting incompatible plants together (different water/light needs), forgetting drainage holes (plants die of root rot), burying stems that shouldn't be buried (causes rot on most plants except tomatoes), planting too deep or too shallow (follow variety-specific guidance), overcrowding (give plants space!), and planting disease/pest-damaged plants (start with healthy stock). These mistakes are all preventable with a little knowledge.
Watering 101: The #1 Beginner Challenge
I'm dedicating serious space to watering because it's the single biggest challenge for beginners and the #1 plant killer.
Why watering kills more plants than anything else: it's the care task you do most frequently (daily in summer), it's not intuitive (different plants need different amounts at different times), beginners either underwater (forget, don't realize how often needed) or overwater (trying to be attentive, killing with kindness), and containers dry out way faster than ground so there's less margin for error. I killed more plants through watering mistakes than all other mistakes combined. Learning to water properly is the difference between success and failure.
The finger test method explained is simple and foolproof: stick your finger into the soil to the second knuckle (about 2 inches deep). If it feels dry at that depth, water. If it feels moist, don't water—check again tomorrow. This direct moisture assessment is way more reliable than schedules, guessing, or surface appearance. Surface soil can be dry while deeper soil is moist (don't water yet) or surface can look fine while deep soil is bone dry (water now). The finger test tells you actual soil moisture.
How often to actually water varies by so many factors. It's not "every day" or "twice a week"—it depends on: plant size (larger plants use more water), container size (small containers dry faster), weather (hot = faster drying), sun exposure (full sun = much faster drying), humidity (dry air = faster drying), wind (wind = faster drying), and plant type (tomatoes drink heavily, succulents don't). In summer peak heat, my containers need watering every 1-2 days. In spring, every 3-4 days. In fall, every 5-7 days. This variability is why schedules don't work.
Signs of overwatering versus underwatering can overlap confusingly. Overwatering: yellowing leaves (especially lower/older leaves), wilting despite wet soil (roots damaged, can't absorb water), mushy stems or roots, mold/algae on soil surface, and persistent wet soil days after watering. Underwatering: wilting that perks up immediately after watering, dry crumbly soil, crispy brown leaf edges, and rapid drying (needs water daily or more). The key diagnostic: check soil moisture. Wilting with wet soil = overwatering. Wilting with dry soil = underwatering.
Creating a checking routine (not a watering schedule) is the mindset shift that transformed my success. Every morning, I walk my balcony with coffee. I stick my finger in each container (takes 30 seconds total for my 25 containers). If dry, I note it. After checking all containers, I water the ones that need it. This responsive routine maintains appropriate moisture for each plant's actual needs. Contrast with a schedule: "water Monday and Thursday"—on cool rainy weeks I'd overwater, on hot weeks I'd underwater. Responsive checking works, schedules don't.
Solutions for forgetful waterers include: phone reminders to CHECK plants (not to water—check, then decide if watering needed), self-watering containers (reservoir lasts 3-7 days), grouping all containers in one area (easier to see and remember), drip irrigation on timers (automated but requires setup), or simply growing fewer plants (if you have 3 containers instead of 15, you're less likely to forget). I'm somewhat forgetful, so I positioned containers where I see them constantly—hard to forget when they're right in my path.
Vacation watering strategies depend on trip length. 1-3 days: water thoroughly before leaving, you'll be fine. 4-7 days: self-watering containers, fill all reservoirs, or ask neighbor/friend to water mid-trip. 1-2 weeks: self-watering containers essential, or hire someone to water, or bring plants inside to more protected environment. 2+ weeks: definitely need someone watering, or accept losses. I've done 10-day trips with self-watering containers filled before leaving—plants were fine. Without self-watering, I'd need help.
Seasonal watering adjustments are significant. Spring: moderate watering, every 3-5 days typically, plants are growing actively. Summer: peak watering, daily or twice daily in heat waves, this is most demanding season. Fall: reduce watering frequency as temperatures drop and growth slows, every 4-7 days. Winter (if growing year-round indoors): minimal watering, every 7-14 days or even less, plants are dormant or slow-growing. I track seasonal patterns in my notes—knowing "fall means water weekly" from experience guides my checking routine.
Fertilizing for Beginners: Keeping Plants Fed
Watering keeps plants alive. Fertilizing keeps them thriving and productive.
Why container plants need fertilizer: every watering leaches nutrients out drainage holes. After 3-6 weeks, most potting mix is nutritionally depleted. In the ground, nutrients are constantly recycled by soil organisms and replenished from deeper soil. Containers are isolated—they only have what's in the pot. Without regular fertilizing, plants slowly starve. Symptoms are slow growth, small leaves, yellowing, poor flowering/fruiting. I've watched identical plants with and without fertilizer—the difference in vigor and production is dramatic.
When to start fertilizing depends on your potting mix. If mix included slow-release fertilizer (check the bag—many do), wait 4-6 weeks before adding more. If mix was plain, start fertilizing 2-3 weeks after planting (give roots time to establish first). I start liquid fertilizing about 3-4 weeks after planting regardless, figuring some baseline nutrition remains from potting mix initially. Starting too early risks burning young roots. Waiting too long means plants starve during peak growth.
Choosing beginner-friendly fertilizers: I recommend liquid all-purpose fertilizer for beginners. Something like Miracle-Gro All Purpose (20-20-20) or similar balanced NPK ratio. It's foolproof—you dilute according to package directions (usually 1 tablespoon per gallon of water) and water plants with it. Or use slow-release granular (Osmocote or similar)—mix into soil at planting and it feeds for 3-6 months. I use both: slow-release as baseline, liquid every 2-3 weeks for extra feeding during peak growth.
How often to fertilize different plants: heavy feeders (tomatoes, peppers, flowering annuals, roses): every 1-2 weeks with liquid fertilizer. Moderate feeders (most herbs, greens, perennials): every 3-4 weeks. Light feeders (succulents, cacti): every 6-8 weeks or even less. Container plants generally need more frequent fertilizing than package directions suggest because of nutrient leaching. I fertilize tomatoes and peppers every 10-14 days during fruiting season, herbs every 3 weeks, and succulents maybe twice per season.
Signs of nutrient deficiency: overall yellowing especially of older leaves (nitrogen deficiency—most common in containers), yellow leaves with green veins (iron deficiency), purple-tinged leaves (phosphorus deficiency, though also caused by cold), slow growth despite adequate water and light (general nutrient depletion), and poor flowering/fruiting (often phosphorus or potassium deficiency). When I see these signs, I increase fertilizing frequency and plants usually recover within 1-2 weeks.
Avoiding over-fertilization: brown crispy leaf tips and edges (salt burn), white crusty buildup on soil surface (salt accumulation), very lush growth but weak stems (too much nitrogen), or in severe cases plant death (root burn). Over-fertilizing is less common than under-fertilizing but it happens when people think "more is better." I follow the "dilute and frequent" principle—half-strength fertilizer more frequently rather than full-strength less often. Safer and more consistent nutrition.
Organic versus synthetic for beginners is mostly personal preference. Synthetic (Miracle-Gro, Peters, etc.): precise nutrition, immediate availability, easy to use, can cause salt buildup. Organic (fish emulsion, compost tea, seaweed, worm castings): slower release, improves soil biology, more forgiving of over-application, can smell bad. I use both—synthetic liquid for predictable feeding, organic amendments for soil health. For absolute beginners, I'd start with synthetic liquid because it's easier and more predictable.
Simple fertilizing schedule I follow: weeks 1-3 after planting (no fertilizer, let plants establish), weeks 4-8 (fertilize every 3 weeks with half-strength liquid), weeks 8+ through end of season (fertilize every 1-2 weeks with half-strength for heavy feeders, every 3-4 weeks for others). I mark fertilizing dates on my calendar and when I fertilize, I check off containers in my notes. This prevents forgetting and prevents accidentally double-fertilizing (both of which I've done). Simple schedule adapted to plant needs.
Dealing with Light: Working with What You Have
Light is the one thing you can't easily change, so you need to work with what you've got.
Understanding your light conditions honestly is critical. Don't convince yourself you have "pretty good sun" when you actually have 3 hours of morning sun. Measure accurately: full sun = 6-8+ hours of direct sun, partial sun/shade = 4-6 hours, shade = under 4 hours or filtered light all day. I measured mine carefully: my balcony gets 4-5 hours of morning/midday sun (partial sun). Accepting this limitation allowed me to choose appropriate plants instead of fighting reality and failing.
Matching plants to available light is the fundamental success strategy. Have full sun? Grow tomatoes, peppers, basil, sunflowers, zinnias. Have partial sun? Grow lettuce, Asian greens, parsley, impatiens, begonias. Have shade? Grow ferns, hostas, coleus, impatiens, leafy greens. I have partial sun, so I focus on greens, herbs, and shade-tolerant plants. I tried sun-loving tomatoes initially—they grew okay but never thrived. Choosing plants matched to my actual light has been transformative.
Maximizing light with reflective surfaces adds usable light without adding sun hours. I placed white boards behind containers on the shady side—light bounces off and reaches the backs of plants. Mylar emergency blankets work great as cheap reflectors. White or light-colored walls naturally reflect more than dark walls. I've measured that reflectors add maybe 10-15% more light—not transformative but helpful at the margins. Every bit helps when light is limiting.
Rotating containers for even growth prevents lopsided plants leaning toward light. Every 3-4 days, I rotate containers 180 degrees so all sides get equal light exposure. This produces symmetrical growth instead of plants leaning heavily toward the sun. Takes 30 seconds per container. For small containers, I do this when checking moisture. For large heavy containers, I rotate less frequently or accept some lean. Rotation matters most for foliage plants where appearance matters.
Supplemental grow lights for low-light balconies can transform shady spaces into productive gardens. LED grow lights have become affordable ($30-100 for decent setups). If your balcony gets under 4 hours of sun, adding grow lights for 4-6 additional hours can enable growing vegetables that would otherwise be impossible. I don't use them (my light is adequate), but friends with north-facing balconies have had great success with supplemental lighting. The electricity cost is minimal—maybe $5-10 per month running 6 hours daily.
Seasonal light changes are significant and often surprising. My balcony gets way more light in summer (sun is higher, longer days) than winter (sun is lower, shorter days). The spot that's full sun in June might be full shade in December due to sun angle. I notice this especially in spring and fall—plants that thrived in one location in summer struggle in the same spot in fall. I adjust plant positions seasonally based on where light is. Understanding that light changes through the year prevents confusion.
Shade solutions for too-bright balconies are necessary in hot climates or for west-facing balconies with intense afternoon sun. Shade cloth (30-50% shade) attached to railings or overhead, patio umbrellas, or awnings reduce light intensity and heat. Some plants (lettuce, greens, shade lovers) actually need protection from full summer sun or they bolt and burn. I don't need shade solutions, but people with south or west-facing balconies in hot climates often do. Shade is easier to add than light—just block some.
When to move containers: I move them when I notice plants struggling despite good care (yellowing, stretching, burning). If a plant is stretching toward light, it needs more light—move it to a sunnier spot. If leaves are scorching, it needs less intense light—move to shadier spot or add shade. I experiment with positioning during the season. Containers are mobile—use that advantage. I've moved plants 3-4 times in a season finding their ideal spot. Once you find what works, that plant stays there.
Common Beginner Problems and Quick Fixes
Here are the problems I see beginners encounter most often, with solutions.
Yellow leaves can indicate multiple problems: lower leaves yellowing = nitrogen deficiency (fertilize), all leaves yellowing = overwatering or root problems (check soil moisture and roots), new growth yellowing with green veins = iron deficiency (add iron supplement or adjust pH), random leaves yellowing = normal aging (don't worry). The diagnostic is: which leaves, and what else is happening? I've learned to look at patterns. Isolated yellowing is normal. Widespread sudden yellowing indicates a problem needing correction.
Wilting despite watering indicates root problems, not thirst. If soil is wet but plant is wilting, roots are damaged (usually from overwatering/root rot) and can't absorb water. Check roots by gently lifting plant—if they're brown and mushy (healthy roots are white/tan and firm), you have root rot. Solutions: reduce watering drastically, improve drainage, repot in fresh soil if severe, or accept the plant may not recover. I've saved some root-rotted plants by drastic action (cutting away damaged roots, repotting, reducing water). Success rate is maybe 50%.
Leggy, stretched growth means insufficient light. Plants stretch toward light when they're not getting enough. Stems elongate, leaves are spaced far apart, plants look thin and weak. Solution: move to more light, add supplemental grow light, or accept that this plant won't thrive in your conditions and choose a different plant. I had this with basil in a shady corner—it stretched to 3 feet tall with sparse tiny leaves. Moved to better light, next basil stayed compact at 18 inches with large leaves. Light changes everything.
Pests on balcony plants are common but manageable. Most common: aphids (tiny green/white bugs on stems/leaves), spider mites (tiny mites, fine webbing, stippled leaves), fungus gnats (small flies around soil, larvae in wet soil), and whiteflies (tiny white flying insects). Solutions: insecticidal soap spray (safe for edibles), neem oil (broad spectrum organic), physically spraying off with water, or introducing beneficial insects. I've dealt with all these. Early detection is key—check plants weekly for pests and treat immediately.
Diseases in containers (less common than pests): powdery mildew (white powdery coating on leaves), root rot (mushy brown roots), and blight (browning/death of stems and leaves). Prevention is easier than treatment: good air circulation, avoid wetting foliage, don't overcrowd, ensure good drainage, and use clean containers/soil. Treatment: remove affected parts, improve air circulation, apply appropriate fungicide for severe cases. I've had powdery mildew on overcrowded containers—improving spacing and air circulation solved it.
Plants not flowering or fruiting indicates: insufficient light (most common—fruiting plants need 6-8 hours sun minimum), wrong temperature (too hot or too cold for that plant), nutrient imbalance (too much nitrogen causes foliage growth at expense of flowers/fruit), or immature plant (be patient, some plants take time to flower). I've had tomatoes not flower when they didn't get enough light. Moved to better light, flowering started within 2 weeks. Light is usually the answer for flowering problems.
Stunted growth issues have multiple causes: container too small (roots bound, no room to grow—size up), nutrient deficiency (fertilize), wrong soil (compacted or poor quality—replace), insufficient light (plants can't photosynthesize enough to grow), or pests/disease stressing the plant. I diagnose by process of elimination: check container size, check nutrients (are you fertilizing?), check soil quality, check light, check for pests. Usually one or two factors are limiting—fix those and growth resumes.
When to give up on a plant: if the stem is completely dead (brown and brittle all the way to soil level), if roots are 90%+ rotted, if the plant is more dead than alive and recovery would take months, or if saving it requires more effort than it's worth to you. I've spent weeks trying to save plants that would have been better composted. Learning to recognize when a plant is too far gone saves time and emotional energy. Pull it, learn from what went wrong, plant something new.
Seasonal Maintenance: What to Do When
Container gardening isn't constant—it has seasonal rhythms. Understanding what to do when prevents problems.
Spring (March-May) is starting and planning season. Tasks: start cool-season crops early spring (lettuce, peas, greens), prepare containers (clean, repair, refresh soil), start seeds indoors if desired, plant warm-season crops after last frost (tomatoes, peppers, basil), fertilize as plants begin active growth. Spring is exciting and busy—everything is starting. I'm outside almost daily planting, observing, adjusting. Spring sets up the whole season—do it right and summer is productive.
Summer (June-August) is peak maintenance period. Tasks: water daily or more in heat, fertilize regularly (every 1-2 weeks for heavy feeders), harvest continuously (vegetables and herbs), deadhead flowers to encourage more blooms, monitor pests (they explode in summer heat), provide shade or extra water during heat waves. Summer is when balcony gardens either thrive or struggle based on consistent care. I spend the most time in summer—watering and harvesting are daily tasks. It's labor-intensive but also when harvests are abundant.
Fall (September-November) is transitions and harvesting season. Tasks: harvest remaining warm-season crops before frost, plant cool-season crops for fall harvest (lettuce, greens, herbs), reduce watering frequency as temperatures drop, reduce or stop fertilizing as growth slows, prepare for frost (bring tender plants inside, cover/protect hardy plants), clean up dead annuals after frost. Fall is bittersweet—abundant late harvests but also saying goodbye to summer plants. I plant lettuce and greens in early fall for late-season harvests.
Winter (December-February) is protecting plants or planning ahead depending on your climate and approach. Tasks: protect overwintering plants (insulate containers, move to sheltered areas), water occasionally if growing year-round (very infrequent, maybe monthly), plan next season (order seeds, research new varieties), clean and store empty containers, or simply let the balcony rest. I don't grow in winter (too cold, not worth the effort in my climate), so I clean everything and plan. This rest period is valuable for preventing burnout.
Seasonal task checklist I keep: spring (clean containers, buy soil and fertilizer, buy/start plants, plant after frost), summer (daily watering, weekly harvesting, bi-weekly fertilizing, weekly pest checks), fall (final harvests, plant cool-season crops, clean up frost-killed plants), winter (plan, dream, rest). Having a checklist prevents forgetting critical seasonal tasks. I review it at the start of each season to make sure I'm covering everything.
Preparing for weather extremes: before heat waves, I water extra thoroughly, add temporary shade, group containers for humidity, and move sensitive plants to cooler spots. Before cold snaps, I cover tender plants, bring tropicals inside, water well (moist soil insulates better than dry), and move containers against building for warmth. Before storms, I secure lightweight containers, remove things that could blow away, and ensure drainage isn't blocked. Weather awareness and preparation prevents damage and loss.
Crop rotation in containers matters less than in-ground but is still beneficial. Don't grow tomatoes in the same soil for multiple years—pests and diseases can build up. I rotate: tomatoes one year, peppers next year, lettuce third year, back to tomatoes. Or just replace soil yearly. Crop rotation isn't critical like in-ground gardens, but it helps prevent soil-borne disease buildup. I think of it as "don't repeat the same plant in the same container consecutive years if possible."
Year-round possibilities depend on climate and effort investment. In mild climates (Zones 8-10), you can grow something year-round easily. In cold climates (Zones 3-6), winter growing requires bringing plants inside or using cold frames/protection. I could grow year-round in a sheltered spot on my balcony with some protection, but I choose not to—winter is rest time. Some people grow herbs on windowsills all winter. Year-round is possible with effort, but seasonal is perfectly valid too.
Harvesting and Enjoying Your Success
Growing food is rewarding, but you need to harvest it correctly to maximize production.
When and how to harvest vegetables varies by crop. Tomatoes: when fully colored and slightly soft (they'll ripen more on the counter if picked slightly early). Peppers: when full-size and firm (can harvest green or wait for color). Lettuce: when leaves are 4-6 inches tall or when hearts form (depending on type). Beans: when pods are full but still tender (daily checking needed). Radishes: when shoulders emerge from soil (usually 3-4 weeks). I learned these timings through experience. Under-ripe vegetables lack flavor. Over-ripe vegetables get tough or split. Optimal timing comes with practice.
Cut-and-come-again harvesting techniques maximize production from leafy greens and herbs. Instead of pulling the whole plant, you harvest outer leaves only, leaving the growing center intact. The plant continues producing new leaves for weeks. I use this with lettuce (harvest outer leaves, center keeps growing), kale (take lower leaves, top keeps producing), basil (harvest top sets of leaves, plant branches and grows bushier), and chard. This technique turns one planting into 6-8 weeks of harvests instead of one harvest.
Proper herb harvesting for continued production: harvest regularly (encourages bushy growth), take stem cuttings not just leaves (you get more and plant bushes out), never take more than 1/3 of the plant at once (leaves need to photosynthesize to support growth), harvest before flowering (flowers reduce leaf production and change flavor). I harvest basil every 5-7 days during peak season, taking 4-6 inches from top stems. This aggressive harvesting keeps it producing and prevents flowering. Gentle timid harvesting actually reduces production.
Storing small harvests: fresh herbs in jar of water on counter (like a bouquet, use within days), lettuce/greens washed and spun dry in container with paper towel in fridge (lasts 5-7 days), tomatoes on counter (never refrigerate—kills flavor), peppers in crisper drawer (last 1-2 weeks). Small harvests need to be used relatively quickly—you're not canning bushels. I eat most things within 2-3 days of harvest when flavor is peak. The freshness is the whole point of growing your own.
Succession planting for continuous harvests means planting small amounts every 1-3 weeks instead of everything at once. Example: plant a row of lettuce every 2 weeks from April through June. First planting is ready mid-May, second early June, third mid-June, etc. Continuous harvests instead of feast-then-famine. I do this with lettuce, radishes, and beans. Succession planting requires planning and discipline (remembering to plant regularly) but produces steady supply. For beginners, start with just 2 succession plantings and see how it works.
Saving seeds from success stories is advanced but worth mentioning. If you have a plant that thrives in your conditions, save seeds from it to replant. Lettuce that doesn't bolt, tomatoes that produce great in your specific balcony, herbs that love your microclimate—these genetics are valuable. I save tomato and lettuce seeds from my best performers. Method: let tomato get very ripe, scoop seeds, ferment 2-3 days in water, rinse, dry thoroughly, store. Lettuce: let plant flower and go to seed, collect seeds when dry. Seeds saved from your conditions often perform better than random varieties.
Celebrating small wins is important for sustaining motivation and enjoyment. Your first homegrown tomato? Take a photo, savor it, tell friends. Harvested enough lettuce for a salad from your balcony? That's genuinely amazing—celebrate it. I take photos of harvests, note yields in my journal, and consciously appreciate the food I've grown. Balcony gardens produce small amounts compared to ground gardens, but those small amounts are special. Celebrating helps you appreciate the value and stay motivated.
Tracking yields and learning: I keep simple notes on how much I harvest from each plant. "Tomato plant A: 42 tomatoes, 8 pounds total. Tomato plant B: 28 tomatoes, 5 pounds total." This tells me plant A's variety or location was better. Next year I replicate A's success. Tracking builds knowledge about what works in your specific conditions. You don't need elaborate records—just simple notes on what produced well versus poorly. This accumulated knowledge makes each season better than the last.
Troubleshooting: When Things Go Wrong
Things will go wrong. Here's how to diagnose and fix problems.
Plant died—what to learn from it: don't just throw it away disappointed. Examine it. Was soil bone dry (underwatering) or soggy (overwatering)? Are roots healthy (white/tan, firm) or rotten (brown/black, mushy)? Was the plant in the right light? Right container size? Review care: did you fertilize, water consistently, check for pests? Every dead plant teaches something if you investigate. I've learned more from failures than successes because failures force you to understand what went wrong.
No growth happening—diagnosis steps: 1) Check container size (is plant root-bound? Size up). 2) Check fertilizing (when did you last fertilize? Container plants need regular feeding). 3) Check light (is plant getting enough hours of sun?). 4) Check water (too much or too little both stunt growth). 5) Check for pests (hidden pests can stall growth). 6) Check temperature (too hot or cold slows growth). Usually one of these is the limiting factor. Fix it and growth resumes. I've had plants stall from being root-bound—potting up triggered immediate new growth.
Pests taking over—beginner-safe solutions: insecticidal soap spray (safe for edibles, kills soft-bodied insects like aphids), neem oil (organic, broad-spectrum), physically removing pests (spray off with water, hand-pick larger insects), introducing beneficial insects (ladybugs for aphids—can buy online), or simply accepting some damage (small pest populations are normal and not fatal). I use soap spray for most pest issues. It works, it's cheap, it's safe. Avoid harsh chemical pesticides on edibles—unnecessary and problematic.
Weather damage recovery: after hail, trim damaged foliage (plants can regrow from healthy stems). After heat stress, water deeply and provide temporary shade (plants usually recover within days). After cold damage, wait to see what survives before cutting (stems may look dead but recover from base). After wind damage, stake/support broken stems, trim completely broken parts. Plants are resilient—many recover from weather damage if you give them time and appropriate care.
Emergency plant rescue techniques for severely stressed plants: if severely wilted from underwatering, water thoroughly and move to shade for recovery. If showing root rot from overwatering, unpot, trim rotten roots, repot in fresh dry soil, stop watering until soil partially dries. If pest-infested, isolate from other plants, treat aggressively with soap spray or neem. If severely stressed from any cause, remove flowers/fruit (redirect energy to survival rather than reproduction), reduce expectations, and give time. Some plants recover, some don't—but intervention gives them a chance.
When to start over versus persist: start over if the plant is 80%+ dead, if recovery would take longer than growing a replacement from scratch, if the problem is systemic (diseased soil, infested beyond treatment), or if you've lost interest/motivation in saving it. Persist if the plant is mostly healthy with fixable issues, if it's a valuable/hard-to-replace plant, if you're learning from the rescue process, or if you're stubborn (valid reason—I've saved plants from pure stubbornness). I've learned to recognize when starting over is smarter than nursing dying plants.
Learning from failures productively: keep simple notes on what failed and why. "Tomato in 3-gallon pot: only got 5 tomatoes, plant stayed stunted, lesson: tomatoes need 5+ gallon containers minimum." "Basil in shade: stretched to 3 feet, sparse leaves, lesson: basil needs 6+ hours sun." These notes prevent repeating mistakes. I review my failure notes before each season and avoid those mistakes. Failures become valuable educational data instead of just disappointments.
Building resilience and skills: every problem you solve builds competence and confidence. First-season me was overwhelmed by yellowing leaves, pests, wilting. Now I diagnose and fix problems almost automatically because I've seen them before. This skill-building is gradual but real. Each season you'll encounter fewer problems (because you're preventing them) and solve problems faster (because you recognize them). Resilience comes from experience—keep going and it gets easier.
Expanding Your Balcony Garden (Year Two and Beyond)
Once you've mastered basics, here's how to level up.
When and how to add more containers: add containers when you're consistently succeeding with your current setup. If your 3-5 initial containers thrived and you want more, add another 3-5 containers the next season. I went from 3 containers first season, to 8 second season, to 15 third season, to 25 where I've stabilized. Gradual expansion prevents overwhelm. Don't jump from 5 to 30 containers—you'll burn out. Incremental growth is sustainable.
Trying more challenging plants after mastering easy ones. Year one: cherry tomatoes, lettuce, basil (easy). Year two: add peppers, cucumbers, more herb varieties (moderate difficulty). Year three: try eggplant, specialty lettuces, harder herbs like rosemary (more challenging). Progressive difficulty as your skills improve prevents frustration. I killed rosemary three years running before succeeding in year four. If I'd started with rosemary year one, I might have given up entirely. Build skills before attempting difficult plants.
Vertical growing systems like tower gardens, wall planters, or trellis systems expand capacity without using more floor space. I added a 5-tier vertical tower garden my third season—it holds 15 plants in a 1.5 square foot footprint. This tripled my capacity in the same balcony space. Vertical growing is the ultimate small-space strategy. Start simple (railing planters, hanging baskets), then add more sophisticated systems (towers, wall systems) as you gain experience.
Specialized containers like self-watering planters, sub-irrigation systems, or smart containers with sensors are worth the investment once you understand what you need. I converted my tomatoes to self-watering containers in year two—game-changer. But I needed year one experience to understand why self-watering would help. Specialized containers solve specific problems. Identify your problems, then invest in specialized solutions.
Experimenting with new varieties keeps gardening interesting. Try new tomato varieties each year. Test unusual greens. Experiment with edible flowers. I try 2-3 new-to-me varieties annually while keeping proven favorites. This balance of reliable and experimental keeps me engaged while ensuring some success. All-experimental is risky (everything might fail). All-repeats is boring. Mix of both is ideal.
Improving soil and systems based on what you learned. After year one, I knew my soil compacted too much—I switched to lighter mix with more perlite. I knew watering was tedious—I invested in self-watering containers. I knew I under-fertilized—I established a fertilizing schedule. Each season, identify 1-2 systemic improvements and implement them. Continuous incremental improvement compounds over years into a really dialed-in system.
Building on first-year successes: whatever worked year one, do more of it. Had great success with cherry tomatoes? Grow more, try different varieties. Loved fresh basil? Expand herb collection. Whatever brought you joy and success, lean into it. I discovered I loved growing greens (lettuce, arugula, kale)—now they're 40% of my garden. Follow your interests and successes.
Long-term balcony garden planning: thinking in multi-year timescales. Perennials that establish and improve (strawberries, some herbs). Container investments that last years (quality pots, self-watering systems). Skill-building progression (year 1 basics, year 2 intermediate, year 3+ advanced). I'm now in year 4 and think of my balcony garden as an established system, not an experiment. This long-term perspective makes planning and investments make more sense.
Community and Resources for Ongoing Learning
You don't have to figure everything out alone. These resources help.
Online communities for balcony gardeners: Reddit r/balconygardening (active, helpful, beginners welcome), Facebook groups for container/balcony gardening (search for local groups too), Instagram hashtags #balconygarden #containergardening (inspiration and connection), Discord servers for urban gardening. I learn constantly from online communities—seeing others' successes and failures, asking questions, sharing experiences. The collective knowledge is invaluable.
Best books for container gardening: "Container Gardening Complete" (comprehensive), "The Vegetable Gardener's Container Bible" (specific to edibles), "Rodale's Basic Organic Gardening" (good fundamentals section on containers). I own these three and reference them regularly. Books provide depth that internet articles lack. I bought books after season one when I wanted deeper knowledge. Not essential for starting but valuable for progressing beyond basics.
YouTube channels worth following: Epic Gardening (great container content, urban focus), Self Sufficient Me (practical advice, Australian but applicable), MIGardener (budget-friendly approach), CaliKim29 (California gardening but good container tips). I watch these while eating lunch or before bed. Visual learning complements reading and experience. Seeing techniques demonstrated helps enormously.
Local gardening groups and connections: many cities have urban gardening meetups, community gardens with container plots, or gardening clubs. My city has a "balcony gardeners" meetup that meets monthly. Local connections provide climate-specific advice and plant swaps. I've learned more about growing in my specific conditions from local gardeners than from any book or website. Seek out local resources—invaluable for regional knowledge.
Seed swaps and plant exchanges: organized events where gardeners trade seeds and starts. I participate in my local seed swap every spring. I've gotten unusual varieties I'd never find at stores, met experienced gardeners willing to mentor, and shared my surplus. Plant exchanges are similar—trading divisions, cuttings, extra seedlings. These build community and diversify your garden for free.
Extension services and free resources: university extension services offer free research-based gardening advice. Look up "[your state] extension service." They have websites with articles, fact sheets, and often answer questions via email or phone. Completely free, research-based, regional-specific. I've used my state extension website constantly—it's a goldmine of reliable information. Often better than random internet articles.
Apps for tracking and learning: plant identification apps (PictureThis, PlantNet), garden planning apps (Gardening Companion, Smart Gardener), weather apps (for planning), and note-taking apps (I use Notes on iPhone for simple tracking). I don't use elaborate apps—simple tools work fine. But some people love detailed tracking apps. Try a few and find what works for you.
Building your knowledge over time: every season I learn new things. Year one: basic watering, basic plant care. Year two: fertilizing, pest management, seasonal timing. Year three: variety selection, succession planting, seed saving. Year four: refinement and optimization. Knowledge builds cumulatively. You don't need to learn everything immediately—you have years to develop expertise. Be patient with yourself and enjoy the learning process.
Common Beginner Questions Answered
Let me address the questions I get asked most frequently.
How much does it cost to start? Minimum: $100-150 for basic setup (3-5 containers, soil, plants, minimal tools). Comfortable: $200-300 for better quality containers, more plants, proper tools, fertilizer. Elaborate: $500+ for self-watering containers, vertical systems, extensive plant collection. I started with about $200 and felt that was appropriate. You can start cheaper, but skimping on containers and soil often leads to problems. Budget $150-250 for a solid beginner setup.
How much time does maintenance take? Initially: 2-3 hours weekly (learning, experimenting, observing). Established: 1-2 hours weekly average, more in summer (daily watering = 10-15 min daily = 1+ hours weekly just for watering), less in spring/fall. Peak summer can be 2-3 hours weekly. Winter is minimal or zero. It's not hugely time-intensive, but it's regular. If you have less than 1 hour weekly, keep your garden very small (3-5 containers maximum).
Can I really grow food on a balcony? Absolutely yes. I grow 30-40% of my summer produce consumption (tomatoes, peppers, salad greens, herbs) from my 6x8 foot balcony. Won't replace all your produce, but meaningful amounts are definitely achievable. One cherry tomato plant produces $30-50 worth of tomatoes. Three herb containers produce $50+ worth of fresh herbs throughout the season. The economics and food production are real.
What if my balcony is shady? You can still garden, just with different plants. Shade-tolerant options: lettuce and greens, leafy herbs (parsley, cilantro), ferns and hostas (ornamental), impatiens and begonias (flowers), and some vegetables (peas, Asian greens). You won't grow tomatoes successfully, but you can absolutely have a productive shade garden. I have friends with north-facing balconies who grow beautiful greens and herbs.
Do I need permission from my landlord? Check your lease. Most leases allow container gardens but prohibit: drilling into building/railings, permanent modifications, creating hazards (blocking emergency exits, exceeding weight limits), unsightly messes. I reviewed my lease and confirmed containers were allowed. Get permission in writing if you're uncertain. Most landlords are fine with container gardens—they're temporary and removable. But confirm before investing hundreds of dollars.
How do I deal with mosquitoes? Empty saucers after watering (don't let water sit—mosquitoes breed in standing water), add mosquito dunks to watering cans or any standing water (Bti bacteria kills larvae, safe for plants and people), ensure no puddles or water-catching areas on your balcony, and consider plants that repel mosquitoes (citronella, lavender, marigolds—though effectiveness is questionable). I empty saucers religiously and use mosquito dunks if needed. Mosquitoes haven't been a major issue.
Can I garden year-round? Depends on climate and commitment. Mild climates (zones 8-10): yes, easily year-round outdoors. Cold climates (zones 3-6): you can if you're willing to bring plants inside or use cold protection, but it's more effort. I'm in zone 6 and choose not to garden Dec-March—it's my rest season. But I could grow herbs indoors on windowsills if I wanted. Year-round is possible with effort, but seasonal gardening is also completely valid.
What if I kill everything? Then you've learned what doesn't work, and you try again with that knowledge. Seriously—I killed 40%+ of plants my first season. It's normal. Each dead plant taught me something: that plant needs more light, more/less water, bigger container, different conditions. Failure is feedback. If you're willing to observe, learn, and try again, you'll succeed eventually. The only real failure is giving up without learning. Dead plants are part of the learning curve—accept it and persist.
Conclusion
We've covered everything from assessing your bare balcony to harvesting your first homegrown vegetables. If you're feeling overwhelmed—good. That means you're taking it seriously. But here's the truth: you don't need to remember all of this to start.
The most important thing is to actually START. Not next season. Not when you have more time. Not when you've researched for three more months. Now. This season. This month. Buy 3-5 containers, get decent potting mix, choose some easy plants (cherry tomatoes, lettuce, basil), and just begin. You'll learn 10x more from three months of actual growing than from six months of research.
Start with just 3-5 containers like I recommended. I know you want more, but restraint now leads to success later. Three containers that thrive because you're not overwhelmed is infinitely better than fifteen containers that struggle because you couldn't keep up. Build from success, not from ambition.
Remember that failure is part of learning. You will kill plants. I killed dozens. Every experienced gardener has. The plants you kill teach you more than the ones that thrive effortlessly. Pay attention to what goes wrong, adjust, and try again. Resilience and observation matter more than perfection.
Start THIS season, not next season. Even if it's mid-summer as you read this, start something. Plant lettuce for fall. Plant herbs that'll grow until frost. Start seeds indoors for next spring. The best time to start was last season. The second-best time is now. Waiting for "perfect timing" means you'll never start.
I'd love to hear about your balcony garden setup—what challenges are you facing? What space are you working with? What are you excited to grow? Share in the comments. Balcony gardening is more fun when you're part of a community learning together.
Final encouragement: balcony gardening is absolutely achievable for complete beginners. I went from serial plant-killer to successful balcony gardener. You can too. The learning curve is real but it's not long—most people see dramatic improvement from season one to season two. The joy, the food, the mental health benefits, the connection to growing things—it's all worth the effort.
Your balcony garden is waiting. Go start it!