Small Balcony Garden Ideas on a Budget: Create a Gorgeous Garden for Under $100
Transform your small balcony into a lush garden on a budget! Get 20+ cheap balcony garden ideas, DIY projects, and money-saving strategies for gorgeous results under $100.
BALCONY TINY PLOTS: TURN YOUR OUTDOOR SPACE INTO A MINI FARM
Introduction
I'll never forget scrolling through Instagram three years ago, seeing these absolutely stunning balcony gardens with designer planters, expensive plants, and perfect styling. I wanted that so badly. Then I checked prices: $80 for a single decorative planter, $30 for a small fiddle leaf fig, $25 for artisan plant stands. I did the math and realized creating those magazine-worthy spaces would cost $500-1,000. I had maybe $75 total to spend.
I almost gave up before starting. But then something shifted in my thinking. What if I approached this like a creative challenge instead of a shopping list? What if I got scrappy, resourceful, and DIY-focused? What if I proved you could create something beautiful without spending a fortune? That mindset change transformed everything.
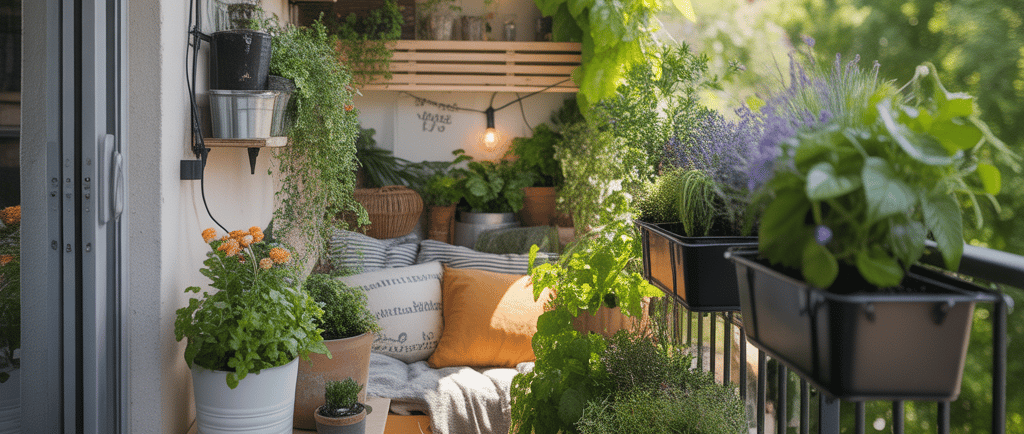
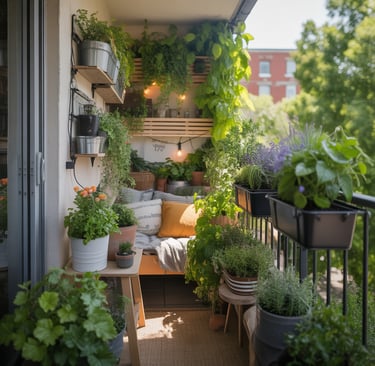
My first balcony garden cost $68 total. I used five-gallon buckets spray-painted black ($15 for 5 buckets and paint), clearance plants from the hardware store ($25 for 8 plants at 50-75% off), bulk potting mix split with my neighbor ($12 for my half), seeds for herbs and greens ($8), and some twine and bamboo stakes I already had. The result? Neighbors stopped to compliment it constantly. Friends asked where I bought my "beautiful planters." The tomatoes tasted better than any I'd bought, and the fresh herbs saved me $10-15 weekly at the grocery store.
Here's what I learned: budget constraints don't prevent beautiful gardens—they actually encourage more creativity, resourcefulness, and personal character than unlimited spending ever could. Some of my favorite gardens I've seen were created for under $50 by people who got creative with materials, propagated plants from cuttings, and designed with intention rather than impulse.
The research backs this up too. Studies on creativity show that constraints actually enhance creative problem-solving. When resources are unlimited, people often default to expensive obvious solutions. When resources are limited, people innovate. Budget balcony gardening is applied creativity—and the results can be just as beautiful (sometimes more beautiful) than expensive gardens.
I've now created probably a dozen budget balcony gardens—for myself across three apartments, for friends, for neighbors who wanted help. I've worked with budgets from $25 to $200. I've sourced free materials, thrifted containers, propagated hundreds of plants from cuttings, and learned every clearance shopping trick. I've proven repeatedly that $50-100 creates genuinely beautiful, functional, productive balcony gardens.
In this guide, I'm sharing every single budget strategy, DIY project, sourcing tip, and money-saving hack I've learned. We'll cover specific dollar amounts with real shopping lists, free and cheap container sources, DIY projects with step-by-step costs, strategic plant choices that maximize value, and complete budget garden examples at $25, $50, and $100 price points. Whether you have $30 or $150, you can create a balcony garden that brings joy and beauty. Let's prove that gorgeous gardens don't require big budgets!
Why Budget Balcony Gardens Can Look Even Better Than Expensive Ones
This isn't just consolation—it's genuinely true. Budget gardens have advantages expensive gardens don't.
Creativity flourishes under constraints in ways unlimited budgets don't encourage. When I had $68, I couldn't just buy the first pretty planter I saw. I had to think: what can I repurpose? How can I make something beautiful from cheap materials? This creative problem-solving produced unique solutions I'd never have discovered with unlimited funds. My spray-painted bucket planters have more character than generic store-bought pots. The constraint forced creativity that became the garden's best feature.
Resourcefulness creates unique character that money can't buy. My friend's balcony garden uses vintage tea tins as herb planters (thrifted for $1 each), an old wooden ladder as a plant stand (found curbside for free), and mismatched ceramic pots from garage sales ($2-5 each). The eclectic mix has way more personality than a matched set of expensive planters from one store. The resourcefulness created a one-of-a-kind aesthetic that looks curated and intentional, not cookie-cutter.
DIY projects add personal meaning and story to your space. Every DIY element represents time, learning, and accomplishment. I built hypertufa planters (concrete and peat moss mixture) for $4 each in materials. They're not perfect—you can see my fingerprints in the texture—but I'm ridiculously proud of them. They mean something. Compare to buying perfect planters: sure, they look good, but there's no story, no connection. DIY creates emotional investment that purchased items don't.
Thrifted and repurposed items have more charm than new mass-produced products. Terracotta pots from the thrift store for $2 each have weathered patinas and character. New ones for $12 each are uniformly orange and generic. Vintage wooden crates (free or $5) have wear and history. New crates ($25-40) look manufactured. The imperfections and history of secondhand items create visual interest and authenticity. I actively prefer thrifted containers now even when I have budget for new ones.
Budget forces intentional choices instead of impulse buying that creates cluttered collections. With limited money, every purchase is considered. Does this plant fit my design? Do I really need this? Will I actually use this? This intentionality creates cohesive thoughtful gardens. Meanwhile, I've seen expensive gardens that are just accumulations—dozens of impulse purchases with no unifying vision. All that money, no cohesion. Budget prevents accumulation and encourages curation.
Learning skills versus buying solutions creates lasting value beyond one garden. I learned to propagate plants from cuttings (free plants forever), build self-watering systems (useful for every future garden), mix my own potting soil (saves money forever), and troubleshoot problems creatively. These skills are transferable and valuable. Someone who just buys solutions doesn't develop these capabilities. The skill-building is as valuable as the garden itself.
Pride in accomplishment versus just spending money is emotionally different. When someone compliments my $68 balcony garden, I feel genuine pride: "I made that with almost nothing!" When someone compliments an expensive garden where you just bought everything, it's different: "Yeah, I spent a lot on it." The pride-per-dollar ratio is higher in budget gardens. The accomplishment is more meaningful. Money is easy (if you have it). Creativity and resourcefulness are impressive.
Sustainability benefits of reusing and repurposing align with values many people hold. Budget gardening is inherently more sustainable: using existing materials, buying secondhand, propagating instead of buying new plants, choosing durable solutions over disposable. This alignment with environmental values adds meaning beyond aesthetics. My garden looks good AND reflects my values. That's worth more than purely aesthetic expensive gardens that create waste and consumption.
Setting Your Budget: Three Tier Approach
Different budgets create different possibilities. Understanding what's realistic at each tier prevents disappointment.
Ultra-budget tier: $25-50 starting garden is absolutely viable for creating something beautiful. This budget typically gets you: 3-5 containers (repurposed or very cheap), minimal soil (maybe 1 bag plus free amendments), seeds or 2-3 clearance plants, and creative solutions for everything else. You're not furnishing a whole balcony at this budget—you're creating a focused intentional start. It works. I've done it. The key is accepting limitations and working within them creatively.
Moderate tier: $50-100 complete setup is the sweet spot for most people wanting a real balcony garden. This budget gets you: 5-8 containers (mix of DIY, thrifted, and cheap new), adequate quality soil, mix of 5-10 plants (seeds and starts), basic tools if needed, and maybe one or two premium touches. This is enough to create a complete cohesive garden that looks intentional and brings real joy. Most of my budget garden projects fall in this range.
Comfortable tier: $100-200 with room for extras allows some flexibility and quality upgrades. This budget gets you: 8-12 containers (some nicer quality), premium soil and amendments, 10-15 plants (more starts, fewer seeds), complete tool set, fertilizer and care supplies, vertical growing elements, and room for mistakes or changes. This is comfortable budget gardening—you can make some mistakes without breaking the bank, and you can add premium touches that elevate the design.
What you get at each budget level differs significantly in scale and quality, but not necessarily in beauty. The $25-50 garden might be smaller (3-5 plants instead of 12) and use more repurposed materials, but it can be just as beautiful in its execution. The $100-200 garden is larger and has more polish, but not necessarily more per-plant beauty. I've seen $40 gardens that are more beautiful than $300 gardens because of better design and plant choices. Budget determines scale and materials, not beauty potential.
Where to splurge and where to save is strategic. Splurge on: soil quality (cheap soil causes more problems than it's worth), a few key plants you really want (one spectacular plant beats five mediocre ones), and items you'll reuse for years (quality pruning shears, a good watering can). Save on: containers (DIY and thrifted work great), most plants (grow from seed or propagate), decorative elements (unnecessary for beauty), and trendy items (they'll be out of fashion anyway).
Prioritizing spending for maximum impact means asking: where does each dollar create the most value? For me: $20 on quality soil creates more value than $20 on a single decorative pot. $15 on seeds that produce dozens of plants creates more value than $15 on one started plant. $10 on spray paint that transforms five ugly buckets creates more value than $10 on one new pot. Think about return on investment for each dollar.
Budget allocation I recommend: 30% containers (if buying all new—less if DIYing), 25% soil and amendments, 30% plants, 10% basic tools/supplies, 5% extras/contingency. Example for $100 budget: $30 containers, $25 soil, $30 plants, $10 tools, $5 extras. This is flexible based on what you already have, but it's a reasonable starting framework. Adjust based on your specific situation.
Hidden costs to account for prevent budget-busting surprises. Soil: you'll need more than you think (calculate cubic feet). Drainage supplies: saucers, pot feet, or gravel. Fertilizer: not included in many budgets but necessary. Watering equipment: watering can or hose attachments. Support structures: stakes, cages, or trellises for vegetables. Replacement plants: some will die. I budget an extra 10-15% beyond "main" purchases for these inevitable additional costs.
Free and Found Container Ideas
With creativity, you can source containers for zero dollars. Seriously.
Repurposing household items as planters is the ultimate free option. I've successfully used: large yogurt containers (drill drainage holes), coffee cans (drainage holes in bottom), plastic food containers from takeout, old mixing bowls with cracks, broken laundry baskets (line with fabric, fill with soil), worn-out colanders (built-in drainage!), and old kitchen pots with holes. The rule: if it can hold soil and you can add drainage, it can be a planter. Cost: $0.
Five-gallon buckets from restaurants and construction sites are incredibly common free containers. Many restaurants get ingredients in 5-gallon buckets and throw them away. I've asked at delis, bakeries, and restaurants: "Do you have any empty 5-gallon buckets I could have?" Success rate is about 50%. Construction sites often have buckets too (ask politely). Five-gallon buckets are perfect for tomatoes, peppers, and large plants. Drill 5-6 drainage holes in the bottom. Spray paint if desired. Cost: $0 (or $3-5 if you buy them at hardware stores).
Old storage bins and baskets work great as planters. I've used: cracked plastic storage bins (drill holes), woven baskets (line with plastic, drill holes through both), old toy bins, broken laundry baskets, and storage crates. Check your own storage for items you're not using. Check curbsides on trash day. Post in local "buy nothing" groups requesting old bins. Cost: $0-5 (thrift store bins are usually $2-5 if you can't find free).
Tin cans and food containers in various sizes create diverse container options. Large coffee cans (3-5 pounds) work for herbs. #10 cans from restaurants (ask bakeries or cafeterias) work for larger plants. Punch drainage holes in bottom with a nail and hammer. I've made entire herb gardens from tin cans spray-painted in coordinating colors. They look intentional and charming. Cost: $0 for cans, $5-8 if spray painting them all.
Wooden crates and pallets are often free from grocery stores, liquor stores, or businesses. Wine crates are perfect container size. Pallets can be disassembled for wood or used whole as vertical gardens. I got a wine crate from a liquor store ($0), lined it with landscaping fabric ($2), and planted herbs in it—looks fantastic. Pallet projects require some effort but create dramatic vertical gardens for nearly free. Cost: $0 for crates/pallets, maybe $5-10 for materials to make them planter-ready.
Discarded furniture as plant stands or planters includes old chairs (remove seat, use as planter holder), shelving units (holds multiple small containers), tables (elevate plants), dressers with drawers (remove drawers, use as planters), and wooden stools. I found a wobbly wooden chair curbside, removed the woven seat, dropped a pot into the opening—instant plant stand with character. Cost: $0 (curbside or free sections online).
Thrift store and garage sale finds are extremely cheap container sources. I regularly find: terracotta pots for $0.50-3, ceramic planters for $2-8, decorative containers for $1-5, baskets for $1-3, and sometimes pristine modern planters for $5-10 (half or less than retail). The key is going regularly—inventory changes weekly. Saturday morning garage sales in nice neighborhoods are goldmines. Cost: $1-10 per container, usually $2-5.
Curbside treasures and free section online (Facebook Marketplace, Craigslist, Nextdoor) yield amazing finds. I've gotten: large ceramic planters (free), wooden shelving units (free), metal plant stands (free), and dozens of plastic pots (free). The key is checking frequently and moving fast—good free stuff goes immediately. Set up alerts for keywords like "planters," "pots," "garden." Cost: $0, just time and pickup effort.
DIY Container Projects Under $10 Each
If you can't find free containers, you can make beautiful ones cheaply.
Concrete hypertufa planters cost under $5 in materials and look like expensive stone planters. Recipe: 2 parts peat moss, 1 part perlite, 1 part Portland cement (available at hardware stores). Mix with water to thick consistency, pack into molds (cardboard boxes, plastic containers), let cure 24-48 hours, unmold. A $15 bag of cement makes 8-10 medium planters. Peat moss and perlite are $8-12 per bag but make many planters. Per-planter cost: $3-5. They look rustic, expensive, and handmade-charming. I've made probably 20 of these.
Painted terra cotta transformations turn $3 plain pots into $20-looking designer pots. Buy basic terracotta at hardware stores ($2-5 depending on size). Paint with acrylic paint ($1-3 per color), chalk paint ($4-8 per can, makes many pots), or spray paint ($4-6 per can, covers 5-8 pots). Options: solid colors, color-blocking, patterns with tape, ombre effects, or stenciled designs. The painting elevates cheap pots into cohesive design elements. Total cost per pot: $3-5 including pot and paint.
Fabric grow bags from landscaping fabric are cheap and functional. Buy landscaping fabric from hardware stores ($8-12 for 3x50 foot roll—makes many bags), cut to size, sew edges (or use heavy-duty stapler), fold bottom and sew/staple to create bag. These are permeable (excellent drainage), lightweight, and collapsible for storage. Commercial fabric grow bags cost $8-15 each. DIY versions cost $2-4 each. I made six 5-gallon fabric bags from one roll of landscape fabric for $12 total ($2 per bag).
Hanging macramé planters from cord cost $5-8 and look boho-chic. Buy macramé cord or thick twine ($5-10 per roll at craft stores—makes 3-4 hangers), follow online tutorials (free on YouTube), hang from ceiling hooks ($2-3 for pack of 4). The completed hangers hold any container (use a plastic pot inside for actual planting). Commercial macramé hangers cost $15-30. DIY cost $5-8. They're also fun to make—I've made them while watching TV.
Wooden box planters from scrap lumber cost $5-10 if you're buying materials, free if using scrap. Cut four sides and a bottom from 1x6 or fence pickets ($3-8 for enough wood), assemble with screws or nails, drill drainage holes in bottom, optionally stain or paint. These look rustic and farmhouse. I built three 12-inch square boxes from $10 worth of fence pickets. Total cost: $3-4 per box. If you have scrap wood or can get pallets free, cost is $0.
Bucket conversions with spray paint transform ugly buckets into cohesive containers. Five-gallon buckets are $3-5 new, free if you source them. Spray paint is $4-6 per can (covers 5-6 buckets). Drill drainage holes, spray paint in your chosen color (matte black is my favorite—looks modern and hides the bucket origin), let dry. Total cost: $4-7 per bucket if buying new, $1-2 per bucket if buckets are free. I've made dozens—they look intentional and professional.
Stenciled and decorated containers add personality to cheap pots. Buy cheap plastic pots ($1-3), paint with base color, use stencils (bought for $3-5 or cut from cardboard free) to add patterns, seal if desired. Or use paint pens ($3-5) to draw designs directly. Or decoupage with fabric scraps or paper (mod podge is $5-8, makes many projects). These techniques transform boring cheap pots into custom designer-looking pieces. Cost: $3-6 per pot including pot and decoration materials.
Self-watering container conversions turn regular containers into low-maintenance self-watering planters for under $10. Method: two containers (one inside the other), wick material (fabric strips, rope), tube for filling reservoir. I've done this with 5-gallon buckets inside larger storage bins, smaller pots inside larger pots, etc. DIY self-watering containers eliminate the $25-40 cost of commercial versions. Materials cost: $5-10 depending on what you have already. Tutorials are free online.
Soil and Growing Medium on a Budget
Soil is where you shouldn't cheap out too much, but there are strategies to reduce costs.
Buying in bulk versus small bags shows dramatic cost differences. Example: 2 cubic foot bag of potting mix at big box store: $8-12. Bulk 3 cubic foot bale from garden center: $18-25 (cheaper per cubic foot). If you need 6+ cubic feet, bulk saves money. I buy bulk and split with neighbors—we each pay $12-15 for 3 cubic feet instead of paying $24-36 for bags. Bulk requires storage space and splitting logistics, but savings are significant.
Mixing your own potting mix saves money if you're filling many containers. Recipe: 40% peat moss or coir ($8-12 per compressed bale, expands to 2-3 cubic feet), 30% perlite or vermiculite ($8-12 per 8 quart bag), 20% compost (free if you make it, $5-8 per bag), 10% garden soil or worm castings. This produces quality mix for $10-15 per 3 cubic feet versus $18-25 for pre-made. The effort is worth it for large projects. I mix my own for container counts over 8-10.
Reusing and refreshing old soil extends the life of potting mix. After one season, potting mix is depleted but structurally okay. I remove old roots, fluff the soil, add fresh compost (20% by volume), add perlite if needed (10%), and reuse. This "refreshed" soil works for another 1-2 seasons. I've cut soil costs by 50% through reusing. Don't reuse if plants had diseases—that's risky. Otherwise, refreshing is economical and sustainable.
Compost as free soil amendment if you make your own compost or have access to community compost. I started a small balcony compost bin (5-gallon bucket with lid, $0 using found bucket) for kitchen scraps. After 3-4 months, I have free compost to add to potting mix or use as top-dressing. This reduces my need for purchased amendments. Community gardens often have free compost piles. Compost is expensive to buy ($5-8 per small bag) but free if you make it.
Splitting bags with neighbors means you each pay half while both getting what you need. I've done this countless times: neighbor and I each need 1-2 cubic feet, we split a 3 cubic foot bale for $12-15 each instead of buying individual $10-12 bags (we actually save money and reduce packaging waste). Post in neighborhood groups or just ask neighbors who garden. This works with soil, perlite, compost, mulch—any bulk material.
End-of-season clearance soil shopping in September-October yields 50-75% discounts. Stores want to clear inventory before winter. I've bought $12 bags for $3-4. Problem: you can't use it until next spring (storage required). Solution: if you have storage space and know you'll garden next year, stock up. I bought four $12 bags for $3 each ($12 total) in October and used them the next spring—saved $36. Worth it if you have room to store.
Adding free amendments reduces need for purchased products. Grass clippings (free from lawn mowing—ask neighbors if you don't have lawn) add nitrogen. Shredded leaves (free in fall) improve soil structure and add organic matter. Coffee grounds from coffee shops (free if you ask) add nitrogen and acidity. Wood ash from fireplaces (free if you or neighbors have fireplace) adds potassium. I've incorporated all of these—they extend expensive potting mix while improving quality.
Making the most of what you buy means calculating needed volume accurately (don't overbuy), storing properly (keep dry, sealed), using efficiently (fill containers fully but not wastefully), and accounting for settling (soil compacts 10-15% after watering, so fill generously). I calculate container volume before buying soil—prevents buying too much or too little. I've wasted money both ways before learning to calculate properly.
Getting Plants Free or Cheap
Plants are the potentially most expensive part, but they don't have to be.
Growing from seed is the ultimate budget option: $2-4 per seed packet yields dozens of plants. One $3 basil seed packet produces 30-50 plants (cost per plant: $0.06-0.10). Compare to buying basil starts at $4-6 each. Example: I grew all my vegetables from seed one year: 3 tomato plants, 3 pepper plants, lettuce, basil, cilantro. Total seed cost: $18. Same plants as starts would have cost $60-75. Savings: $42-57. Tradeoff: time and effort. Seeds take 4-8 weeks longer than starts. For budget gardeners with patience, seeds are unbeatable.
Propagating from cuttings is literally free plants from friends, neighbors, or even your own plants. Many plants root easily from cuttings: pothos, coleus, basil, rosemary, sweet potato vine, tradescantia, geraniums, succulents. Method: cut 4-6 inch stem, remove lower leaves, place in water until roots form (1-3 weeks), plant in soil. I've propagated hundreds of plants this way. Cost: $0. Success rate varies (80-90% for easy plants like pothos, lower for others), but free means you can try multiple times.
Plant swaps and community exchanges are organized events where gardeners trade plants, seeds, and cuttings. I've attended seed swaps where I brought extra basil seeds and left with tomato, flower, and herb seeds I wanted. I've participated in plant exchanges where I brought coleus cuttings and got hostas, ferns, and perennials I'd never buy. Post in local gardening groups, check community gardens, or organize your own swap with neighbors. Cost: $0, just trading what you have for what you want.
Clearance shopping strategies maximize value from purchase plants. Timing: shop evenings and weekends when stock is lowest (best clearance selection), late summer (annuals discounted 50-75%), spring after Mother's Day (huge discounts), and after any holiday (unsold holiday plants marked down). Inspection: buy "sad" plants that are alive but struggling (dry, leggy, root-bound)—they recover with proper care and cost 50-90% less. I bought pepper plants for $0.50 each (normally $5) in late June because they looked bad—they recovered and produced prolifically.
Growing from kitchen scraps is free and fun. Regrow green onions from roots ($0, infinite supply), lettuce from cores ($0, multiple harvests), celery from base ($0, works great), potatoes from sprouted potatoes ($0, fun experiment), herbs from grocery store plants (buy one basil for $4, divide into 3-4 plants, propagate from cuttings = infinite basil). I've maintained green onions for a year from one grocery store purchase. The cost savings and reduced waste are meaningful.
Dividing perennials for multiple plants turns one plant into many. Example: buy one hosta large plant for $15, divide into 3-4 smaller plants ($3.75-5 per plant equivalent). Or get divisions from friends/neighbors who are splitting overgrown perennials (free). Many perennials (hostas, daylilies, ornamental grasses, ferns) benefit from division and readily split. I've turned single plants into 3-5 plants through division—effectively free plants.
Asking friends and neighbors for divisions taps into free plant sources all around you. Many gardeners have overgrown perennials they need to divide. Asking "do you have any perennials you're dividing this spring that I could have a piece of?" often yields free plants. I've gotten hostas, daylilies, irises, ornamental grasses, and ferns this way. People are usually happy to share—they're dividing anyway, and they like helping someone start a garden. Cost: $0, builds community.
Free plants from buy/sell/trade groups online (Facebook, Nextdoor, Craigslist) are abundant if you're patient. People give away divisions, extra seedlings, plants they're getting rid of, etc. Set up alerts for "free plants," check regularly, message fast (free plants go quickly). I've gotten: perennial divisions, overgrown houseplants, seed packets, containers with plants, and more. Cost: $0, just pickup effort. This requires time and responsiveness but absolutely works.
The $25 Starter Balcony Garden
Here's a complete real-world example of what $25 creates.
Three containers: what to use and where to find for this budget. Option A: three 5-gallon buckets (free from restaurants or $3-5 each if buying = $9-15 total) spray painted black or terracotta color (one spray paint can = $5, covers all three). Option B: three thrifted pots (garage sales or thrift stores = $3-8 total). Option C: three repurposed household containers (yogurt tubs, coffee cans, storage bins = $0). I'd go with buckets—they're food-safe, durable, and paint transforms them. Cost: $5-15.
Soil budget-friendly options with $10-15 allocated. Option: buy one 2 cubic foot bag of quality potting mix ($10-12), which fills approximately two 5-gallon buckets. Mix with free amendments (grass clippings, shredded leaves) to stretch to fill third bucket. Or buy one 3 cubic foot bale ($15) and save excess for topping up later. Soil is where I don't compromise even on tight budgets—bad soil kills plants and wastes money. Cost: $10-15.
Plants: best value choices with remaining $5-10. Strategy: choose one purchased plant you really want (tomato or herb, $4-6), grow rest from seeds ($3-4 per packet = dozens of plants). Example: buy one cherry tomato start ($5), buy basil seeds ($2), buy lettuce seeds ($2), buy marigold seeds ($2). Total plants: 1 tomato, 15-20 basil plants, 20-30 lettuce plants, 10-15 marigolds. Cost: $11. Adjust based on your preferences—this is just one example. Key: maximize number of plants through seeds.
Design: making it look intentional even with three containers. Arrangement: use triangle principle—place containers at different depths and heights. Put tomato (tallest) in back corner, basil and marigolds (medium) in front on opposite sides, trailing lettuce over front edges of pots. Color scheme: green tomato and basil, bright marigold flowers, green lettuce creates cohesive green-and-yellow/orange palette. Keep it simple—three containers with three plant types is focused and intentional.
Shopping list with specific costs for the $25 budget:
3 buckets: $9 (bought new) or $0 (found free)
1 spray paint can: $5
1 bag potting mix (2 cu ft): $12
1 tomato seedling: $5
3 seed packets (basil, lettuce, marigolds): $6
Total: $37 if buying everything, or $23 if buckets are free and soil is on sale. Adjust based on what you can find free/cheap. The flexibility of this budget allows substitutions.
Timeline: what to expect from this $25 garden. Week 1: plant everything, water, wait. Weeks 2-4: seeds germinate and grow, tomato establishes. Weeks 4-8: basil ready for first harvests, lettuce producing, marigolds flowering, tomato growing. Weeks 8-16: tomato producing fruit, continuous basil and lettuce harvests, marigolds blooming nonstop. This garden produces food and beauty from late spring through fall frost. Not bad for $25.
Maintenance costs are minimal ongoing. You'll need: water (free from tap), occasional fertilizer ($10 for liquid fertilizer lasts all season), and potentially replacement plants if something dies ($0-5). Total season maintenance: $10-15. This garden's total first-season cost is $25 initial + $10-15 maintenance = $35-40 total. The produce value (tomatoes, basil, lettuce) exceeds the cost by midsummer.
Expansion plan for adding more later: season one, establish these three containers and learn. Season two, add 2-3 more containers following the same budget principles. By season three, you have 8-10 containers and substantial growing capacity, all built incrementally on minimal budget. The $25 starter isn't your end goal—it's your foundation. Starting small and expanding gradually is financially sustainable and success-building.
The $50 Complete Balcony Garden
This is the sweet spot for creating a real, complete balcony garden on a budget.
Five containers in varied sizes creates design possibilities. Mix: two 5-gallon containers for larger plants like tomatoes ($6-10 total if buying buckets, $0 if found), two 3-gallon containers for medium plants ($4-8 total), one hanging basket or railing planter ($3-6). Total container cost: $13-24. Option to reduce: find more free containers, DIY from repurposed materials. Option to splurge: buy one nice decorative pot ($10-15) for focal point, use cheap/free for others.
Quality soil for all containers with $15-20 allocated. Buy: one 3 cubic foot bale of quality potting mix ($15-20) fills approximately three 5-gallon buckets or equivalent volume. For five containers, you'll need roughly 4-5 cubic feet total. Options: buy bulk and split with neighbor (each pay $12-15 for 3 cubic feet), buy two bags and stretch with free amendments, or mix your own. I'd buy one 3 cubic foot bale ($18) and supplement with compost and free amendments to reach needed volume. Cost: $15-20.
Mix of seeds and starter plants balances instant gratification with budget value. Allocate $15-20 for plants. Strategy: buy 2-3 key plants as starts (tomato, pepper, or favorite herb, $4-6 each = $12-18), buy seeds for everything else (3-4 seed packets at $2-4 each = $6-16). Example: buy cherry tomato start ($5), buy basil start ($4), buy pepper start ($5), buy lettuce seeds ($2), buy marigold seeds ($2), buy nasturtium seeds ($3). Total: $21 for plants. This gives instant impact plus abundant seedlings.
One or two tools needed if you don't have basics. Essential: hand trowel ($5-8), pruning shears or scissors (use kitchen scissors = $0, or buy $6-10), watering can (repurpose jug or pitcher = $0, or buy basic $8-12). Most critical: trowel for planting. If you have kitchen scissors and a pitcher, you can skip buying the other tools. Allocate $5-10 for trowel, adjust if you need more. Cost: $5-15 depending on what you have.
Design strategy for cohesive look with five containers. Framework: use thriller-filler-spiller model. Thriller: tomato or pepper in largest container back/center. Filler: basil and another herb or flower in medium containers. Spiller: nasturtiums or trailing plant in hanging basket or front container. Color scheme: choose 2-3 colors that complement (green + yellow + orange, or green + purple + white). Arrangement: triangular grouping, varied heights. Five containers is enough to create real design impact.
Detailed shopping list with real costs for $50 budget:
Containers: 2 buckets ($6), 2 thrifted pots ($6), 1 hanging basket ($5) = $17
Soil: 3 cu ft bale ($18)
Plants: tomato start ($5), basil start ($4), pepper start ($5), lettuce seeds ($2), marigold seeds ($2), nasturtium seeds ($2) = $20
Tools: hand trowel ($7)
Misc.: spray paint for buckets ($5)
Total: $67. To get to $50: find free buckets (-$6), use household items as containers (-$11), skip spray paint (-$5), buy more seeds instead of starts (save $8). Adjusted total: $45-50.
Expected results and timeline from this garden. Week 1: everything planted, garden looks intentional and designed. Weeks 2-4: seeds germinate, starts establish, visible growth. Weeks 4-8: lettuce and marigolds ready, basil harvestable, tomato and pepper flowering. Weeks 8-20: continuous harvests of tomatoes, peppers, lettuce, basil, herbs; marigolds and nasturtiums blooming prolifically. This garden produces substantial food and beauty all season.
Where this budget goes furthest: in areas with long growing seasons (more harvest weeks = better value), when you can source free containers and amendments (more budget for plants), with high-value plants like tomatoes and herbs (grocery savings), and when you're willing to DIY and propagate (skills extend the budget). This $50 garden in ideal conditions produces $200+ worth of produce and flowers over the season.
The $100 Dream Budget Balcony
With $100, you can create something truly special while still being budget-conscious.
Eight to ten containers allows substantial variety and abundance. Mix: three 5-7 gallon containers for large plants ($15-25), four 3-5 gallon containers for medium plants ($12-20), two-three small containers or hanging baskets for spillers and accents ($8-15). Include mix of materials: some thrifted/DIY (saves money), one or two quality new containers (elevates design). Container budget: $35-60 depending on choices. I'd spend $45: mostly thrifted and DIY, plus two nice new containers for focal points.
Premium touches include one special container or plant that elevates the whole design. Ideas: one beautiful ceramic planter ($15-25) for featured location, one premium plant variety (heirloom tomato, special herb, unusual flower, $8-15), quality tomato cage or decorative support ($10-15), or upgraded vertical growing element (nice trellis, $15-25). These touches create a polished "designed" look. Budget: $15-25 for one premium element. I'd buy one gorgeous planter for the thriller plant—instant focal point.
Mix of edibles and ornamentals creates both beauty and function. Suggested ratio: 60% edibles (tomatoes, peppers, herbs, greens), 40% ornamentals (flowers for color and pollinators). Example plants: 2 tomato varieties, 1-2 peppers, 3-4 herbs, 1-2 greens, 3-4 flowering plants, 1-2 trailing plants. This mix provides continuous harvests plus beautiful flowers. Total plants: 12-15 across ten containers (some containers have multiple compatible plants).
Basic tool set if starting from scratch. Quality hand trowel ($8-12), pruning shears ($10-15), watering can ($10-15), plant labels ($3-5), small hand rake or cultivator ($6-10), spray bottle for pest control/misting ($3-5). Total tools: $40-62. But if you have some kitchen/household items that work (scissors, pitchers, etc.), reduce this. Tool budget allocation: $20-30, prioritizing what you truly don't have.
Fertilizer and amendments included in this budget. Quality liquid fertilizer ($8-12 for season supply), slow-release granular fertilizer ($10-15), compost or worm castings ($5-8), perlite for soil improvement ($8-12). These amendments and fertilizers support healthy productive plants all season. Budget: $15-25. I'd buy liquid fertilizer ($10) and slow-release granules ($10), skip the rest by using free amendments.
Vertical growing elements maximize space. Options: bamboo or metal trellis ($10-20), hanging basket hardware and hangers ($5-10), railing planter brackets ($8-15), tiered plant stand ($15-25), or DIY vertical pallet garden (materials $10-20). Vertical growing dramatically increases capacity in small spaces. Budget: $15-25 for vertical element. I'd build a simple pallet vertical garden for $15 in materials—adds capacity for 8-10 small plants in 2 square feet.
Complete shopping breakdown for $100 budget:
Containers (8-10 pots, mix quality): $45
Soil (enough for all containers): $25
Plants (mix of 12-15 starts and seeds): $35
Tools (basics you don't have): $20
Fertilizer: $10
Vertical element: $15
Contingency/extras: $10
Total: $160. To reach $100: reduce containers to $30 (more DIY/thrifted), reduce plants to $25 (more seeds, fewer starts), reduce or skip tools (use household items), reduce to $10 fertilizer, DIY vertical for $10. Adjusted: $95-100.
Creating a polished finished look with this budget involves: color-coordinated containers (spray paint unmatched pots), cohesive plant palette (choose 2-3 colors, repeat them), proper spacing (don't overcrowd), height variation (use stands, hanging, ground level), one focal point (that premium container/plant), clean edges (remove dead leaves, keep neat), and finishing touches (maybe mulch on soil surface, $5). The result looks intentional, designed, and beautiful.
Vertical Growing for Maximum Space on Minimum Budget
Vertical growing is essential for small balconies and can be done very cheaply.
DIY hanging planters from rope and containers use materials you likely have. Materials: rope or strong twine ($3-5 for enough to make 2-3 hangers), containers (repurposed plastic pots, tin cans, small buckets = $0), ceiling hooks (command hooks for renters or screw hooks for owners = $2-5 for pack). Method: macramé style hanger from rope, nest container inside, hang from hook. Tutorials are free online. Cost per hanger: $2-4. I made four for $12 total. They hold herbs and trailing plants beautifully.
Over-door shoe organizers for plants cost $10-15 and create 12-24 planting pockets. Buy clear plastic over-door organizer (see-through pockets work best), hang over door or railing, fill pockets with soil, plant small herbs or succulents in each pocket. Drainage is tricky (pockets don't have holes)—be careful with watering. This system creates vertical garden on door/railing for $10-15. I tried this and it works but needs careful moisture management. Best for succulents and drought-tolerant plants.
Pallet vertical gardens are often completely free using discarded pallets. Source: ask warehouses, shipping companies, or stores (many give pallets away). Method: stand pallet upright, staple landscaping fabric to back and bottom (fabric = $5-8), fill with soil through slats, plant in pockets between slats. One pallet provides 8-12 planting spaces vertically. I built one for $8 (just fabric staples—pallet was free). It holds strawberries and herbs on my balcony wall.
Tension rod systems for windows utilize window space without permanent installation. Buy shower curtain tension rods ($8-15 for 2), position across window frame or between balcony walls, hang small planters from S-hooks on the rod ($2-3 for pack of hooks). This creates two levels of growing space. Perfect for renters—completely removable. Cost: $10-18 total. I use this for trailing herbs in my kitchen window—works great.
Ladder shelf from found materials creates multi-level vertical growing. Source: old wooden ladder (thrift store $5-15, garage sale $5-10, curbside free), or build simple A-frame ladder from scrap lumber ($0-10). Use: lean against wall, place small containers on each rung. A 5-foot ladder with 4 rungs holds 8-12 small pots vertically. Cost: $0-15. I found a ladder curbside (free), painted it ($5), and use it for herbs and small flowers.
Wall-mounted solutions with command hooks avoid drilling for renters. Heavy-duty command hooks ($5-8 per pack of 2) hold up to 5-10 pounds each. Use to hang: small planters with built-in hangers, macramé planters, railing-style planters secured with hooks. This adds wall growing space without damaging walls. I have six command hooks holding three hanging planters—completely removable when I move. Cost: $15-25 for enough hooks for several planters.
Railing planters from repurposed items use balcony railing space. Method: attach containers to railing with wire, rope, or hooks. Containers: cut PVC pipe lengthwise (free scrap), old gutters (salvaged = free), wooden boxes built to hang ($5-10 materials), or plastic bins with drainage ($2-5). Secure well—you don't want them falling off! I made railing planters from fence pickets ($8) and hung with wire ($2). Three planters for $10 total.
Maximizing cubic feet versus square feet is the mindset shift. Ground space is limited (square feet), but air space is abundant (cubic feet). By growing vertically, you might have 10 square feet of floor space but create 30+ cubic feet of growing space through vertical layers. This density allows way more plants in small spaces. My 8x6 balcony has maybe 25 square feet usable but through vertical growing I have 60+ cubic feet of planting space.
Budget-Friendly Plant Choices That Look Expensive
Some plants punch way above their price point in visual and productive impact.
Perennials are one-time cost, years of beauty—they're budget investments. Examples: hostas ($8-15, last decades), daylilies ($6-12, multiply and spread), ornamental grasses ($10-15, dramatic impact), sedum ($5-10, evergreen interest), ferns ($8-15, lush foliage). Perennials cost more upfront than annuals but return year after year. A $12 hosta planted today will still be there in ten years—effective cost is $1.20 per year. I prioritize perennials in permanent containers for long-term value.
Self-seeding annuals that come back function like perennials. Examples: nasturtiums (drop seeds, regrow next year), alyssum (self-seeds prolifically), calendula (reseeds reliably), cosmos (self-sows enthusiastically), bachelor's buttons (come back in the cracks). Plant these once ($2-4 for seeds) and they return yearly if you let them go to seed. I planted nasturtiums four years ago for $3—they've self-seeded and returned every year since. Effective cost: $0.75 per year and dropping.
Fast-growing plants for instant impact create mature-looking gardens quickly. Examples: sunflowers (6 feet tall in 60 days, $2 seeds), morning glories (cover trellis in 4-6 weeks, $2 seeds), zinnias (flower in 60 days, prolific, $3 seeds), basil (harvest-size in 4-6 weeks, $2 seeds), lettuce (ready in 30-40 days, $2 seeds). These plants create abundance fast, making new gardens look established quickly. For budget gardens where you want impact now, not in three years, fast growers deliver.
Propagate-able plants you can multiply turn one purchase into infinite plants. Examples: pothos (cuttings root in water easily), coleus (stems root readily), basil (root from cuttings), succulents (leaves propagate easily), spider plants (produce baby plants), tradescantia (cuttings root anywhere). Buy one pothos for $8, propagate into twenty plants over a year = $0.40 per plant. I've propagated hundreds of plants from original purchases—this strategy dramatically reduces long-term costs.
High-impact foliage plants create drama without flowers. Examples: hostas (huge leaves, bold presence, $10-15), ornamental grasses (movement and texture, $10-15), coleus (colorful foliage, $4-8), elephant ears (tropical drama, $8-12), sweet potato vine (colorful trailing, $4-6). These plants provide visual interest through foliage alone—no deadheading needed, continuous impact. A $12 hosta makes more statement than $12 worth of petunias. Foliage impact is underrated and budget-efficient.
Flowers that bloom prolifically maximize color per dollar. Examples: marigolds (bloom continuously June-frost, $3 for six-pack), petunias (profuse bloomers, $3-5), zinnias (continuous cut flowers, $3 seeds), cosmos (bloom machines, $3 seeds), impatiens (nonstop blooms in shade, $3-5). These plants produce hundreds of flowers per season. Compare to plants that bloom briefly—same cost, less impact. I choose prolific bloomers for maximum visual value.
Edibles that save grocery money pay for themselves. High-value examples: cherry tomatoes (produce $40-60 worth of tomatoes from $5 plant), fresh herbs (save $10-15 monthly, $4 plant pays off in month 1), salad greens (continuous harvest, $30+ value from $2 seeds), peppers (produce $20-30 worth of peppers from $5 plant). Growing high-value edibles makes budget gardens functional, not just decorative. My tomatoes and herbs alone save $400-500 per season—way more than the garden costs.
Low-maintenance plants that always look good reduce replacement costs. Examples: succulents (thrive on neglect, $3-8), snake plants (indestructible, $8-15), ZZ plants (tolerate anything, $10-15), pothos (hard to kill, $6-10), spider plants (resilient, $5-8). These plants don't die from mistakes, so you're not constantly replacing them. For budget-conscious beginners, low-maintenance plants prevent the cycle of buying, killing, replacing. Buy once, enjoy for years.
Money-Saving Plant Care Strategies
Ongoing care costs can add up, but there are many ways to reduce them.
Making your own fertilizer is free or extremely cheap. Compost tea: steep finished compost in water for 24 hours, strain, dilute, use as liquid fertilizer (cost: $0 if you compost). Grass clipping tea: same method with grass clippings (nitrogen boost, cost: $0). Banana peel tea: soak banana peels in water for a week, use for potassium (cost: $0, from kitchen scraps). Eggshell water: soak crushed eggshells for calcium (cost: $0). I use these homemade fertilizers to reduce my purchased fertilizer use by 50-75%.
Rainwater collection for free watering saves tap water and money (small savings, but real). Simple method: place buckets under downspouts during rain, use collected water for plants (cost: $0 if you have buckets). Advanced method: install rain barrel with spigot ($50-100 if buying, free if you build from found barrel). Rain water is chlorine-free (plants prefer it). Even small collection helps—I collect 5-10 gallons per rainfall in buckets. Over a season, that's hundreds of gallons of free water.
Mulching with free materials reduces watering needs and looks polished. Options: grass clippings (free, add nitrogen as they decompose), shredded leaves (free in fall, improve soil), wood chips (often free from arborists—call local tree services), shredded newspaper (free, breaks down), or straw (check with farmers—sometimes free or very cheap). Mulch reduces evaporation, suppresses weeds, and regulates soil temperature. I use grass clippings and shredded leaves exclusively—$0 spent on mulch ever.
Pest control with household items avoids expensive pesticides. Dish soap spray (1 tsp dish soap per quart water) kills aphids and soft-bodied insects ($0—you have dish soap). Neem oil spray (mix neem oil with water and drop of dish soap) controls various pests ($8 for bottle that makes 30+ applications = $0.25 per use). Hand-picking larger pests (caterpillars, beetles) costs $0, just time. Strong water spray dislodges aphids ($0). I've controlled pests for years using just these methods—never bought commercial pesticides.
Propagation to replace instead of buying turns dead plants into opportunities for free new plants. When annual flowers fade, take cuttings to propagate before they die—free replacements for next year. When herbs bolt, root cuttings—free new plants. When perennials need dividing, use divisions as replacements for failed plants. This mindset (propagate rather than purchase) saves money long-term. I probably propagate 20-30 plants per year that I'd otherwise buy for $4-8 each—savings of $80-240 annually.
Succession planting to extend harvests maximizes value from limited space. Instead of planting all lettuce at once (harvest for 2 weeks, then nothing), plant small amounts every 2 weeks (continuous harvest for months). Same space, more harvests, better value. I do this with lettuce, radishes, and beans. The continuous production means I'm getting more value from the same containers. It requires minimal extra effort (planting small amounts regularly) but dramatically increases yield.
Seed saving for next season makes future plants free. Let one or two plants go to seed, collect seeds when dry, store in cool dry place, plant next spring. Works well for: tomatoes (scoop seeds from ripe tomato, ferment, dry), lettuce (let bolt and form seeds), beans/peas (let pods dry on plant), basil (let flower and set seed), marigolds (collect dried flower heads). I save seeds from my best-performing plants—free plants next year adapted to my conditions.
Preventing expensive mistakes through learning saves money long-term. Mistake examples that cost money: planting in containers without drainage (plants die, money wasted), using garden soil instead of potting mix (plants fail, wasted money), buying plants that don't fit your conditions (they die, wasted money), overcrowding containers (all plants struggle, wasted money). Each mistake teaches something. I've made all of these—the learning prevents repeating them. Budget gardeners can't afford repeated mistakes—learn from each one.
Thrifting and Secondhand Shopping Strategies
Thrifting is an art that dramatically reduces garden costs.
Best places to find cheap containers: thrift stores (Goodwill, Salvation Army, local thrifts—check weekly, inventory changes constantly), garage sales (Saturday mornings in spring, nice neighborhoods, bring cash), estate sales (people liquidating everything, often willing to negotiate), Facebook Marketplace and Craigslist free sections (check daily, move fast), Nextdoor and Buy Nothing groups (community sharing), and curbside treasure hunting (especially in nice neighborhoods on trash day). I've sourced 75% of my containers from these sources for $0-5 each.
Garage sale negotiation tips that get you better prices. Timing: go late in day (sellers want to get rid of stuff, will discount), or early for best selection. Strategy: bundle multiple items (ask "would you take $5 for all three pots?"), offer lower than marked price politely (50-75% of asking is reasonable), bring small bills (exact change makes quick transactions), be friendly and show genuine interest. I've negotiated $2 pots down to $1, or gotten three $3 pots for $5 total. Most sellers prefer selling cheap to packing it back up.
Estate sale hidden gems exist because estate sellers don't know garden stuff's value. I've found: vintage planters worth $40 for $5, quality tools for $2-5, nearly-new containers for $1-3, and specialty pots for half price. Estate sales list everything—often including garage/garden items. Go on final day for best discounts (everything must go). Check outside areas (garage, shed, porch) where garden items hide. Estate sales are goldmines but require checking regularly.
Thrift store garden section timing improves your finds. Best times: spring (people donate winter stuff, garden items appear), Saturday mornings (items just put out), weekday afternoons (less picked-over than weekends). Scout multiple thrift stores—some are better for garden items. I have two thrift stores I check every 1-2 weeks. Some visits yield nothing, some yield amazing finds. It's treasure hunting—you need patience and regular checking.
Online marketplace strategies for finding deals: set up saved searches with notifications for "planters," "pots," "garden," "containers," act fast on good deals (they go quickly), filter by price (low to high), check free section daily, ask for measurements (ensure items are useful size), inspect in person before committing, bring cash for transactions. I check Facebook Marketplace free section daily—I've gotten amazing free plants, containers, and supplies by being responsive and available for quick pickup.
Knowing what to buy secondhand versus new improves value. Buy secondhand: decorative containers (cosmetic damage doesn't matter), basic tools (hand trowels, pruners—just clean them), pots of any kind (as long as functional), plant stands and furniture, watering cans, and most supplies. Buy new: soil and amendments (you want fresh, pest-free), seeds (old seeds have lower germination), fertilizers (shelf life concerns), and anything that contacts chemicals (safety). I buy 90% secondhand but always buy fresh soil and seeds.
Inspecting used items for safety and function prevents bad purchases. Check: drainage holes exist or can be added (no holes = useless unless you drill), containers are clean and no cracks (small cracks okay, large cracks leak), tools function properly (blades sharp, handles attached), items are stable (pots won't tip), and size is useful (measure if unsure). I've passed on beautiful but cracked pots, rusty tools, and tiny containers. Being selective prevents buying useless cheap stuff.
Cleaning and preparing thrifted finds makes them garden-ready. Wash with soap and water (remove dirt and grime), soak in 10% bleach solution for 10 minutes if previous plant died in it (kills disease organisms), rinse thoroughly, let dry completely, drill drainage holes if needed, paint or decorate if desired. This prep takes 10-20 minutes per container but ensures clean start. I've cleaned hundreds of thrifted pots—the effort is worth the savings.
Seasonal Shopping: When to Buy What
Strategic timing dramatically affects what you pay for garden supplies.
Spring (March-May) is when to buy and when to wait. Buy: seeds as soon as available (best selection), cool-season plants (pansies, lettuce starts), soil before rush (prices rise in April-May), tools on early-season sales. Wait on: annuals (prices drop after Mother's Day), vegetables (often discounted late May), perennials (often sales in June), and containers (better deals later). I do mixed strategy—buy seeds and soil early, wait on plants. Buying everything at spring peak prices is expensive.
Summer (June-August) clearance plant shopping yields incredible deals. Plants go on clearance starting late June through August. I've bought: $6 petunias for $1.50, $5 tomatoes for $0.50-1, $8 perennials for $2-4. They look "sad" (leggy, dry, stressed) but recover with care. July-August is when I buy 75% of my plants. Yes, you get less growing season, but at 75% off, the math works. I've bought August-discounted plants that still produced abundantly through fall.
Fall (September-November) offers 75% off end-of-season sales on everything. This is absolute best time for bargains. I've bought: $15 bags of potting mix for $3-4, $12 planters for $3, tools at 50-75% off, perennials for $2-5, and seeds for next year at 75% off. Problem: limited selection (inventory is depleted). Solution: buy supplies for next year. I stock up on soil, containers, tools, and seeds in fall at massive discounts. Storage required but savings are huge.
Winter (December-February) is planning and accumulating supplies season. This is when I: plan next season's garden (research varieties, make shopping lists), watch for sales (holiday sales on tools, containers, gift cards), browse thrift stores (less competition from other gardeners), acquire free materials (ask for leaves, check curbside treasures). Winter isn't buying season but preparation season. The planning and accumulation set up successful spring.
Holiday sales for tools and containers happen around major holidays. Memorial Day, July 4th, Labor Day: garden departments discount inventory 25-50%. Black Friday / Cyber Monday: tools and equipment on sale. After-Christmas: gift sets and tools discounted. Valentine's Day: planters and plant accessories on sale Mother's Day: week after sees massive discounts on unsold inventory. I bought a $60 three-tier plant stand for $25 on Memorial Day sale. I picked up tool sets at 40% off after Christmas. Holiday sales are predictable—plan major purchases around them.
Regional timing variations matter depending on your climate. Southern gardeners: buy cool-season stuff in October-November, buy warm-season in February-March. Northern gardeners: buy cool-season in March-April, buy warm-season in May-June. Clearance timing varies too—northern stores clearance in August, southern stores clearance in September-October. Know your region's calendar and shop accordingly. I'm in Zone 6—my clearance shopping happens July-August.
Stocking up versus just-in-time buying depends on storage space and planning. Stocking up (buying soil, containers, seeds in fall at clearance for next spring): requires storage space, saves 50-75%, needs planning discipline. Just-in-time (buying what you need when you need it): requires no storage, costs more, allows flexibility. I do hybrid: stock up on non-perishables (containers, tools, some soil), just-in-time for plants and perishable supplies. Find your balance based on storage capacity.
Planning purchases around sales cycles maximizes budget. Annual cycle I follow: January (plan, research, dream), February (buy seeds if I haven't already), March (buy cool-season plants, soil if needed), April (buy remaining supplies), May (wait—prices peak), June (start watching clearance), July-August (clearance plant shopping bonanza), September-October (clearance supply shopping, stock up for next year), November-December (rest, plan next season). This cycle saves me 30-50% compared to buying everything at retail in spring.
Free Resources and Community Support
You don't have to figure everything out alone or spend money on education.
Extension service free advice and materials is an underutilized goldmine. University extension services (Google "[your state] extension service") offer: free publications on gardening topics, free answers to questions via email/phone, free or cheap soil testing, workshops (often free or $5-10), demonstration gardens, and research-based advice. I've used my state extension constantly—free advice on pest ID, plant problems, varieties for my region. Better than random internet advice because it's research-based and regional-specific. Cost: $0.
Library seed libraries and tool lending programs exist in many communities. Seed libraries: borrow seeds, grow plants, save seeds, return some to library (free seeds forever). Tool lending libraries: borrow garden tools, return when done (free tool access without buying). My library has both—I've borrowed specialty tools (soil auger, lopper) and rare seeds without buying. Check your library's website or ask—these programs aren't always advertised but they exist.
Community gardens and bulletin boards connect you with local gardeners. Community gardens often have: bulletin boards with free plant offers, seed swaps, tool sharing, composting facilities, and experienced gardeners to learn from. Even if you don't have a community garden plot, visit and check their bulletin board. I've found: free plant divisions, compost, seeds, and made connections with experienced gardeners willing to mentor. Community gardens are hubs of sharing and knowledge.
Facebook groups for free plants and supplies are extremely active in most regions. Search: "[your city] plant swap," "[your city] gardening," "buy nothing [your neighborhood]," "[your region] free plants." These groups have daily posts offering: plant divisions, extra seedlings, excess harvest, empty containers, soil, compost, and advice. I'm in three local groups and get alerts daily. I've received and given away countless plants and supplies. Cost: $0, just reciprocal generosity.
Neighborhood sharing and swapping builds community while reducing costs. Start with neighbors you know: "I'm dividing my hostas—would you like some?" or "I have extra tomato seedlings—want a few?" This often leads to reciprocal sharing: "I have spare basil plants—want to trade?" I've built a neighborhood sharing network where we trade plants, containers, soil, and help. It's built community and saved everyone money.
Online forums for advice and troubleshooting provide free expertise. Reddit (r/gardening, r/containergardening, r/vegetablegardening), GardenWeb forums, and specialty forums offer free advice from experienced gardeners. Post photos of problems, ask questions, learn from others' posts. I've diagnosed pest issues, identified plants, gotten variety recommendations, and troubleshot problems through forums. Cost: $0, just time to participate. The collective knowledge is invaluable.
YouTube tutorials instead of paid classes teach every skill imaginable for free. Search: "how to propagate [plant name]," "container gardening for beginners," "how to build [project name]," "troubleshooting [problem]." Channels like Epic Gardening, MIGardener, CaliKim29 teach everything from seed starting to harvest. I've learned most of my skills from free YouTube videos. Compare to paid classes ($50-200)—the free knowledge is equally good. Cost: $0, just time watching.
Free apps and resources for garden planning help organize and track. Free apps: Plantum (plant ID), Gardenate (planting calendar), FromSeed (seed tracking), and many more. Free websites: extension service publications, seed company guides, plant databases. I use a mix of free apps and simple notes on my phone. You don't need expensive software or complicated systems. Free resources are abundant and sufficient. Cost: $0.
Making Your Budget Garden Look Intentional
The difference between "cheap" and "budget-friendly chic" is intentionality.
Color coordination with free/cheap plants creates cohesion despite mismatched sources. Choose 2-3 colors as your palette (green + purple + white, or green + yellow + orange, etc.). Then buy/propagate only plants in those colors. I chose green foliage + purple flowers + white accents—every plant fits this scheme. This coordination makes thrifted containers and bargain plants look like a curated collection, not random accumulation. The color discipline creates polish.
Repeating elements for cohesion ties diverse elements together. Repeat: the same container color across multiple pots (spray paint all buckets black), the same plant in multiple locations (three pots of basil creates rhythm), the same material (all terracotta, or all DIY wood), or the same form (trailing plants repeated). I spray-painted seven mismatched containers matte black—suddenly they looked like a matching set. Repetition creates intentional design from disparate parts.
Clean containers matter more than expensive ones in creating polished appearance. A clean, well-painted $2 bucket looks better than a dirty $20 ceramic pot. I spend time cleaning thrifted containers thoroughly, painting where appropriate, and maintaining them clean through the season. Cleanliness signals care and intentionality. Neglected appearance signals randomness and decline. The effort to keep things clean costs nothing but dramatically affects perception.
Proper spacing beats overcrowding every time. Resist the temptation to cram many plants into small space. Proper spacing allows: each plant to be seen individually, air circulation (prevents disease), adequate light reaching all plants, and room for growth. I've learned that five well-spaced intentional plants look better than fifteen crammed plants. The breathing room creates elegance. Crowding creates chaos regardless of how much you spent.
Height variation from creative solutions adds visual interest without cost. Use: inverted pots as pedestals (free), found bricks or blocks to elevate containers (free), hang some containers from hooks (minimal cost), use vertical growing (minimal cost), vary container heights naturally through selection. I create three height levels: ground level, elevated 8-12 inches on improvised stands, hung 4-5 feet high. This variation creates dimensionality and interest for nearly free.
Hiding cheap containers behind prettier ones strategically places expensive and cheap elements. If you have one gorgeous $25 planter and five $2 buckets, put the gorgeous planter front-center where it's most visible, arrange buckets behind and to sides where they're less prominent. The focal point draws the eye and sets the quality perception. I do this constantly—featured beautiful container, supporting budget containers. It works.
Styling techniques that cost nothing but elevate appearance include: deadheading spent flowers regularly (looks tidy), removing yellow leaves promptly (looks healthy), arranging containers in triangular compositions (looks intentional), wiping dirt off container rims (looks clean), adding simple mulch layer on soil (looks polished), and cleaning up debris (looks maintained). These maintenance habits cost zero money but dramatically affect appearance. I spend 10 minutes weekly on styling—huge visual impact.
Photography tips to showcase your space make it look even better. Photograph: during golden hour (early morning or late evening light), from your best viewing angle, with background decluttered, after deadheading and grooming, with close-ups of individual plants plus wide shots of whole space. Good photos make budget gardens look magazine-worthy. I've gotten dozens of compliments on photos of my $68 garden—lighting and composition matter more than money spent.
Budget Design Mistakes to Avoid
These mistakes waste money and undermine your budget garden's success.
Buying too many small plants instead of fewer larger ones is a common beginner mistake. Example: six 4-inch plants at $3 each ($18) versus three 1-gallon plants at $6 each ($18). The larger plants create immediate impact and establish faster. The small plants take weeks to fill out and many don't establish well. I've made this mistake—buying many small plants that struggled. Now I buy fewer larger plants for better results. Same money, better outcome.
Choosing high-maintenance plants that need replacing wastes money. Plants that die annually and can't be easily propagated or regrown from seed cost money every year. Example: expensive tropical annuals ($8-12 each) that die in fall versus perennials ($8-12) that return yearly. Or finicky plants that die from minor mistakes versus bulletproof plants that tolerate neglect. I avoid high-maintenance one-season plants unless they're dirt cheap or I'm propagating them. Budget gardens need low-replacement plants.
Neglecting proper drainage kills plants and wastes all the money spent on them. This is the most expensive budget mistake: no drainage holes = root rot = dead plants = wasted money on plants, soil, containers, everything. I've seen this repeatedly: someone doesn't drill holes (to preserve decorative container), plants die within weeks, all money wasted. Always ensure drainage. Drill holes in everything. This one rule prevents more waste than any other.
Impulse buying without plan leads to incompatible purchases that don't work together. Budget gardeners can't afford impulse buying. Every dollar needs intention. Impulse buying creates: plants that don't fit your light conditions (die, wasted money), containers in random sizes (design looks chaotic), plants with incompatible care needs (complicated maintenance), and accumulation without cohesion (cluttered appearance). I used to impulse buy constantly—now I shop with list. Lists prevent expensive mistakes.
Cheaping out on soil is false economy that backfires expensively. Bad soil (garden soil, ultra-cheap potting mix, old degraded soil) causes: poor drainage (root rot), nutrient deficiency (stunted plants), compaction (suffocated roots), disease problems (contaminated soil). All of which kill plants or reduce success significantly. Spending $5 on cheap soil instead of $12 on good soil, then having plants fail (wasting $20 in plants)—you "saved" $7 but lost $20. Not economical. I always buy decent soil now.
Overcrowding containers reduces every plant's performance. Crowding seems economical ("more plants per container = more value") but actually wastes money because: all plants are stunted (reduced harvest/beauty), plants are weak (more susceptible to problems), competition for resources (all plants struggle), increased disease (poor air circulation). I've overcrowded containers trying to maximize space—all plants performed poorly. Better to properly space fewer plants that thrive than crowd many plants that struggle.
Not considering mature plant size leads to expensive repositioning or replacement. Buying a plant that grows 4 feet wide for a 2-foot space means you either have to: move it (hassle), prune it constantly (work), or remove it (wasted money). Research mature size before buying. I planted sweet potato vine once without researching—it grew 8 feet and overwhelmed everything. I had to remove it—wasted $5 and the whole growing season. Now I research first.
Buying plants that don't fit your conditions is the most common budget killer. Shade plants in full sun = death = wasted money. Full sun plants in shade = failure = wasted money. Drought-tolerant plants with frequent watering = root rot = wasted money. The fix: know your conditions (sun, water availability, climate) and only buy compatible plants. Every plant that dies from wrong conditions is completely wasted money. I've killed dozens of plants this way before learning to match plants to conditions.
DIY Projects That Save Money Long-Term
Initial time investment in DIY creates ongoing savings.
Building your own self-watering system saves $20-40 per container. Materials for DIY version: two buckets (free-$6), fabric wicking strip ($0—cut from old t-shirt), tube for filling reservoir (PVC scrap or plastic tubing, $1-3). Total cost: $1-9 versus $30-50 for commercial self-watering planter. I built five DIY self-watering containers for $25 total ($5 each) versus $150-250 for commercial versions. Savings: $125-225. The system reduces watering frequency from daily to weekly—ongoing time savings too.
Creating drip irrigation from recycled materials provides automated watering almost free. Materials: plastic bottles ($0—use empty water bottles), tubing from old aquarium or medical supply ($0-5), container for reservoir (bucket, $0-5). Method: elevate reservoir, run tubing to containers, create slow drips using bottle caps with holes. I built a gravity-drip system for $8 that waters eight containers automatically. Compare to commercial drip systems ($50-150)—I saved $40-140 and it works fine.
Making compost for free fertilizer turns kitchen waste into valuable resource. Setup: 5-gallon bucket with lid ($0—free bucket), drill holes for air ($0—you have drill). Add: kitchen scraps (vegetable peels, coffee grounds, eggshells), shredded paper/cardboard, occasional mixing. Wait 3-4 months, harvest compost. This provides free fertilizer and soil amendment forever. I've made probably 50+ gallons of compost over years—value of $200-300 if I'd bought it, cost of $0 to make.
Building simple structures from found materials creates functional elements free. I've built: trellis from bamboo stakes and twine ($0—found stakes, had twine), plant stands from stacked bricks ($0—found curbside), shelving from scrap lumber ($0—neighbor's leftover deck materials), windbreaks from old lattice ($0—curbside find). Each project would cost $15-40 to buy commercially. Total DIY cost: $0. Total commercial equivalent: $60-160. The effort saved $60-160.
Seed-starting setup from household items eliminates buying seed-starting supplies. Use: egg cartons for seed cells ($0), yogurt cups for larger seedlings ($0), clear plastic containers as humidity domes ($0), sunny window for light ($0), or DIY grow light from desk lamp and CFL bulbs ($8-12). Commercial seed starting kits cost $20-50. My DIY setup cost $0-12. I start 50-100 plants annually in this setup—it's paid for itself hundreds of times over.
Rain barrel or collection system provides free water indefinitely. Simple version: position buckets under downspouts ($0—free buckets). Advanced version: food-grade barrel ($15-30 craigslist or free from restaurants), spigot ($5-10), mosquito screen ($3-5), downspout diverter ($8-15). Total DIY rain barrel: $30-60 versus commercial rain barrels at $80-150. Savings: $20-90. Plus ongoing free water—in my climate, I collect 500-1000 gallons per year. At municipal water rates, that's $5-10 saved annually—small but real.
Tool organization from repurposed items keeps tools functional and accessible. Use: old buckets for tool storage ($0), hooks from command strips ($2-3), coffee cans for small items ($0), pegboard and hooks ($10-15 if buying new, $0 if found). This preserves tool life (prevents rust and damage from disorganization) and saves time (tools are accessible). I organized tools in an old bucket and hung frequently-used items on command hooks—cost $3, saves time every use, prevents losing/damaging tools.
Winter protection materials from free sources extend plant life and reduce replacement costs. Materials: bubble wrap from packages ($0), old blankets ($0), cardboard boxes ($0), leaves for mulch ($0), styrofoam from packaging ($0). Use these to: wrap containers for insulation, create cold frames, mulch heavily, protect tender plants. I've overwintered perennials that would have died, saving $20-40 in replacement costs, using only free materials. The effort extends plant life and reduces long-term costs.
Real Budget Garden Transformations
Real examples prove budget gardens absolutely work.
$30 balcony makeover before and after transformation. Before: bare 4x6 balcony, concrete floor, no plants. After: three containers (two free buckets spray-painted, one thrifted pot), cherry tomato, basil, marigolds, total investment $28. The result: stunning compact garden producing tomatoes and herbs all summer, beautiful marigold color, neighbors commenting on it constantly. Cost breakdown: buckets free, spray paint $5, thrifted pot $3, soil $10, plants $10. Total: $28. Time to create: one afternoon. Impact: huge, all season.
$75 productive vegetable garden breakdown. Five containers (mix of free buckets, thrifted pots, one DIY wood box), two tomatoes, two peppers, three herbs, lettuce, marigolds. Cost breakdown: containers $15 (mostly DIY/thrifted), soil $25, plants $30 (mix of starts and seeds), tools $5 (hand trowel only). Total: $75. Results: 80+ tomatoes, 30+ peppers, continuous herbs, salad greens for 8 weeks, flowers all summer. Produce value: $150-200. The garden paid for itself and then some.
$50 flower paradise cost analysis. Seven containers (all thrifted except one DIY), perennials and annuals in purple/white/green color scheme (hostas, petunias, alyssum, ivy, lavender). Cost breakdown: containers $8 (garage sales and DIY), soil $20, plants $22 (bought perennials on clearance, annuals from seeds). Total: $50. Results: gorgeous color all summer, many plants return yearly (perennials), cohesive design that looks expensive. Compliments: constant. Perceived value by observers: $200+. Actual cost: $50.
$100 herb garden investment and returns. Ten containers (mix of sources), twelve herb varieties (culinary focus), vertical growing elements. Cost breakdown: containers $30, soil $25, plants $30 (mostly starts for instant harvest), vertical elements $10, fertilizer $5. Total: $100. Returns: fresh herbs save $10-15 weekly at grocery store = $40-60 monthly = $200-300 over 5-month season. The garden paid for itself in less than two months. Plus: perennial herbs (rosemary, thyme, chives) return yearly—future free herbs.
Tiny space ($25 budget, 3x4 feet) transformation. Constraints: tiny balcony corner, minimal budget, first-time gardener. Solution: three containers (stacked vertically using found bricks as risers), compact plants (dwarf tomato, two herbs, trailing nasturtiums). Cost breakdown: containers $0 (found buckets), bricks $0 (curbside), soil $12, plants $13 (starts for instant success). Total: $25. Results: productive tiny garden in 12 square feet of space, provided tomatoes and herbs all summer, proved you can garden anywhere on any budget.
Rental-friendly budget garden ($60, all removable). Constraints: rental apartment, no drilling, must be movable. Solution: six containers (lightweight plastic and fabric bags), all freestanding elements, adhesive hooks for one hanging basket. Cost breakdown: containers $20 (mostly cheap plastic), soil $20, plants $15 (seeds and a few starts), adhesive hooks $5. Total: $60. Results: beautiful balcony garden that's completely reversible, moved successfully to new apartment (containers went with me), landlord-approved design that left no damage.
Year-round budget garden ($80 with seasonal swaps). Approach: invest in perennials and containers, swap annuals seasonally. Cost breakdown: containers $25 (mix, all reusable), soil $20 (refresh partially yearly), spring plants $15, fall plants $10, perennials $10 (last for years). Total year one: $80. Subsequent years: $20-30 (just plant replacements). Results: balcony has interest 12 months—pansies and kale in cool seasons, herbs and tomatoes in warm seasons, evergreen perennials provide constant structure.
High-impact budget garden ($40 focusing on one spectacular feature). Strategy: invest in one stunning element, support with free/cheap surrounding plants. Execution: one gorgeous large hosta ($20), surrounded by free propagated plants (pothos, coleus, spider plant divisions), in mix of containers (thrifted $5 total), soil ($15). Total: $40. Results: the dramatic hosta is the star, free supporting plants fill space and create lushness, overall effect is high-end and curated despite minimal investment. Lesson: one quality focal point can carry an entire design.
Maximizing Your ROI: Budget Garden Economics
Let's talk actual numbers and value.
How much can you save growing food depends on what you grow. High-value edibles: cherry tomatoes (one plant produces $40-60 worth), fresh herbs especially basil ($30-50 value per plant over season), salad greens ($20-30 value from $2 seeds), peppers ($20-30 value per plant). Medium-value: cucumbers, beans, summer squash ($10-20 value per plant). Lower value but still worthwhile: radishes, green onions ($5-10 value but very easy). I grow high-value crops to maximize savings—my typical season saves $200-400 in groceries.
Cost per harvest calculating value shows some plants are better investments. Example: cherry tomato costing $5 as seedling produces 100 tomatoes. Store price $0.30-0.50 per tomato = $30-50 value. Cost per harvest = $5 ÷ 100 = $0.05 per tomato. Compare to buying at $0.30-0.50 = 600-1000% return on investment. Or basil: $4 plant produces 50 harvests (cutting stems weekly for 8-10 weeks) = $0.08 per harvest. Store basil $4 for single package = your ROI is 5000%. These numbers are real and dramatic.
Perennials offer multi-year return on investment that's even more impressive. Example: $12 hosta returns for 10+ years = $1.20 per year cost. Or $10 lavender returns for 5+ years = $2 per year. The longer perennials live, the better the value. I have hostas, daylilies, and herbs that are 4+ years old—at this point they're generating value for pennies per year. Perennials are budget investments that compound over time.
Herbs show the highest value for money spent. Fresh basil at grocery store: $3-4 for small package (maybe 1/2 cup). One basil plant produces 10-20 cups over a season. Value: $60-160 from a $4 plant. Rosemary: $4 for tiny package at store, or $8 for plant that produces unlimited rosemary for years. Cilantro, parsley, thyme—all have similar economics. Herbs are the highest-ROI plants you can grow, period. If budget is extremely limited, grow only herbs.
Flowers provide value in joy versus cost that's harder to quantify but real. One $3 packet of zinnia seeds produces 50+ plants creating hundreds of flowers. Store-bought bouquets: $10-20 each, last one week. Home-grown flowers: constant supply for 3-4 months. If flowers bring you joy, the value is enormous even though it's not directly financial. I grow flowers primarily for mental health and happiness—the value is real even if not measurable in dollars.
Comparing first year cost to ongoing costs shows budget gardens get cheaper over time. Year one: $50-100 (containers, soil, plants, tools, everything). Year two: $20-40 (soil refresh, replacement annuals, seeds). Year three: $20-30 (even less as perennials establish). The initial investment is highest. Subsequent years cost only consumables. My year one was $68, year two was $25, year three was $15, year four was $20. The per-year cost decreases while enjoyment and productivity increase.
When budget gardens pay for themselves varies by focus. Vegetable-focused: pays for itself in one season through grocery savings (often 2-4 months). Herb-focused: pays for itself in 1-2 months (herbs are expensive at stores). Flower-focused: payback is in joy and mental health (less directly measurable). Mixed garden: pays for itself in one season. My $68 garden paid for itself financially in produce savings by mid-July (2.5 months). Everything after that was pure profit.
Non-monetary returns include health, happiness, and learning that have immense value. Physical health: gardening is exercise, fresh produce is nutritious. Mental health: gardening reduces stress, provides purpose, connects to nature. Learning: gardening teaches biology, self-sufficiency, problem-solving. Community: gardening connects you with neighbors, creates sharing opportunities. These benefits are priceless but absolutely real. My balcony garden improved my mental health significantly during difficult times—that value exceeds any financial calculation.
Conclusion
After covering everything from free containers to DIY projects to real budget examples, here's what I want you to take away: creating a beautiful, productive balcony garden on a budget is absolutely achievable. It's not a compromise or a second-best option—it's a different approach that often results in more creative, characterful, and meaningful gardens than unlimited spending creates.
The core truth is that beautiful gardens aren't about how much you spend—they're about creativity, intentionality, and care. A $50 garden designed with thought and maintained with attention will beat a $500 garden that's just accumulated purchases every single time. The constraint of limited budget forces you to think, to plan, to problem-solve, to DIY, to learn—and these processes create better gardens and more skilled gardeners.
Start with whatever budget you actually have. If it's $25, create an amazing $25 garden. If it's $100, create an amazing $100 garden. Don't wait until you have some imaginary "enough" budget. Start now with what you have. My first garden was $68 and it brought more joy than gardens I've created with triple that budget. The money matters less than you think.
Remember the key strategies: source containers free or cheap through thrifting and DIY, invest in decent soil (false economy to cheap out here), maximize value through seeds and propagation, choose high-value plants (edibles, perennials, prolific bloomers), maintain intentional design (color scheme, repetition, cleanliness), and keep learning (every season teaches you how to do better next season).
I'd love to hear about your budget balcony garden! What's your budget? What creative solutions have you found? What thrifting wins have you had? What questions are you still figuring out? Share in the comments—budget gardeners helping each other is how we all create more beautiful spaces for less money.
Final encouragement: you absolutely do not need hundreds of dollars to create a gorgeous balcony garden. You need creativity, resourcefulness, and willingness to try. The budget gardens I've created and helped others create are among my proudest accomplishments—not despite the budget constraints, but because of them. Constraints breed creativity. Limited budgets create unlimited satisfaction when you prove you can create beauty anyway.
Now go create your budget balcony garden. Hit up thrift stores, check curbsides, propagate some cuttings, plant some seeds, spray paint some buckets, and prove that gorgeous gardens don't require big budgets. Your beautiful budget balcony is waiting—and it'll mean more because you created it with ingenuity instead of just buying it!