Regrowing Vegetables from Kitchen Scraps: What Actually Works (And What Doesn't)
Discover the truth about regrowing vegetables from kitchen scraps — which ones actually thrive and which are a waste of time. Honest, tested advice on regrowing green onions, lettuce, celery, herbs, and more at home.
TINY PLOT BEGINNERS: YOUR FIRST HARVEST STARTS HERE
Introduction
Americans throw away roughly 30 to 40 percent of the food supply — and a significant chunk of that waste happens right at the kitchen counter, in the form of onion roots, lettuce bases, herb stems, celery bottoms, and ginger pieces that go straight from the cutting board into the trash or compost without a second thought. Most of those scraps contain living plant tissue that, under the right conditions, will grow again. Some of them will grow again prolifically, producing meaningful harvests of free food from something that cost you nothing because you were going to throw it away anyway. That's a pretty compelling proposition.
I've been experimenting with scrap growing for about eight years, and I want to be upfront about something before we go any further: a lot of what gets shared about regrowing vegetables from scraps online is either exaggerated, misleading, or just flat-out wrong. The viral photos of perfectly regrown heads of lettuce and celery? Those are real — but they don't tell you that the regrown lettuce gives you maybe five leaves before it's done, or that the regrown celery produces mostly new growth from the center that takes weeks to develop into anything harvestable. I've spent a lot of time testing what actually delivers meaningful results versus what produces a few days of interesting window-watching before fading into disappointment.
This guide is the honest version. I'm going to tell you which scraps are genuine, reliable, ongoing sources of free food — and which ones give you one small bonus harvest before they're done. I'm going to tell you exactly what you get from each type of scrap and whether it's worth the counter space. And I'm going to give you the realistic picture of what scrap growing can do for your kitchen versus what it can't. No viral photo hype, just what actually works. Let's dig in.
The Truth About Regrowing Vegetables from Scraps
Before getting into the specifics of individual vegetables, I want to establish some honest framework for thinking about scrap growing — because the gap between the viral social media version of scrap growing and the actual kitchen reality is wide enough that going in without realistic expectations leads to frustration and abandonment of a practice that genuinely has real value when approached correctly.
The most important distinction in scrap growing is between vegetables that regenerate indefinitely from a single piece — providing ongoing harvests from one initial scrap — and vegetables that give you one secondary harvest before they're exhausted. This distinction is almost never made explicit in scrap growing content, but it fundamentally determines the value proposition of any given scrap growing project. Green onions fall into the first category — the same root can be harvested and regrown dozens of times before it finally gives out. Lettuce falls into the second category — the cut base will produce some new leaves, but it has a limited energy reserve and will exhaust itself after one or two small harvests. Both are worth doing. But they're worth doing for different reasons and with different expectations, and conflating them is why people feel misled by scrap growing advice.
Another important honest truth is that regrown vegetables are almost always smaller, less vigorous, and less productive than new plants grown from seed or transplant. The scrap is drawing on stored energy in the root or base rather than having the full developmental resources of a plant grown from scratch. Regrown lettuce leaves are smaller than leaves from a growing lettuce plant. Regrown celery stalks are thinner than original stalks. Regrown herb cuttings take time to establish before producing at the rate of a mature plant. This isn't a reason not to grow scraps — it's a reason to value them correctly: as a bonus, a supplement, a free extension of the vegetable's productive life, not as a replacement for actually growing or buying fresh produce.
The genuine value proposition of scrap growing is zero cost and zero additional setup for most methods. You were going to throw the scrap away. It takes thirty seconds to put it in a glass of water instead. If it produces anything — even a small handful of green shoots over the following two weeks — that's pure gain. No investment, no risk, no loss if it doesn't work. Framed that way, scrap growing makes sense even for the vegetables that only give you one modest bonus harvest, because the alternative to that harvest was nothing. The high-value scrap growing projects — green onions, herb cuttings, ginger, sweet potato slips — provide genuine ongoing production that changes how you think about keeping certain ingredients stocked in your kitchen.
The cleanliness and simplicity of scrap growing in water is genuinely appealing as a kitchen practice, but it requires one consistent maintenance habit that many people skip: regular water changes. Scraps sitting in stagnant water develop bacterial growth, sliminess, and eventually rot. Changing the water every one to two days keeps the growing environment clean, provides fresh oxygen to the developing roots, and dramatically extends the productive life of any water-grown scrap. This single habit — thirty seconds every other day — is the difference between scrap growing that works and scrap growing that rots in your windowsill.
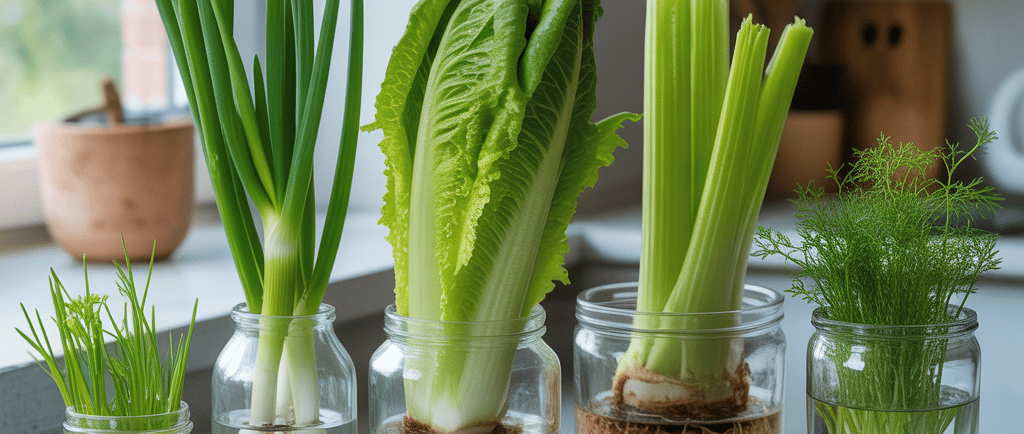
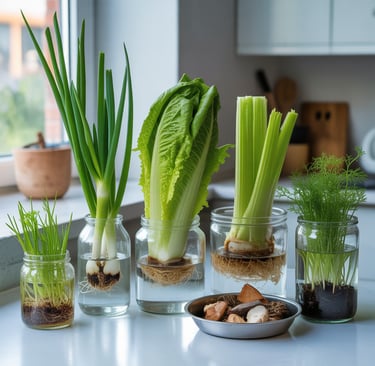
Green Onions — The King of Scrap Growing
Green onions are, without any close competition, the single best vegetable to regrow from scraps. They are fast, reliable, indefinitely renewable, and genuinely useful in cooking in a way that provides ongoing practical kitchen value. If you take nothing else from this guide, take this: put your green onion roots in a glass of water right now. You will have regrown green onions in four to five days and they will keep regrowing for months. This is not hype. This is the most reliable, immediately rewarding thing you can do with a kitchen scrap.
Here's why green onions work so well. The white root end of a green onion contains the plant's active growing tissue — the basal plate, which is the compressed stem from which both roots and shoots emerge. When you cut green onions for cooking, leaving an inch or two of white base with the roots intact, that basal plate is alive and ready to grow. Put it in a glass with enough water to cover the roots but not the cut end of the green shoots, set it near a window or under a light, and within twenty-four hours you'll see the cut ends beginning to push new green growth. Within four to five days you'll have harvestable-length regrowth. Within a week you'll be harvesting again.
The water method is the standard approach and it works extremely well for continuous green onion production. Use a glass or jar narrow enough to hold the roots upright without the bases tipping over — a shot glass, a small mason jar, or a drinking glass work perfectly. Keep water level consistent — covering the roots but not sitting the bases in water above the root area, which encourages rot. Change the water every two days without fail. Harvest by snipping new growth above the white base, leaving the basal plate intact to regrow again. Repeat indefinitely. I've regrown the same set of green onion roots for three to four months before the basal plate finally exhausted itself and stopped producing vigorous growth.
The soil method takes slightly longer to establish but produces more vigorous, more flavorful regrowth than the water method once it's going. Plant the white root ends about an inch deep in a small pot of potting mix, water regularly, and within a week you'll have strong new growth emerging. Soil-grown regrown green onions develop a broader, more developed root system than water-grown ones, which supports more robust above-ground growth. The flavor of soil-grown regrowth is noticeably better than water-grown — closer to the original green onion flavor than the somewhat milder, more aqueous taste of water-grown shoots. If you have any soil available, transitioning from water to soil after the first regrowth cycle is worth doing.
You can regrow the same roots through many cycles before the productivity diminishes noticeably. By the third or fourth month of regrowth, you'll notice the new shoots becoming thinner and less vigorous — this is the signal that the root's energy reserves are genuinely depleted and it's time to retire it and start fresh with the next batch of grocery-store green onion roots. Keeping two or three root clusters going in rotation ensures continuous availability even when one set is starting to slow down.
Lettuce, Cabbage, and Leafy Green Bases
Lettuce regrowth from cut bases is one of the most widely shared scrap growing projects on social media, and it does work — but the honest picture is more modest than the viral photos suggest, and understanding what you're actually getting helps you appreciate it correctly rather than feeling disappointed.
When you cut lettuce leaves and leave an inch or two of the base intact — the compressed, pale stem from which the leaves grew — that base contains the growing tip of the plant. In water or moist soil, this growing tip will produce new leaf growth. The regrowth starts from the center of the cut base, pushing new small leaves upward. Over one to two weeks in a sunny window or under a grow light, you'll get a small rosette of new leaves — typically enough for a side salad garnish or a couple of sandwich additions, not a full replacement head. This is a genuine bonus harvest and genuinely free — but it's a one-time bonus, not an ongoing production system. After the initial regrowth flush, the base doesn't have sufficient energy reserves for another full cycle, and trying to keep it going longer than two to three weeks typically results in the center rotting rather than continuing to grow.
The water tray method is the standard approach and works well for the compact nature of lettuce base regrowth. Place the cut base in a shallow dish or tray with enough water to cover the bottom of the base — roughly half an inch — but not so much that the cut leaf area is submerged. Set it in the brightest available light. Change the water daily or every other day to prevent bacterial growth and rot. The new growth emerges from the center and grows upward from the original cut surface. For the best results, use the freshest possible base — a lettuce base from a head you cut that day will regrow more vigorously than one that's been in the refrigerator for several days before trying to regrow it.
Cabbage, bok choy, and napa cabbage all follow essentially the same pattern as lettuce — cut the base, place in shallow water in a bright spot, and get a single cycle of new leaf growth from the center growing point. Bok choy is particularly satisfying for this because the regrowth is relatively vigorous and the new inner leaves are tender and flavorful. I keep a shallow dish near my kitchen window and cycle through lettuce, bok choy, and cabbage bases from whatever I'm cooking — the dish always has something growing in it, I change the water daily, and I harvest the small regrowth as it develops. The cumulative contribution to my kitchen over the course of a week isn't large, but it's genuinely free and it takes seconds of daily maintenance.
Transitioning lettuce and leafy green bases to soil extends the regrowth period somewhat and generally produces better growth than water alone. Once the initial water regrowth has produced a small rosette of new leaves — after about a week — you can carefully pot the base in a small container of moist potting mix, burying it just enough to hold it stable. The plant will push roots from the cut base into the soil and continue growing for another few weeks, producing slightly more leaf material than the water phase alone would. This is worth doing if you want to maximize the harvest from each base, though the total production still won't match a plant grown from seed.
Celery, Fennel, and Leeks — Regrowth from the Base
Celery is one of the most satisfying and visually dramatic scrap growing projects, producing obvious, enthusiastic regrowth that gives genuine kitchen returns — though the honest picture of what that regrowth provides is worth understanding before you start.
Cut the base of a celery bunch so you have the bottom two to three inches — the pale, dense base from which all the stalks emerge. Place this in a shallow dish of water, cut side up, with water covering just the bottom of the base. Within two to three days you'll see pale new growth emerging from the center of the cut surface, and within a week that growth will have developed into recognizable tiny celery leaves and nascent stalk development. Over two to three weeks, the regrowth produces a cluster of inner stalks surrounded by leaf growth — thin relative to grocery store stalks, but genuinely celery in flavor and texture, and perfectly usable in cooking. I use regrown celery inner stalks and leaves in exactly the situations where I'd use celery: soups, stocks, stir-fries, salads. The leaves in particular — which regrow abundantly and quickly — are intensely flavored, more so than the stalks, and excellent as an herb in cooked dishes.
The honest limitation of celery base regrowth is that you're getting the smaller, inner portion of a celery plant rather than the full outer stalks of a supermarket bunch. Think of it as celery hearts with abundant leaves rather than full celery stalks. For cooking purposes — especially cooked applications where the thin stalks soften appropriately — the regrowth is genuinely useful. For applications where you want substantial crisp celery stalk texture, like crudités or snacking, the regrowth is less appropriate. For maximum production, transition the base to a pot of moist potting mix after the initial water phase — celery growing in soil produces significantly more growth over a longer period than celery kept in water.
Fennel bulb base regrowth follows the same principle as celery and is equally satisfying. The base of a fennel bulb — the bottom inch or so with any remaining root attachment — produces lacy, feathery fennel frond growth from its center when placed in a shallow dish of water. The regrowth is primarily fronds rather than new bulb development — you're not going to get a second fennel bulb from a scrap, but you do get a steady supply of fresh fennel fronds, which are a wonderful herb for cooking fish, salads, and pastas. Fennel fronds are sometimes sold separately at specialty grocers for significant prices, so getting them free from a scrap you were going to compost is a genuine kitchen win.
Leeks are one of the less celebrated scrap growing projects but one of the most reliably productive. Cut a leek about two to three inches from the root end, leaving the root base and the beginning of the white shaft intact. Place root-end down in a small glass with an inch of water, near good light, and within days you'll see new green growth emerging from the center. The regrowth produces new green tops — the dark green portion of the leek — that are excellent in all the ways leek greens are used: soups, stir-fries, grain dishes, egg recipes. The flavor is genuine leek flavor, sometimes slightly milder than the original but fully recognizable. The root end will continue producing new green growth through multiple harvest cycles, making leeks one of the closer analogues to green onions in the scrap growing world.
Herbs — What Regrows and What Doesn't
Herb regrowth from scraps and cuttings is one of the highest-value scrap growing categories because herbs are expensive at retail, used in small quantities, and genuinely propagate well vegetatively — meaning a cutting from a herb plant can produce a whole new plant rather than just a single bonus harvest. The distinction in the herb category is between regrowing from stem cuttings in water (which produces new plants) and regrowing from cut base stubs (which typically produces a limited amount of new growth from existing tissue).
Basil is the herb that most reliably and dramatically produces new plants from stem cuttings in water, and it's one of the most satisfying propagation projects in the kitchen. When you buy a bunch of fresh basil from the grocery store or farmers market, or when you're pruning a basil plant, the removed stems can be rooted in water to produce entirely new plants. Trim stems to about four to six inches, remove all leaves from the bottom two inches of stem, and place in a glass of water on a sunny windowsill. Change the water every two days. Within one to two weeks, you'll see white root hairs emerging from the submerged nodes on the stem. Within three to four weeks, those roots will be developed enough to pot the cutting in soil, where it will grow into a full productive basil plant. I have produced many basil plants this way from grocery store bunch scraps — it's one of the most cost-effective kitchen gardening practices I do regularly.
Mint is even easier to propagate from cuttings than basil — mint is one of the most enthusiastic rooters in the plant world and will often show root development within a week in water. The approach is identical: four to six inch stem cutting, lower leaves removed, in a glass of water with regular water changes. Mint roots so readily that some cuttings will show tiny white roots within two to three days. Once rooted, pot in soil and you have a new mint plant that will grow vigorously. Because mint is vigorous to the point of invasiveness when given full soil, growing it in a contained pot rather than mixing it into a larger container is important — it will take over otherwise.
Cilantro and parsley are the more challenging herbs from a cutting perspective because they're tap-rooted rather than fibrous-rooted, which makes them less cooperative about producing roots from stem cuttings. Short stem segments — two to three inches — placed in water do sometimes root, particularly from younger, softer stems, but the success rate is lower than basil or mint and the process is slower. It's worth trying with stems you'd otherwise discard, but I wouldn't count on it. The better approach for these herbs is to grow them from seed, which is fast and easy, rather than relying on cutting propagation.
Rosemary and other woody herbs like thyme and sage can be propagated from stem cuttings but require a different approach from the soft-stemmed herbs. Semi-hardwood cuttings — stems that have some woodiness but still have some flexibility — root more reliably than either fully woody or very soft green growth. Remove the lower leaves from a four to six inch cutting, dip the cut end in rooting hormone powder if available (not essential but helps), and plant directly into moist potting mix or a propagation medium rather than water. Keep the cuttings moist and covered with a plastic bag or humidity dome to prevent drying out while roots develop — a process that takes three to six weeks for woody herbs. It's slower and less guaranteed than soft-herb water propagation, but a successfully rooted rosemary cutting gives you a plant that will last years.
Herbs that don't regrow well from scraps include dill and chervil, which are annuals that bolt quickly and don't propagate well vegetatively. Tarragon can be propagated from cuttings but is finicky. Bay laurel theoretically roots from cuttings but takes months and has low success rates without controlled propagation conditions. For these herbs, buying small plants or growing from seed is more reliable than scrap propagation.
Root Vegetables — Carrot Tops, Beet Greens, and Radish
Root vegetable scrap growing is perhaps the most commonly misunderstood category, primarily because people expect to regrow the root — the carrot, the beet, the radish — when the reality is that what grows from a root vegetable crown is greens, not a new root. Understanding this distinction is important because carrot greens and beet greens are genuinely useful in cooking, but they're a different thing from more carrots or more beets.
Carrot tops are the classic example of this misunderstanding. The cut top of a carrot — the crown with the green stub — will absolutely produce feathery, beautiful carrot green growth when placed cut-side down in a shallow dish of water. Within a week you'll have lovely frilly carrot greens emerging from the crown. What you will not get is a new carrot root. The crown doesn't have the capacity to produce a new root — it's only the above-ground growing portion of the plant, not the root-forming tissue. But carrot greens are actually edible and useful — they have a slightly bitter, herby flavor similar to parsley and can be used in pestos, chimichurri, soups, and salads. They're more bitter than parsley so using them where a slightly assertive flavor is appropriate works better than substituting them directly. Growing carrot tops primarily makes sense if you want the greens specifically — not if you're hoping for more carrots.
Beet greens from beet crowns are a more immediately practical regrowth project because beet greens are genuinely delicious — tender, mild, with earthy sweetness — and commonly cut off and discarded rather than eaten. Slice the top quarter inch off a beet, including the crown where the leaves were attached, and place it cut-side down in a shallow dish of water. New beet green growth will emerge from the crown within a week, producing tender young greens that are excellent sautéed with garlic, added to salads, or used anywhere you'd use Swiss chard. The regrowth cycle is typically one good flush of greens before the crown exhausts itself. Like carrot tops, this produces greens not a new beet root.
Radish regrowth is somewhat more interesting than other root vegetables because radish plants regrow both tops and, under the right conditions, can produce seed pods that are themselves edible and surprisingly delicious. A radish that's left to bolt — allowed to flower rather than being harvested at the root stage — produces elongated seed pods with a crisp texture and mild radish flavor that are wonderful raw in salads or pickled. If you have a radish that's already past its ideal root-harvest stage and starting to send up a flower stalk, let it continue rather than composting it — the seed pods that follow are a bonus harvest worth having. The root itself, left in soil after the prime eating stage, becomes more fibrous and pungent, but remains edible in cooked applications.
Turnip and parsnip crowns follow the same pattern as carrot and beet — place the cut crown in shallow water and harvest the greens that emerge. Turnip greens are particularly good — milder and more tender than mature turnip greens — and worth growing if you cook turnips regularly. The greens can be used in exactly the same applications as any leafy cooking green: sautéed, braised, added to soups, used in egg dishes. The same honest caveat applies: greens, not new roots, are what you're getting.
Garlic, Onions, and Potatoes — Regrowth from Whole Pieces
The allium and tuber family offers some of the most interesting and practically productive scrap growing projects, though the nature of what you're growing and the timeline to harvest varies significantly across the category.
Garlic cloves that have begun to sprout — the familiar pale green shoot emerging from the top of the clove — are growing a garlic plant whether you want them to or not. The sprouted garlic clove has committed its stored energy to producing a plant, which is why the flavor of sprouted garlic is considered inferior for eating — the sugars and volatile compounds have been redirected into green growth. Rather than throwing sprouted garlic away, plant the cloves root-end down about an inch deep in a small pot of potting mix and grow garlic greens. These greens — essentially scallion-like shoots with a distinct garlic flavor — are harvestable within two to three weeks and are outstanding in cooking anywhere you'd want garlic flavor with a milder, more vegetal edge. Snip them like chives and use in scrambled eggs, pasta, dumplings, soups — they're genuinely excellent. You can also simply place sprouted cloves in a glass with the bottom in a small amount of water and harvest the green shoots as they develop, though soil-grown garlic greens are more vigorous.
Onion bottoms — the root end of an onion with a small amount of the base flesh attached — will produce green shoots when placed in a shallow dish of water, just like green onions. The regrowth is less vigorous and less prolific than green onion regrowth because regular onions are biennial rather than perennial and their regrowth energy is more limited. But a fresh onion bottom in water will produce two to three inches of green growth within a week, which can be harvested and used as a mild onion-flavored green garnish. It's a modest return but it costs nothing and takes thirty seconds to set up, which makes it worth doing routinely with onion trimmings.
Potato eyes are the familiar sprouting points on aging potatoes — those pale, elongated shoots that emerge from the shallow divots in potato skin when potatoes are stored for too long. Each eye is a potential new potato plant. Cut a potato piece containing one or more eyes — about an inch of potato flesh around each eye — let the cut surface dry for a day or two (this prevents rot), and plant in a pot of moist potting mix with the eye facing up. Growing an entire potato plant in an apartment container is a multi-month project and requires a reasonably large container — at least a five-gallon pot — but the satisfaction of harvesting actual potatoes from an apartment container garden using a scrap that was headed for the compost is real. The yield won't be enormous — expect a handful of small potatoes per plant rather than a grocery bag — but the project is genuinely fun and educational.
Sweet potato slips are arguably the most productive scrap-to-food project in this entire guide and are especially worth detailed attention. A sweet potato partially submerged in water — suspended by toothpicks so the bottom half is in water and the top half is in air — produces slips, which are rooted shoot cuttings that can be detached and planted to grow full sweet potato plants. One sweet potato in water can produce many slips over the course of six to eight weeks, each slip capable of growing into a full plant. In warm outdoor conditions these plants can produce a substantial sweet potato harvest. In apartment conditions with grow lights they'll produce less, but the plants themselves are attractive — sweet potato vines are beautiful trailing plants — and they'll produce some yield with adequate light and a large enough container.
Ginger, Turmeric, and Lemongrass — Exotic Regrowth
The tropical and subtropical plants that appear regularly in Western kitchens — ginger, turmeric, lemongrass — are genuinely excellent candidates for scrap regrowth and represent some of the highest-value scrap growing projects available, particularly for people who cook Asian, Caribbean, or other cuisines that use these ingredients regularly.
Ginger is one of the scrap growing projects I'm most enthusiastic about, and it delivers genuinely meaningful results over time. A piece of fresh ginger from the grocery store — even the gnarly pieces that aren't ideal for cooking — will sprout and grow into a productive ginger plant if given warm conditions, indirect light, and consistently moist soil. Find a piece of fresh ginger with visible growth buds — the smooth, slightly shiny bumps on the surface — cut it into sections containing at least one bud, let the cut surfaces dry overnight, then plant shallowly in moist potting mix with the bud facing upward. Within two to four weeks in warm conditions (ginger wants temperatures above 65°F consistently), you'll see pale shoots emerging from the soil. Over the following months, the plant grows into an attractive clump of cane-like stems with long, narrow leaves. After six to eight months, you can dig the pot gently and harvest new ginger rhizomes from the root ball — genuine, flavorful, homegrown ginger from a grocery store scrap.
The honest caveat for indoor apartment ginger growing is that it needs warmth, moderate indirect light, and consistent moisture — conditions that most apartment kitchens can provide in summer but that may require supplemental heat or light in winter. Ginger goes partially dormant when temperatures drop below 60°F, losing its above-ground growth but maintaining viable rhizomes underground if kept barely moist. Bringing it back to active growth in spring by increasing warmth and moisture restores the plant and continues the rhizome development. It's a patient project — months rather than weeks — but the yield of homegrown ginger from a piece that cost you nothing is genuinely satisfying.
Turmeric follows almost exactly the same approach as ginger and has the same requirements: warm temperatures, indirect light, consistent moisture, and patience. Fresh turmeric rhizomes — now available in many grocery stores and specialty markets — sprout readily when planted shallowly in moist potting mix. The plant is beautiful — large, paddle-shaped leaves with a tropical appearance — and the rhizome harvest after six to eight months yields genuine fresh turmeric with a more vibrant, complex flavor than the dried ground version. For anyone who cooks with turmeric regularly, a container turmeric plant grown from a grocery store rhizome is an excellent long-term kitchen garden project.
Lemongrass from grocery store stalks is one of the most reliably successful water-rooting scrap projects. Fresh lemongrass stalks — look for ones with intact root bases rather than clean-cut bottoms — placed root-end down in a glass with two to three inches of water will develop roots within one to two weeks. The new root development is visible as small white root hairs emerging from the base of the stalk. Once roots are an inch or more long, pot the rooted stalk in moist potting mix. In warm conditions with good light, lemongrass grows quickly into a substantial clump within a few months — exactly the architectural grass-like plant discussed in the earlier article on beautiful edible plants. Harvest stalks from the outside of the clump as needed for cooking while the plant continues growing from the center.
Making Scrap Growing a Sustainable Kitchen Habit
The practical challenge of scrap growing isn't starting it — the barrier to entry is genuinely low for most projects — it's making it a consistent, sustainable kitchen habit rather than something you do enthusiastically for two weeks and then abandon. The setups and habits that make scrap growing stick are worth thinking about deliberately.
A dedicated scrap growing station — even a small, simple one — makes the practice dramatically more sustainable than the alternative of trying to find space for a random glass of green onion roots each time. Mine is a small wooden tray on the sunniest part of my kitchen counter that holds four to six small glasses and shallow dishes in rotation. The tray catches any water drips, keeps things visually organized, and signals clearly that this is a designated growing space rather than clutter. Anything being actively regrown lives on the tray. When something is harvested out or exhausted, it comes off the tray and gets composted, and the next scrap takes its place. The tray system is the single organizational habit that transformed scrap growing from an occasional project into an ongoing kitchen practice for me.
Understanding which scraps to always save versus which to put directly in the compost makes the decision process automatic rather than effortful. My always-save list includes: green onion roots (always — every single time, no exceptions), fresh herb stems with leaves intact that can be water-propagated, ginger and turmeric pieces with visible buds, lemongrass stalks with intact bases, and any sprouted garlic. My sometimes-save list includes: lettuce and leafy green bases when I have space on the tray and energy to maintain them, celery bases, leek root ends, and fennel bases. Everything else — carrot tops, beet crowns, onion bottoms — I assess based on whether I actively want the greens they'll produce given my current cooking plans. This tiered prioritization prevents the tray from becoming overcrowded with low-value projects that require daily maintenance without producing meaningful harvest.
Combining scrap growing with other indoor growing methods creates a more complete and productive indoor food system than any single approach alone. Scrap-grown herb cuttings that root successfully get potted up and join my herb growing shelf under a grow light, where they become productive plants rather than one-time water-grown novelties. Surplus green onion roots that have been in water for a while get transplanted into a pot of potting mix and moved to a growing shelf, where they produce more vigorous regrowth than they would in water indefinitely. The scrap growing station is an entry point and propagation system as much as a production system — the best scraps graduate to proper containers while the simple bonus harvests stay in the water tray until exhausted.
Keeping a simple record of what works in your specific kitchen — which scraps root reliably, which varieties regrow most vigorously, what the timeline looks like in your specific light and temperature conditions — is one of those practices that seems like extra work but compounds in value over time. I use a small notebook on my kitchen windowsill where I jot the date I started each scrap, the source, and what it produced. After years of doing this, I have a clear picture of exactly which projects reliably pay off in my kitchen and which ones I've tried enough times to know don't work well for me. That clarity makes the practice more efficient and more consistently rewarding.
The mindset shift that scrap growing creates is something I've found genuinely valuable beyond the practical food it produces. Seeing kitchen scraps as potential plants rather than waste changes your relationship with food in a small but meaningful way. The end of a bunch of green onions becomes the beginning of next week's green onions. The base of the celery becomes a cluster of growing leaves. The woody ends of herb stems become new plants. That shift in perception — from waste to resource, from ending to beginning — is one of the more quietly satisfying things that kitchen gardening of any kind produces, and scrap growing is where it starts for a lot of people.
Conclusion
The honest summary of regrowing vegetables from kitchen scraps is this: some of it is genuinely remarkable — green onions, herb cuttings, ginger, lemongrass — providing ongoing, meaningful, free food from scraps that would otherwise be composted or thrown away. Some of it is a pleasant bonus — lettuce bases, celery bottoms, carrot tops producing one small supplementary harvest before they're done. And some of it is more interesting as a project than as a food production strategy — potato eyes, sweet potato slips, root vegetable crown regrowth — worth doing for the experience and the satisfaction without expecting significant kitchen contribution.
The place to start is exactly where the guide began: green onions. Tonight, if you have any in your kitchen, cut them for cooking and put the white root ends in a glass of water on your windowsill. Set a reminder to change the water in two days. In five days, check back and look at what's grown. That single, immediate, zero-cost success is the experience that makes scrap growing click — and from there, the curiosity to try the next project, and the next, tends to take care of itself.
Drop your scrap growing wins, your interesting failures, your best-performing varieties, or your questions in the comments below. Whether you've been doing this for years and have a rotation that runs like clockwork, or you just put your first green onion roots in a glass twenty minutes ago — this is a community of people who find meaning in turning kitchen waste into kitchen food, and every experience shared here adds something useful for everyone reading. ♻️