Best Low-Light Vegetables You Can Grow Indoors: Complete Guide to Indoor Food Production
Grow fresh vegetables indoors with limited light! Discover 15+ low-light vegetables perfect for apartments, basements, and shaded spaces. No full sun needed!
INDOOR TINY PLOTS: FRESH FOOD & GREENERY ALL YEAR

Introduction
I'll never forget the moment I realized I could actually grow food in my apartment despite having terrible natural light. I was living in a north-facing studio with one small window that got maybe 3-4 hours of weak morning sun. Every houseplant I'd tried had either died or stretched into sad, leggy versions of themselves reaching desperately for light. I'd completely written off the idea of growing anything edible.
Then one winter day, I was buying yet another $4 package of wilted lettuce from the grocery store and thought "this is ridiculous—I spend $15-20 weekly on greens that go bad in my fridge." On impulse, I bought a $3 packet of lettuce seeds and a small container. I planted them on my kitchen counter near that pathetic north window, expecting nothing. Two weeks later, I had tiny lettuce seedlings. Four weeks later, I harvested my first salad. I was stunned.
That single success changed everything. Over the next year, I experimented obsessively with every vegetable I could think of in my low-light apartment. I had spectacular failures (tomatoes that grew 3 feet tall and produced zero fruit, herbs that died mysteriously, peppers that just sat there doing nothing). But I also had amazing successes: endless lettuce, prolific microgreens, abundant green onions, productive herbs. I learned that while you can't grow everything in low light, you can grow way more than you'd think.
Here's what surprised me most: some vegetables actually prefer shade. They evolved in forest understories or temperate climates where they naturally grow in dappled light. Full blazing sun isn't ideal for them—it causes stress, bolting, and bitterness. My low-light apartment was actually better for these vegetables than a sunny balcony would have been. This realization was game-changing.
I've now grown food indoors in low-light conditions for 5+ years across three different apartments. I've tested probably 30+ vegetable varieties, failed with at least half, succeeded brilliantly with the rest. I've grown food under north windows, in basements with just fluorescent lights, on counters with zero natural light using cheap LED bulbs. I've harvested hundreds of pounds of food from spaces with objectively terrible light.
In this guide, I'm sharing everything I've learned about growing vegetables in low-light indoor conditions. We'll cover which vegetables actually work (and which are hopeless wastes of time), how to optimize whatever light you have, when grow lights are worth it versus overkill, and practical growing strategies that produce real food in real apartments. If you've ever thought "I can't grow food because I don't have enough light," I'm here to prove you wrong. Let's grow some vegetables!
Understanding "Low-Light" for Indoor Vegetables
Before we start planting, let's define what "low-light" actually means and what's possible.
What low-light actually means is typically 3-6 hours of direct sun equivalent or bright indirect light most of the day. This includes: north-facing windows (indirect light all day), east-facing windows (morning sun 3-4 hours), shaded south/west windows (filtered through trees or buildings), or bright rooms without direct sun exposure. Low-light is NOT total darkness—plants still need light for photosynthesis, just less than "full sun" vegetables require.
Difference between low-light and no-light is critical to understand. Low-light: plants can grow, though more slowly than in full sun. No-light: plants cannot grow (they'll germinate using seed energy but die once that's depleted). Even shade-tolerant vegetables need some light. I've tried growing lettuce in a completely windowless bathroom with just regular LED ceiling lights—it failed completely. Light matters. The question is how much minimum light is needed, not whether you need any.
Natural light versus artificial light options both work but differently. Natural light (even low-light): free, full spectrum, plants evolved for it. Artificial light: costs money (electricity), requires equipment, but completely controllable. I've successfully grown vegetables in both. Natural low-light works for shade-tolerant vegetables. Artificial light expands possibilities dramatically. Many successful indoor gardeners use both: natural light as primary, artificial supplementation extending growing hours or intensity.
North-facing windows and indoor conditions are the classic "low-light" scenario. North windows (in Northern Hemisphere) get no direct sun—just bright indirect light all day. This is actually perfect for many vegetables. I grew lettuce, spinach, and herbs prolifically in a north window. The consistent moderate light without harsh afternoon sun prevented bolting and bitterness. South/west windows get too hot and intense for many greens. North/east windows are often ideal for shade-loving vegetables.
Why some vegetables tolerate shade better than others comes down to evolution and plant purpose. Shade-tolerant vegetables evolved in: forest edges (lettuce family), understory environments (many Asian greens), or temperate climates with limited sun (spinach, arugula). These plants developed efficient photosynthesis in low-light conditions. Fruiting vegetables (tomatoes, peppers, squash) evolved in full-sun environments and require high light intensity to produce fruit. Leafy vegetables just need to grow leaves—lower energy requirement.
Measuring your actual light levels helps set realistic expectations. Methods:
Smartphone light meter apps (measures foot-candles or lux)
Observe sun movement over full day
Time direct sun exposure with timer
Compare to outdoor shade (outdoor shade is often brighter than indoor "bright")
I measured my north window: 500-800 foot-candles peak. Outdoor shade: 1,000-2,000 foot-candles. Full sun: 10,000+ foot-candles. My window was dim compared to outdoors but adequate for shade vegetables.
Realistic expectations for low-light growing means accepting: slower growth than full sun (lettuce might take 6 weeks vs. 4 weeks outdoors), smaller yields per plant (but you can grow year-round, so total yield can be higher), some vegetables won't work (tomatoes, peppers, fruiting plants generally fail), and focus on leafy and fast-growing crops. I grow about 60% of the lettuce and herbs I consume from low-light indoor growing. I don't grow tomatoes indoors—not worth the effort. Knowing limitations prevents frustration.
Supplementing natural light when needed extends possibilities. Options: position grow lights to extend day length (natural light 4 hours + artificial 4 hours = 8 hours total), increase light intensity during winter (when natural light is weakest), or supplement on cloudy days. I use a small LED grow light during winter to boost my north window garden. In summer, natural light alone suffices. Strategic supplementation works better than going all-artificial.
The Science: Why Some Vegetables Grow in Shade
Understanding the biology helps you choose the right vegetables.
Evolution of shade-tolerant plants explains why some vegetables thrive in low light. These plants evolved in environments with limited sun: forest floors, north-facing slopes, temperate climates with frequent clouds. They developed photosynthesis mechanisms efficient at low light levels. Example: lettuce originated in Mediterranean regions growing as understory plants. Spinach evolved in Persia (now Iran) with moderate sun and cool temperatures. These evolutionary origins predict their modern growing requirements.
Photosynthesis efficiency in different light levels varies by species. C3 plants (most vegetables) have lower light saturation points than C4 plants (corn, many grasses). Shade-adapted C3 plants saturate at 500-1,500 foot-candles—more light doesn't increase photosynthesis. Sun-adapted plants saturate at 5,000-10,000+ foot-candles. This means: shade vegetables reach maximum productivity at relatively low light levels. Adding more light doesn't help much. Sun vegetables never reach full productivity in low light.
Leafy vegetables versus fruiting vegetables have drastically different light requirements. Leafy vegetables (lettuce, spinach, greens): goal is leaf production, lower energy requirement, can thrive in 25-50% of full sun. Fruiting vegetables (tomatoes, peppers, beans): goal is flower and fruit production, high energy requirement, need 80-100% full sun for good yields. This is why indoor low-light gardens focus on leafy vegetables almost exclusively.
Fast-growing crops and light requirements correlate interestingly. Fast-growing crops (many greens, radishes, microgreens): reach maturity quickly before light limitations become severe. Slow-growing crops (peppers, tomatoes): accumulate light deficits over months, resulting in weak growth. Strategy: choose fast-maturing vegetables that complete their lifecycle before light limitations cause serious problems. Microgreens (7-14 days) are perfect. Lettuce (4-6 weeks) works well. Tomatoes (90+ days) struggle.
Cool-season vegetables and shade preference overlap significantly. Cool-season vegetables (lettuce, spinach, arugula, Asian greens, peas): evolved for cool moderate climates, prefer temperatures 60-70°F, tolerate and often prefer shade. Warm-season vegetables (tomatoes, peppers, squash): evolved for warm sunny climates, prefer 70-85°F, need full sun. Indoor low-light environments are often naturally cool (60-70°F) and low-light—perfect for cool-season vegetables, terrible for warm-season.
How plants adapt to lower light includes: larger, thinner leaves (capture more light per unit area), increased chlorophyll concentration (more green color), slower growth rates (less energy available), reduced flowering/fruiting (prioritize survival over reproduction), and etiolation if light is too low (stretching toward light—bad sign). I've seen these adaptations in my indoor plants. Shade-grown lettuce has larger, darker green leaves than sun-grown. This is adaptive, not problematic.
Trade-offs between yield and light intensity are real. Lower light = lower yields per plant BUT: you can grow year-round indoors (vs. seasonal outdoors), you can have continuous succession plantings, you avoid weather/pest issues that reduce outdoor yields, and total annual yield can be higher despite lower per-plant yield. I harvest less per lettuce plant indoors (maybe 60% of outdoor) but I harvest 12 months instead of 4-5 months. Total: way more lettuce annually.
Understanding diminishing returns on light means knowing when more light doesn't help. For shade vegetables, returns diminish beyond 1,500-2,000 foot-candles. Adding more light (expensive grow lights) produces minimal yield increase. Better to optimize plant choice, watering, and fertilizing. For fruiting vegetables, returns diminish around 8,000-10,000 foot-candles, but they need that much to fruit at all. I don't chase maximum light for my greens—I provide adequate light and focus on other factors.
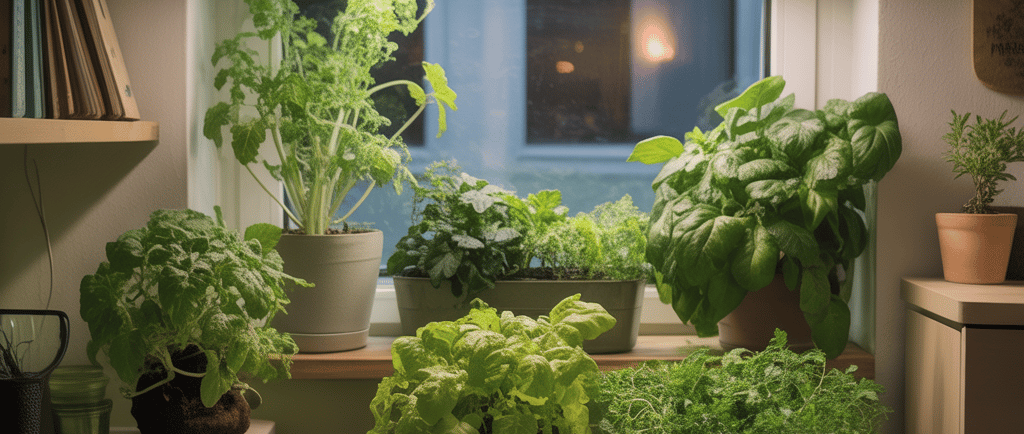
Leafy Greens: The Low-Light Champions
This category is where indoor low-light gardening shines. Literally every greens variety I've tried has worked to some degree.
Lettuce varieties for indoor growing are incredibly diverse and almost all work well. Best varieties: loose-leaf types (harvest individual leaves continuously), butterhead (tender, mild, fast-growing), romaine (upright growth, space-efficient), and mesclun mixes (variety in one planting). Avoid: iceberg (slow-growing, needs more light). I've grown probably 15 lettuce varieties indoors. Success rate: 95%. My favorites: 'Black Seeded Simpson' (loose-leaf, very productive), 'Buttercrunch' (heads up nicely even indoors), and 'Little Gem' romaine (compact, sweet).
Spinach in low-light conditions grows beautifully with one caveat: it bolts (flowers) easily in warm temperatures. Indoor success factors: keep cool (60-70°F ideal, struggles above 75°F), provide consistent moisture, harvest regularly. I grow spinach fall through spring indoors when my apartment is cooler. Summer spinach bolts within weeks despite adequate light. Varieties: 'Space' (compact, slow-bolting), 'Bloomsdale' (classic, productive), or baby spinach mixes. Expected yield: 2-4 ounces per plant over 6-8 weeks of harvesting.
Arugula is fast and shade-tolerant—one of my absolute favorites for indoor growing. Germinates in 3-5 days, ready to harvest in 3-4 weeks, tolerates low light excellently, has spicy flavor that enhances salads. I grow arugula constantly. It's fast enough that even in very low light, it reaches maturity before light limitations cause problems. Plant every 2 weeks for continuous harvest. Grows prolifically in north windows or under basic fluorescent lights.
Kale and collards indoors grow larger and slower than quick greens but produce abundantly over months. Best for: larger containers (8-10 inches deep minimum), cooler spots (they're very cold-hardy, don't mind 55-65°F), and cut-and-come-again harvesting (take lower leaves, let plant keep growing). I've kept single kale plants producing for 4-6 months indoors. Varieties: 'Dwarf Blue Curled' kale (compact), 'Lacinato'/'Dinosaur' kale (upright, space-efficient). They're slower than lettuce but very productive long-term.
Swiss chard provides color and nutrition year-round indoors. Advantages: extremely shade-tolerant, colorful stems (rainbow chard is gorgeous), productive over many months, nutrient-dense. I love chard for indoor growing—it's forgiving, beautiful, and productive. Plant one chard plant and harvest outer leaves for months. Varieties: 'Bright Lights' (colorful), 'Fordhook Giant' (productive). Chard tolerates lower light than most greens in my experience.
Asian greens including bok choy, mizuna, and tatsoi are perfect for indoor low-light growing. These vegetables evolved in East Asian climates with moderate sun and cool temperatures. They're naturally shade-tolerant, fast-growing, and cold-hardy. I've had exceptional success with: mizuna (frilly leaves, mild mustard flavor, very fast), bok choy (both baby and full-size varieties), tatsoi (rosette shape, space-efficient), and komatsuna (spinach mustard, very productive). Most mature in 4-6 weeks and tolerate my low-light north window perfectly.
Mustard greens and their spicy kick add flavor variety to indoor gardens. Faster and more shade-tolerant than kale, slower than lettuce, spicy flavor that's addictive in salads. Varieties: 'Red Giant' (colorful, moderate spice), 'Mizuna' (technically a mustard, mild), 'Southern Giant Curled' (classic, productive). I find mustard greens even more forgiving of low light than lettuce—they grow in almost any conditions. Great for beginners.
Success rates and expected yields from my experience:
Lettuce: 95% success rate, 3-6 ounces per plant over 4-6 weeks
Spinach: 80% success (fails in heat), 2-4 ounces per plant over 6-8 weeks
Arugula: 98% success, 2-3 ounces per plant over 3-4 weeks (then replant)
Kale: 85% success, 8-16 ounces per plant over 3-4 months
Chard: 90% success, 10-20 ounces per plant over 4-6 months
Asian greens: 90% success, 3-8 ounces per plant over 4-6 weeks
Mustard greens: 95% success, 4-8 ounces per plant over 5-8 weeks
These yields are for low-light conditions (north window or basic supplemental light). Full sun would be higher, but these numbers represent real indoor production.
Microgreens: Maximum Nutrition, Minimum Light
Microgreens are the secret weapon of low-light indoor gardening.
What microgreens are and why they work indoors: microgreens are vegetables harvested 7-14 days after germination at the seedling stage with first true leaves. They're not sprouts (which are germinated seeds with no leaves). Microgreens are baby plants. Why they work indoors: they complete their lifecycle before light limitations matter much, they grow in very small spaces (high density), and they're harvested before they need significant light for maturity. I can grow microgreens successfully in spaces where mature vegetables would fail.
Best varieties for low-light include peas, sunflower, radish, broccoli, mustard, and arugula. These germinate vigorously and grow well even in moderate light. I've grown all of these in north windows with success. Pea shoots: sweet, crunchy, everyone's favorite. Sunflower: nutty flavor, substantial greens. Radish: spicy, fast (7-10 days). Broccoli: mild, nutritious. Avoid: slower varieties like basil and beet (they work but take longer and benefit from more light).
Growing cycle of 7-14 days seed to harvest is incredibly fast. Timeline: Day 1: soak seeds (if recommended). Day 2: plant densely in shallow tray. Days 2-4: keep in dark (or covered) while germinating. Days 4-7: uncover, provide light, watch growth explode. Days 7-14: harvest when first true leaves appear. Replant immediately for continuous production. I can get 26-52 harvests per year from the same space—impossible with mature vegetables.
Space efficiency and production volume is remarkable. One 10x20 inch tray produces: 4-8 ounces of microgreens (depending on variety), equivalent to 2-4 store packages ($8-16 value), from $1-3 worth of seeds. I grow microgreens in trays on shelves, on counter
tops, anywhere with moderate light. The density and fast turnover means massive production from tiny spaces. Ten trays on a shelf unit can produce 2-3 pounds of microgreens weekly.
Nutritional density compared to mature plants is extraordinary. Studies show microgreens contain 4-40x more vitamins and antioxidants than mature vegetables (varies by variety and nutrient). A handful of broccoli microgreens has more sulforaphane (cancer-fighting compound) than a full head of mature broccoli. The nutritional density means you need less volume for same nutrition. I eat 1-2 ounces of microgreens daily for major nutritional impact.
Equipment needed is minimal: shallow trays (10x20 inch standard, or any shallow container 1-2 inches deep), potting mix or coco coir (1 inch depth), spray bottle for watering, and moderate light source. Optional: humidity dome for germination. Total startup cost: $15-30 for basic setup. I started with a $2 aluminum tray, $5 bag of coco coir, and $8 in seeds. That's it. No fancy equipment needed.
Continuous production strategies keep harvest flowing. System: stagger planting new trays every 3-5 days. With 7-14 day cycles, this creates overlapping harvests. Example: 4 trays planted 4 days apart = weekly harvests continuously. I maintain 6-8 trays at different stages. I plant 2 trays weekly, harvest 2 trays weekly, continuous cycle. This produces 8-16 ounces weekly from a 2x3 foot shelf.
Economics of growing versus buying: store microgreens cost $4-8 for 2 ounces. Growing: $1-2 per tray (seeds and growing medium) produces 4-8 ounces. Cost per ounce: growing $0.15-0.50, buying $2-4. Savings: 80-90%. I eat microgreens daily. Store-bought would cost $200-300 monthly. Growing costs $30-40 monthly in supplies. Savings: $160-260 monthly. Microgreens have the best economics of any food I grow.
Herbs That Thrive in Shade
Not all herbs tolerate low light, but some absolutely thrive.
Parsley is the shade-loving workhorse herb. Flat-leaf and curly parsley both grow excellently in low-light. Characteristics: slow to germinate (2-3 weeks—be patient), very shade-tolerant once established, produces continuously for 6-12+ months, and is biennial (won't flower first year). I maintain 2-3 parsley plants year-round in a north window. They produce more parsley than I can use. Harvest outer stems regularly and the plant keeps producing from the center.
Cilantro that doesn't bolt is achievable in low-light cool conditions. Cilantro's biggest problem: bolting (flowering) quickly in heat and high light. Low-light cool indoor conditions actually prevent bolting. Strategy: keep cool (60-68°F ideal), provide moderate light (not full sun), harvest regularly, choose slow-bolt varieties. I grow cilantro successfully indoors using 'Calypso' or 'Slow Bolt' varieties. It produces for 6-8 weeks before bolting versus 3-4 weeks outdoors in summer heat.
Chives for year-round harvests are nearly foolproof indoors. Perennial, extremely cold-hardy, tolerates low light well, continuously productive. Plant chives once and harvest for years. I've had the same chive plant for 3+ years. It goes dormant occasionally but always regrows. Harvest by cutting stems to 2 inches above soil level—regrows within weeks. Chives tolerate absurdly low light in my experience—they grow in spots where other herbs fail.
Mint varieties and container considerations: mint grows vigorously indoors in low-light BUT it's invasive—always contain it. Mint spreads via underground runners. In containers, this is controlled. Benefits: extremely shade-tolerant, fast-growing, many varieties (spearmint, peppermint, chocolate mint, etc.), productive year-round. I grow peppermint in a 6-inch pot. It tries to escape constantly (runners come out drainage holes) but produces abundantly. Harvest stems regularly to keep it under control.
Lemon balm and other shade herbs include: lemon balm (vigorous, lemony flavor, very shade-tolerant), oregano (possible in low-light but slower than sun), and thyme (struggles more than the others but can survive). I've had success with lemon balm in very low light—it grows enthusiastically even in north windows. Oregano produces but slowly. Thyme barely survives—I don't recommend it for very low light unless you supplement.
Basil in low-light is challenging but possible with caveats. Basil prefers full sun and warmth. In low-light: grows slowly, stays small, may stretch (leggy growth), and produces smaller leaves. Success factors: choose compact varieties ('Spicy Globe', 'Windowsill'), provide warmest spot available, supplement with grow light if possible, pinch regularly to encourage bushiness. I grow basil with supplemental LED light. Without it, basil struggles badly. Don't make basil your first low-light herb.
Oregano and thyme possibilities are limited in very low light. Both are Mediterranean herbs evolved for hot sunny dry conditions. They survive in low-light but don't thrive. Oregano: slow growth, sparse leaves, acceptable flavor. Thyme: extremely slow, often fails, better in brighter spots. If you love these herbs, grow them in your brightest window or supplement with grow light. I gave up on thyme in low-light—not worth the struggle. Oregano is marginal but possible.
Growing from seed versus starts: for slow-germinating herbs (parsley, cilantro), starts give you a head start. For fast herbs (basil, mint), seeds are fine. I buy parsley as starts (saves 3 weeks), grow cilantro from seed (germinates in 7-10 days), and propagate mint from cuttings (free and fast). Chives can be grown from seed but divisions from mature plants are faster. Optimize based on patience and budget.
Root Vegetables You Can Grow Indoors
Root vegetables are surprisingly viable indoors with the right containers.
Radishes are the fastest indoor vegetable at 25-30 days seed to harvest. Benefits: extremely fast, tolerates low light well, needs minimal space, and provides instant gratification for beginners. Container: 6-8 inches deep minimum, any diameter. Varieties: 'Cherry Belle' (classic red, 25 days), 'Easter Egg' (colorful mix, 30 days), 'French Breakfast' (oblong, mild, 28 days). I plant radishes every 2 weeks for continuous harvests. They work in very low light—I've grown them in north windows successfully. Thin seedlings to 2 inches apart for proper bulb development.
Green onions from scraps provide infinite supply for zero cost. Method: buy green onions from store, use green tops, save white bases with roots, place in water (roots submerged, tops above water), change water every 2-3 days, harvest regrowth in 7-10 days, repeat indefinitely. I've maintained green onions for 6+ months from a single store purchase. They grow in almost no light—I've kept them in dark corners with just ambient room light. Eventually they decline (after 4-6 cuttings), but by then you've harvested 5-10x what you paid.
Beets for greens and roots are dual-purpose. Beet greens: ready in 4-6 weeks, very nutritious, grow in low-light excellently. Beet roots: need 8-12 weeks, require deeper containers (10-12 inches), grow in moderate light but slower than greens. Strategy: grow beets primarily for greens in low-light, roots are a bonus. I harvest outer beet leaves continuously and sometimes get small beet roots. Varieties: any variety works, 'Bulls Blood' (dark red leaves, ornamental and edible).
Carrots in deep containers require specific setup. Container depth: 12+ inches (standard carrots), 8-10 inches (baby/round varieties). Varieties: 'Paris Market' or 'Thumbelina' (round, short, perfect for containers), 'Little Finger' or 'Babette' (baby carrots, 6-8 inches), avoid full-size varieties (need 14+ inches depth). I've grown 'Paris Market' successfully in 10-inch pots indoors. They take 60-75 days and need moderate light. This is at the edge of "low-light" viability—needs your brightest spot or supplemental light.
Turnips and their dual harvest work like beets. Turnip greens: fast (4-5 weeks), shade-tolerant, spicy flavor. Turnip roots: 50-60 days, need 8-10 inches depth, moderate light. I grow turnips primarily for greens. The roots are often small indoors but edible. 'Hakurei' variety (salad turnips): sweet, mild, good for containers. Turnip greens are underrated—very productive in low-light.
Ginger and turmeric cultivation is surprisingly viable indoors. These tropical rhizomes actually prefer shade and warmth. Method: plant ginger/turmeric rhizomes (organic from grocery store work) in 10-12 inch deep containers, keep warm (70-75°F), keep moist, provide low-moderate light, harvest in 8-10 months. I've grown ginger successfully indoors. It grows slowly but produces. Turmeric is similar. Both prefer shade over full sun, making them perfect for low-light indoor growing.
Container depth requirements summary:
Radishes: 6-8 inches minimum
Green onions: 4-6 inches (or just water)
Beets: 8-10 inches for roots, 6 inches for greens only
Carrots: 8-12 inches depending on variety
Turnips: 8-10 inches for roots, 6 inches for greens only
Ginger/turmeric: 10-12 inches
Match container depth to what you're growing. Too shallow = deformed roots.
Harvesting strategies for continuous production: thin seedlings and eat thinnings (baby roots), harvest outer leaves on beets/turnips (let plant keep growing), succession plant radishes every 2 weeks, and replant immediately after final harvest. I maintain rolling plantings of radishes—every 2 weeks I plant a new container and harvest a mature one. Continuous fresh radishes year-round.
Other Surprising Low-Light Vegetables
Beyond the standards, these vegetables also work indoors in low-light.
Peas (shoots and pods) offer two harvest options. Pea shoots: microgreen stage (10-14 days), extremely shade-tolerant, sweet tender shoots, very productive. Full peas (pods): 60-80 days, need more light than shoots, possible in bright indoor spots with supplemental light, dwarf varieties required. I grow pea shoots constantly—they're one of my top microgreens. Full pea pods I've attempted with limited success (got some pods but yield was low). For low-light, focus on pea shoots.
Dwarf tomatoes with supplemental light can work in bright spots but need assistance. Requirements: brightest window available (south or west), supplemental grow light highly recommended (8-12 hours daily), compact determinate varieties ('Tiny Tim', 'Window Box Roma', 'Red Robin'), and realistic expectations (lower yields than outdoor). I've grown cherry tomatoes indoors with grow lights—I got fruit but maybe 20 tomatoes per plant versus 100+ outdoors. Worth it only if you really want fresh tomatoes in winter and accept lower production.
Small peppers in bright indoor spots are marginally viable. Like tomatoes, peppers need significant light. Requirements: brightest spot available, supplemental light helpful, ornamental or small varieties ('Prairie Fire', 'Numex Twilight', 'Medusa'), and patience (slow growth, low yields). I tried peppers indoors once—got maybe 6 small peppers over 6 months. Not worth the effort for me, but if you want to say you grew peppers indoors, it's possible.
Sprouts (bean sprouts, alfalfa) are the ultimate no-light vegetables. Sprouts are germinated seeds, not grown to plant stage. They need zero light—grow in jars in cupboards. Method: soak seeds 8-12 hours, drain, rinse twice daily, harvest in 3-5 days. I grow mung bean sprouts and alfalfa sprouts regularly. They're not exactly vegetables but they're fresh, nutritious, and grown at home. Perfect for truly no-light situations (basements, interior rooms).
Mushrooms are the ultimate low-light crop because they're fungi, not plants—they don't photosynthesize at all. Mushroom growing: buy mushroom growing kit ($20-40), follow instructions (usually just misting daily), harvest in 1-2 weeks, get 2-4 flushes (harvest rounds). I've grown oyster mushrooms in my basement with zero natural light. Success depends on humidity and temperature more than light. Mushrooms are technically not vegetables but they're food you grow indoors in the dark—worth mentioning.
Edible flowers for garnish add beauty and flavor. Violas, pansies, and nasturtiums tolerate low-moderate light and produce edible flowers. I've grown nasturtiums indoors—both leaves and flowers are edible. They grow in low light but don't flower prolifically unless light is adequate. More viable in moderate light than true low-light, but worth trying in your brightest spots.
Perennial vegetables indoors are mostly houseplants that happen to be edible. Examples: aloe (medicinal), snake plant (technically edible but not particularly palatable), sweet potato vine (edible leaves). These are marginal food sources but fun to experiment with. I've eaten sweet potato leaves from my ornamental sweet potato vine—they're actually good steamed.
Experimental crops worth trying: any vegetable can be tried indoors. Some will fail, some will surprise you. I've experimented with: leeks (slow but worked), shallots (from scraps, regrew nicely), celery (from scraps, regrew leaves), bok choy (very successful), cucumbers (failed—needed more light and space), and bush beans (marginal—got some beans but low yield). Experimentation is part of the fun. Don't let this guide limit you—try things and see what works in your conditions.
Container Selection for Indoor Vegetables
The right container makes or breaks indoor vegetable success.
Depth requirements by vegetable type are non-negotiable. Shallow-rooted (4-6 inches): microgreens, sprouts, lettuce, shallow herb starts. Medium depth (6-10 inches): most greens, herbs, radishes, green onions, beets (greens). Deep (10-12+ inches): carrots, turnips (roots), ginger, kale, chard, full-size herbs. I learned this through failure—growing carrots in 6-inch pots produced deformed roots. Match depth to plant needs.
Width and spacing considerations affect yield and health. General rule: greens need 4-6 inches spacing, herbs need 6-8 inches, root vegetables need 2-3 inches. Container width depends on how many plants: 6-inch pot (1 plant), 10-inch pot (2-3 plants depending on type), 12-inch pot (4-6 greens or 2-3 herbs). I use various sizes: 4-inch for microgreens, 6-8 inch for single herbs, 10-14 inch for multiple greens.
Material choices—plastic, ceramic, fabric—all work with different tradeoffs. Plastic: cheap, lightweight, retains moisture, can look cheap. Ceramic: attractive, heavy, retains moisture, expensive. Fabric: excellent drainage, lightweight, dries fast (more watering), cheap. For indoors, I prefer plastic or ceramic for aesthetics (visible in living space) and moisture retention (don't dry out as fast). Fabric bags are great functionally but look utilitarian—fine for basements, not for kitchens.
Drainage is absolutely non-negotiable for containers. Every container must have drainage holes. No holes = root rot = dead plants. This is even more critical indoors than outdoors because water doesn't evaporate as quickly indoors. If you love a decorative pot with no holes: drill holes (ceramic, plastic, some wood), use as cache pot (liner pot with holes inside decorative pot), or don't use it for plants. I drill holes in everything. No exceptions.
Self-watering containers provide consistency that's valuable indoors. Self-watering containers have reservoirs that wick water up as needed. Benefits: less frequent watering (weekly vs. every 2-3 days), consistent moisture (plants thrive), idiot-proof (hard to underwater or overwater). I use self-watering containers for herbs and greens. They cost 2-3x more but are worth it for convenience and improved plant health. Especially good for beginners or forgetful waterers.
Space-efficient container arrangements maximize limited indoor space. Strategies: tiered plant stands (3-4 levels in same footprint), hanging planters (use vertical space), shelving with lights (multi-level growing), window boxes (utilize window space), and tight grouping (containers touching, creates humidity). I use a 3-tier wire shelf with grow light—9 square feet of floor space holds 25-30 small containers across three shelves.
Decorative versus functional containers balance aesthetics and budget. Decorative: ceramic, matching sets, pretty but expensive. Functional: plastic, resin, repurposed, cheap but less attractive. For visible locations (kitchen counter, living room), I invest in 2-3 nice decorative pots. For less visible (shelves, basement, behind furniture), I use cheap plastic. Mix both to balance budget and appearance.
Budget-friendly container options include: plastic pots from garden centers ($1-3 each), yogurt containers with holes drilled ($0), repurposed food containers, thrift store finds ($0.50-2), and fabric grow bags ($3-5 for pack of 5). My container collection is probably 70% free/cheap repurposed and 30% purchased decorative. Total investment for 40+ containers: maybe $100 over several years. Containers don't need to be expensive.
Soil and Growing Medium for Indoor Success
Soil choice is critical for indoor container success.
Why potting mix (not garden soil) is essential: garden soil compacts in containers (eliminating air spaces roots need), drains poorly in containers (causes root rot), is heavy (weight issues indoors), and contains pests/diseases/weed seeds (problematic indoors). Potting mix is specifically designed for containers: fluffy texture, excellent drainage, lightweight, and sterile. I learned this the hard way—I used garden soil once and plants struggled terribly. Never again. Always use potting mix for containers indoors.
Lightweight mixes for indoor use matter when you're moving containers, placing on furniture, or dealing with weight-sensitive locations. Lightweight options: peat or coir-based mixes (lighter than composted bark mixes), high perlite content (perlite is very light), and soilless mixes (no actual soil, just peat/coir + amendments). My indoor potting mix is about 50% potting mix, 30% perlite, 20% coir—very lightweight and works excellently.
Soilless options using coir, peat, and perlite mixes can be even cheaper than commercial potting mix. DIY mix: 40% coconut coir (expands from compressed bricks, $8-12 for huge amount), 30% perlite ($8-12 per bag), 20% vermiculite ($8-12 per bag), 10% compost or worm castings (nutrients). Mix thoroughly, moisten before use. This produces quality growing medium for $15-20 per large batch (equivalent to 5-6 bags of commercial mix at $40-60). I mix my own for large setups. For small beginners, buying premade is easier.
Nutrient requirements for containers are higher than ground growing. Container plants: limited soil volume, frequent watering leaches nutrients, no natural replenishment. Solution: fertilize regularly (weekly or bi-weekly), use quality potting mix with starter nutrients, or add compost/worm castings to soilless mix. I fertilize indoor vegetables every 2 weeks with diluted liquid fertilizer. Without this, plants yellow and stunt within 4-6 weeks.
pH considerations for different vegetables matter less in containers with quality potting mix. Most potting mixes are pH 6.0-7.0 (neutral to slightly acidic) which suits most vegetables. Greens prefer 6.0-7.0, herbs prefer 6.5-7.0, root vegetables prefer 6.0-6.8. Commercial potting mixes are usually fine without adjustment. I've never adjusted pH for indoor vegetables—quality mix works as-is. Only concern: very old mix or weird water might require checking.
Refreshing versus replacing soil: potting mix degrades over time (compacts, nutrients deplete, structure breaks down). Lifecycle: 6-12 months typically for productive use. Options: replace completely (fresh start, costs money), refresh partially (remove top 30%, add fresh mix + compost), or amend (add compost, perlite, nutrients to revitalize). I replace soil annually for long-term plants (herbs that live 1+ years), refresh every 6 months for short-term vegetables, and completely replace after disease issues.
Organic versus conventional for indoor: organic potting mix costs more but avoids synthetic fertilizers and chemicals. Conventional mix includes synthetic fertilizers and sometimes chemical wetting agents. For indoor growing, I slightly prefer organic because: no chemical smell indoors, feels better growing food organically, no real disadvantage. But conventional works fine too. I use whatever is available and affordable. Plants don't care much—proper watering and fertilizing matter more than organic vs. conventional mix.
Mixing your own growing medium saves money for large operations. Worthwhile if: using more than 10+ containers, growing long-term (mixing once for whole year), or interested in optimization and customization. Not worth it if: small scale (3-5 containers), occasional growing, or prioritizing convenience. I mix my own because I have 30+ containers. For smaller growers, buying bagged mix is easier and fine.
Light Optimization Strategies
Maximizing whatever light you have makes or breaks low-light gardening.
Positioning near windows by direction changes everything. South windows (Northern Hemisphere): most light, too intense for some greens in summer, perfect in winter. East windows: morning sun (gentle, 3-5 hours), excellent for most greens, my favorite window direction. West windows: afternoon sun (hot, intense), can be too much for greens, better with filtering. North windows: indirect light all day, surprisingly good for shade greens, where I grow most lettuce. I have plants in east and north windows—both work excellently but for different vegetables.
Using reflective surfaces multiplies available light significantly. Strategies: white walls (reflect 80% of light), aluminum foil or mylar (reflect 90-95% of light), mirrors (reflect light and look nice), white boards or foam core behind plants. I placed white foam boards behind my north window plants—measurable light increase (20-30% more) and better growth. The foil-covered cardboard trick is cheap and effective but looks terrible—I only use it in basement or hidden areas.
Rotating containers for even exposure prevents lopsided growth. Plants grow toward light source (phototropism). If not rotated, they lean dramatically toward windows. Solution: rotate containers 180 degrees every 3-4 days. I rotate weekly as part of watering routine. Takes 30 seconds per container. Results: symmetrical plants instead of lopsided stretching plants. Simple habit with big impact.
Grow lights: when and which type becomes relevant when natural light is insufficient. When needed: north windows in winter (very low light), interior rooms with no windows, basements, or when growing light-demanding vegetables (tomatoes, peppers). Which type: LED (most efficient, best spectrum, slightly expensive upfront), fluorescent (cheap, adequate spectrum, less efficient), or incandescent (inefficient, avoid). I use LED strip lights for supplemental lighting. Cost more upfront but last 10+ years and use minimal electricity.
LED versus fluorescent comparison for grow lights:
LED:
Initial cost: $25-100 per light
Spectrum: excellent (red + blue)
Efficiency: very high (uses 1/3-1/2 electricity of fluorescent)
Lifespan: 50,000+ hours (10+ years)
Heat: minimal
Fluorescent (T5/T8):
Initial cost: $15-50 per fixture
Spectrum: good (full spectrum bulbs available)
Efficiency: moderate
Lifespan: 10,000-20,000 hours (2-4 years)
Heat: moderate
I've used both. For new setups, I buy LED. For existing fluorescent fixtures, I keep using them. Both work for greens.
Light timers and schedules automate lighting and ensure consistency. Timers: mechanical ($8-15) or digital ($15-25). Schedule: most vegetables need 12-16 hours light daily. I run my grow lights 7am-10pm (15 hours)—mimics long summer days. Timer ensures consistency even when I'm away. Set it once, forget it. Timers are essential for artificial lighting—manual on/off gets forgotten or mistimed.
Measuring light with apps helps optimize placement. Smartphone apps: "Lux Meter" (free, measures in lux or foot-candles). Method: measure light at plant level, move plants to compare locations, aim for 1,000-2,000 foot-candles for greens (10,000-20,000 lux). I measured all my windows and growing areas—discovering my north window had more useful light than I thought. Data guides decisions better than guessing.
Maximizing natural light you have through strategic choices: clean windows (dirty windows block 20-40% light), remove obstacles between window and plants, use sheer curtains instead of heavy (diffuses light without fully blocking), keep windows clear of items, and choose lightest/brightest spots for light-demanding plants. I cleaned my windows and measured 15% light increase. Small optimizations compound.
Grow Lights 101: When Natural Light Isn't Enough
For spaces with very limited natural light, grow lights transform possibilities.
Types of grow lights include LED, fluorescent, HID, and incandescent. LED: best for home use, efficient, long-lasting, full spectrum. Fluorescent: good budget option, adequate for greens, less efficient than LED. HID (High Intensity Discharge): very powerful, used commercially, overkill for home use, expensive. Incandescent: terrible efficiency, wrong spectrum, avoid. Focus on LED or fluorescent for home indoor vegetable growing.
Spectrum requirements vary by plant and growth stage. Blue light (400-500nm): promotes leafy growth, prevents stretching, good for greens. Red light (600-700nm): promotes flowering/fruiting, good for tomatoes/peppers. Full spectrum (white): includes all colors, mimics sun, works for everything. For leafy greens: blue-heavy or full spectrum. For fruiting vegetables: red + blue. I use full-spectrum LED lights—they work for everything I grow and look more natural than purple "blurple" lights.
Wattage and coverage area determine how many lights you need. General guideline: 20-40 watts per square foot for leafy greens, 40-60 watts per square foot for fruiting vegetables. Coverage: one 2-foot LED light bar (20-30 watts) covers about 2 square feet. I use two 24-inch LED bars (60 watts total) over a 3x2 foot shelf—about 10 watts per square foot supplementing natural light. For pure artificial light (no natural), double these numbers.
Distance from plants affects light intensity dramatically. Too close: light burns (bleaching, crispy leaves). Too far: insufficient light (stretching, weak growth). General guidelines: LED (12-24 inches above plants), fluorescent (6-12 inches above plants). I keep LEDs 18 inches above plants—close enough for intensity, far enough to avoid burns. Adjust as plants grow—maintain consistent distance.
Duration: how many hours daily depends on natural light supplement vs. sole source. Supplementing natural light: 4-8 hours daily (extending day length). Sole light source: 14-16 hours daily (mimicking full summer day). I run lights 7am-10pm (15 hours) for basement plants with no natural light, or 5pm-midnight (7 hours) for window plants I'm supplementing. More hours isn't always better—plants need dark periods too (12 hours light, 12 hours dark is minimum ratio).
Budget options for $20-50 setups work fine for greens:
Clip-on LED grow light ($15-25): small, portable, good for 1-3 small plants
LED bulb in desk lamp ($12-18): just screw in LED grow bulb, use any lamp
2-foot LED strip light ($25-40): mounts under shelf, covers 2-4 square feet
4-foot fluorescent shop light + grow bulbs ($35-50): old school but works
I started with a $20 clip-on LED. It grew lettuce successfully in a windowless bathroom. Budget options absolutely work.
Premium options and when they're worth it include: programmable spectrum LEDs ($100-300, adjust red/blue ratios), high-output commercial LEDs ($200-500, very powerful), or complete grow tent systems ($300-800+, for serious growing). Worth it if: growing extensively (20+ containers), growing year-round, growing light-demanding plants (tomatoes, peppers), or wanting maximum yields. For casual vegetable growing, budget lights are fine. I've upgraded to mid-range LEDs ($60-100 range) for main shelves but still use budget lights for smaller areas.
Energy costs and efficiency matter for year-round operation. LED efficiency: 20-30 watts for 2-4 square feet, running 15 hours daily = 0.3-0.45 kWh per day, about $3-5 per month at average electricity rates. Fluorescent: 50-80 watts for same coverage = $6-10 per month. Over a year: LED costs $36-60, fluorescent $72-120. LED's higher upfront cost pays back in 1-2 years through lower electricity. I track costs—my total grow light electricity is about $15 monthly for extensive setup (5 lights, 15+ square feet coverage). Very affordable for year-round fresh vegetables.
Watering Indoor Vegetables
Watering indoors is completely different from outdoor watering.
Moisture needs without outdoor evaporation means indoor plants need less frequent watering than you'd expect. Outdoor: sun, wind, heat evaporate water quickly (daily watering common). Indoor: no wind, moderate temperatures, higher humidity (water evaporates slowly). Indoor container watering frequency: every 2-5 days typically versus daily outdoors. I water my indoor greens every 3-4 days in winter, every 2-3 days in summer. Way less frequent than outdoor containers.
Overwatering is the #1 killer indoors, not underwatering. Overwatering causes: root rot (roots suffocate without oxygen), fungal growth (too-wet soil grows mold), fungus gnats (breed in constantly moist soil), and yellowing leaves. Signs: soil stays wet for days, mushy stems, moldy soil surface. I've killed more plants from overwatering than underwatering. The fix: water less frequently, ensure good drainage, let top inch of soil dry before watering again.
Testing soil moisture accurately prevents both over and underwatering. Method: stick finger 1-2 inches into soil. Dry at that depth = water. Moist at that depth = wait. This finger test is more reliable than schedules, guessing, or surface appearance. I check moisture before every watering. Sometimes plants need water, sometimes they don't—the soil tells you. Moisture meters ($8-15) also work but finger is free and equally effective.
Self-watering systems for convenience include: commercial self-watering containers (built-in reservoir), DIY wicking systems (rope wicks water from reservoir), or drip irrigation (automated watering). I use self-watering containers for herbs—they maintain consistent moisture and reduce watering to weekly reservoir fills. For large setups, drip systems make sense. For small setups, self-watering containers or hand watering work fine.
Humidity considerations: indoor air is often dry (30-40% humidity) especially in winter with heating. Most vegetables prefer 50-60% humidity. Dry air affects plants through: faster soil drying, leaf tip browning, increased pest susceptibility. Solutions: group plants together (they create local humidity), use pebble trays (water-filled trays with pebbles, containers sit on pebbles above water), or use humidifier in growing area. I group plants closely—noticeably better performance than isolated plants.
Watering schedules versus responsive watering: schedules ("water every Monday and Thursday") fail because plant needs vary. Responsive watering (check soil, water when needed) succeeds because you're meeting actual needs. I check plants every 2-3 days, water those that need it, skip those that don't. Some plants dry faster (small containers, warm spots). Some dry slower (large containers, cool spots, low light). Responsive watering adapts to these variations.
Drainage management indoors requires handling water that drains out. Options: saucers under containers (catch drainage, empty within hours), elevate containers above saucers on pot feet (prevent sitting in water), or water lightly (enough to moisten soil, not enough to drain significantly). I use saucers and empty them 30-60 minutes after watering. Standing water in saucers leads to root rot and mosquitoes.
Preventing mold and fungal issues in indoor growing: provide air circulation (small fan), don't overwater (let soil dry between waterings), avoid wetting foliage (water soil, not leaves), maintain good spacing (air flows between plants), and clean up dead leaves promptly (they harbor fungus). I run a small oscillating fan near my indoor plants—major difference in preventing mold and fungus. The gentle air movement keeps everything healthier.
Fertilizing Container Vegetables
Indoor container vegetables need regular fertilizing to thrive.
Why indoor vegetables need regular feeding: limited soil volume (nutrients deplete quickly), frequent watering (leaches nutrients out drainage holes), and no natural replenishment (unlike ground soil). Without fertilizing, plants yellow and stunt within 4-8 weeks. I learned this when my first lettuce started yellowing at week 5—I'd never fertilized. Started feeding weekly, plants recovered and thrived.
Liquid versus granular fertilizer both work with different advantages. Liquid: absorbed quickly, easy to adjust strength, convenient for watering simultaneously, needs frequent application (weekly). Granular: slow-release (feeds for weeks/months), convenient (apply once), harder to adjust strength. I use both: slow-release granules mixed into soil at planting (baseline nutrition), liquid fertilizer every 2 weeks (supplemental boost). This combination works excellently.
Organic options include compost tea, fish emulsion, seaweed/kelp fertilizer, and worm castings. Benefits: gentle on plants (hard to over-fertilize), improve soil biology, environmentally friendly. Drawbacks: can smell bad indoors (fish emulsion especially), nutrients release slowly, more expensive per application. I use fish emulsion occasionally but prefer odorless synthetic liquid indoors—the smell of fish fertilizer in my kitchen is unpleasant. Outdoors, organic all the way. Indoors, I compromise.
NPK ratios for leafy versus fruiting vegetables guide product selection. Leafy vegetables (lettuce, greens, herbs): want higher nitrogen (N) for leaf growth. Ideal: 3-1-2 or 5-3-3 (N-P-K). Fruiting vegetables (tomatoes, peppers—if attempting indoors): want balanced or higher phosphorus/potassium. Ideal: 5-10-10 or similar. I use balanced 10-10-10 for everything—works fine. Specialty ratios optimize but aren't necessary for casual growing.
Frequency varies by fertilizer type and plant growth rate. Liquid fertilizer: weekly for fast-growing (lettuce, microgreens), bi-weekly for moderate (herbs), monthly for slow-growing (perennials). Slow-release granules: every 2-3 months (they release gradually over time). I fertilize greens every 2 weeks with half-strength liquid fertilizer. This schedule keeps them green and productive without over-fertilizing.
Signs of over-fertilization include: brown crispy leaf tips/edges, white crusty deposits on soil surface (salt buildup), very dark green leaves (too much nitrogen), or stunted growth despite good care. I've over-fertilized a few times—the crusty white salt on soil surface is the telltale sign. Fix: flush soil with water (water heavily until it drains thoroughly, washing away excess salts), reduce fertilizer concentration, or repot in fresh soil if severe.
Signs of deficiency vary by nutrient. Nitrogen deficiency: overall yellowing (especially older/lower leaves), slow growth. Phosphorus: purple tinge to leaves, poor root development. Potassium: brown leaf edges, weak stems. Iron: yellowing with green veins (interveinal chlorosis). Calcium: distorted new growth. Most common indoors: nitrogen deficiency (everything needs nitrogen for growth). Solution: increase fertilizing frequency or strength. I see nitrogen deficiency most often—starts as subtle yellowing, progresses to severe if not addressed.
Budget-friendly fertilizing strategies reduce costs. Options: mix own liquid fertilizer from dry soluble powder (cheaper per gallon than pre-mixed), use compost tea (free if you compost), dilute commercial fertilizer to half-strength and apply more frequently (makes bottles last longer), or collect grass clippings for nitrogen tea (steep in water, free nitrogen). I buy concentrated liquid fertilizer ($12 for bottle that makes 50+ gallons diluted) rather than ready-to-use bottles. Lasts all year, very economical.
Temperature and Humidity Control
Indoor growing means managing climate conditions for plant health.
Ideal temperature ranges by vegetable vary significantly. Cool-season vegetables (lettuce, spinach, arugula, Asian greens, peas): prefer 60-70°F, tolerate 50-75°F, struggle above 75°F (bolt, become bitter). Warm-season vegetables (tomatoes, peppers, basil): prefer 70-85°F, struggle below 60°F (slow growth, poor fruit set). Herbs: most prefer 65-75°F. I grow cool-season vegetables year-round because my apartment stays 65-72°F—perfect for them. Warm-season plants struggle in winter when temps drop to 62-65°F.
Cool-season crops indoors in 60-70°F conditions thrive because this matches their evolutionary preferences. These vegetables evolved in temperate climates with moderate temperatures. Too hot = stress (bolting, bitterness, disease susceptibility). Indoor growing avoids extreme summer heat—actually ideal for these crops. My lettuce grows better indoors in controlled temps than outdoors where summer temps hit 85-95°F and cause immediate bolting.
Managing winter heating effects on plants: forced-air heating creates: very dry air (30-40% humidity), temperature fluctuations (thermostat cycles), and warm dry air rising. Impacts: faster soil drying, leaf tip browning, increased pest problems (spider mites love dry heat). Solutions: group plants away from heat vents, use humidifier or pebble trays, monitor moisture more frequently. I moved plants away from heating vent—dramatic improvement in health.
Humidity requirements are 40-60% ideal for most vegetables. Indoor air: often 30-40% (dry), sometimes lower in winter heating. Low humidity causes: crispy leaf edges, stunted growth, increased spider mite problems. High humidity (over 70%) causes: mold, fungal disease, poor pollination. I maintain 45-55% humidity in my growing area using: grouped plants (transpiration creates local humidity), pebble trays, and occasional misting.
Increasing humidity without mold requires balance. Safe methods: group plants closely (create microclimate), pebble trays (water evaporates without wetting soil), humidifier running intermittently (boosts room humidity), misting in morning (leaves dry before night). Unsafe: constant misting (wet leaves promote fungus), poor air circulation (damp stagnant air grows mold), overwatering (wet soil + high humidity = fungus). I use grouping and pebble trays—effective without mold risk.
Air circulation importance cannot be overstated for indoor growing. Benefits: prevents fungal disease (moving air stops mold/mildew), strengthens stems (slight movement triggers growth response), distributes heat/humidity (eliminates pockets), reduces pests (some insects dislike breeze). I run a small 6-inch oscillating fan on low 24/7 near my plants. Not pointed directly at them (too much drying), just creating gentle air movement. Plants are noticeably healthier with fan versus without.
Protecting from drafts and vents: while air circulation helps, cold drafts harm plants. Avoid: placing plants in direct line of AC vents (cold blast), near frequently opened doors (temperature shock), or in drafty windows (cold at night). I learned this when plants near my leaky window struggled in winter—moved them 3 feet away and they recovered. Gentle circulation = good. Cold drafts = bad.
Seasonal adjustments to temperature and humidity: Winter (heating season): lower humidity, warmer days/cooler nights, drier air—increase watering frequency, add humidity, protect from vents. Summer (AC season): moderate humidity, consistent temps, AC drying—monitor moisture, less humidity needed. Spring/fall (minimal heating/cooling): ideal conditions, minimal adjustments. I adjust care seasonally—more attention to humidity in winter, less in summer.
Pest Management in Indoor Gardens
Indoor growing reduces pests dramatically but doesn't eliminate them.
Common indoor pests I've encountered: Aphids (small soft-bodied insects, cluster on new growth, suck plant sap), fungus gnats (small flies around soil, larvae eat roots), spider mites (tiny mites, fine webbing, stippled leaves), and whiteflies (small white flying insects, cluster on leaf undersides). I've dealt with all of these. Early detection and treatment prevents infestations.
Prevention through cleanliness is the best pest management. Practices: inspect new plants before bringing inside (quarantine first), don't reuse infested soil, clean up dead leaves and debris promptly, sterilize containers between uses, avoid overwatering (fungus gnats breed in wet soil), maintain good air circulation. I've prevented most pest problems through these habits. Clean growing environment = fewer pests.
Early detection strategies catch problems when they're manageable. Weekly inspection routine: check leaf undersides (where pests hide), look for sticky honeydew (aphid secretion), watch for webbing (spider mites), notice small flies (fungus gnats), observe any leaf damage. I inspect plants every few days during watering. Early-stage infestations (a few aphids) are easy to control. Late-stage infestations (covering entire plant) are much harder.
Organic pest control methods work well indoors. Insecticidal soap spray (1 tsp dish soap per quart water, spray pests directly): kills soft-bodied insects (aphids, whiteflies), safe for edibles, need repeated applications. Neem oil (follow product instructions): broad-spectrum, organic, leaves slight smell. Physically removing pests: spray off with water, wipe leaves with damp cloth, prune heavily infested parts. I use soap spray for most issues—cheap, effective, safe.
Quarantining new plants prevents introducing pests to established plants. Protocol: keep new plants separate for 2-3 weeks, inspect thoroughly and repeatedly, treat preventatively if suspicious, only introduce to main area when confirmed pest-free. I've introduced pests via new plants twice—now I quarantine religiously. The inconvenience is much less than dealing with infestations in my entire collection.
When to give up versus treat depends on infestation severity and plant value. Give up if: infestation is severe (covering plant entirely), plant is cheap/easy to replace (lettuce, etc.), or treatments aren't working after 3-4 attempts. Treat if: caught early (manageable population), plant is valuable (productive herb you've maintained for months), or willing to invest effort. I've given up on badly infested lettuce (just pull it, plant new seeds for $0.10) but fought for a 2-year-old rosemary plant (invested time and history).
Avoiding pest introduction in first place: buy healthy plants (inspect before purchase), don't bring plants in from outdoors without treatment, wash reused containers thoroughly, use fresh sterile potting mix, maintain plant health (healthy plants resist pests better). I'm much more careful now about what enters my growing space. Prevention beats treatment every time.
Pet and child-safe treatments matter for many households. Safe options: insecticidal soap (plain dish soap), neem oil (can smell strong but non-toxic), manual removal, sticky traps (for flying insects). Avoid: synthetic pesticides (toxic if ingested), anything sprayed on edible plants immediately before harvest. I only use soap spray on edibles—completely safe even if residue remains when I harvest.
Space-Efficient Growing Systems
Maximizing production in limited space requires creative systems.
Vertical growing on walls using wall-mounted planters, pocket planters, or pegboard with containers dramatically increases capacity. One wall (3x6 feet = 18 square feet): could hold 1-2 floor containers traditionally, or 15-20 wall-mounted pockets (900% increase in planting space). I installed fabric pocket planter on a kitchen wall—12 pockets on 2x3 feet of wall space. Grows herbs and small greens. Uses wall space that was previously wasted.
Tiered shelving systems create multiple growing levels in single footprint. A 2x4 foot floor area with 3-shelf unit (each shelf 2x4): creates 24 square feet of growing space (3 shelves × 2 × 4) from 8 square feet of floor space. Add grow lights under each shelf for plants below. I use wire metro shelves (6 feet tall, 4 shelves, 2x4 feet) in my basement—32 square feet of growing space from 8 square feet of floor. Game-changing for small apartments.
Hanging planters for trailing vegetables like pea shoots, cascading lettuce varieties, or strawberries utilize overhead space. Each hanging planter: zero floor space used, grows 1-3 plants depending on size. I have three hanging planters (ceiling hooks, $3 each) growing pea shoots and lettuce. They use space that was completely empty air. Bonus: hanging plants get better light since they're elevated toward windows/lights.
Window box arrangements maximize window sill space. Standard window (3 feet wide): can hold window box with 6-10 lettuce or herb plants versus maybe 2-3 standard pots on the sill. I use a long narrow window box (30 inches × 6 inches × 6 inches deep) growing lettuce, arugula, and chives. Produces way more per inch of window than individual pots.
Countertop gardens utilize kitchen counter space productively and conveniently. Benefits: near water source (easy watering), near where you cook (easy harvesting), attractive (decorative and functional). I keep 3-4 herb containers on my kitchen counter—use them daily while cooking. The convenience means I actually use the herbs versus forgetting about them in another room.
Cart systems for movable gardens allow repositioning based on light, season, or space needs. Rolling cart: move to window for light, roll away for floor space, relocate to different rooms seasonally. I use a three-tier rolling cart for microgreens—roll near east window for morning sun, roll to counter for harvesting. Mobility is very valuable in dynamic living spaces.
Maximizing cubic feet versus square feet is the key insight. Floor space is limited (square feet), but vertical space is abundant (cubic feet). Traditional thinking: how many containers fit on floor. Space-efficient thinking: how many containers fit in the room volume including walls, shelves, hanging, stacking. I shifted from 12 floor containers (limited by floor space) to 35+ total containers (utilizing vertical space). Mindset shift enabled massive increase.
Multi-level lighting setups support vertical growing. Simple: one grow light high up (covers top shelf only), plants below get window light. Advanced: grow light under each shelf (every level independently lit). I have lights under top and middle shelves—bottom shelf gets window light only. This supports productive plants on all three levels. Initial setup cost more but ongoing production justified it.
Harvesting and Succession Planting
Proper harvesting and replanting keep production continuous.
Cut-and-come-again harvesting extends single planting for weeks/months. Method: harvest outer/lower leaves, leave growing center intact, plant continues producing new leaves. Works for: lettuce, kale, chard, Asian greens, beet greens, herbs. I harvest lettuce this way for 6-8 weeks before plants decline. Compare to harvesting entire head once (then it's done)—cut-and-come-again produces 5-10x more per plant.
Proper harvesting to extend production means cutting (not tearing) with clean knife/scissors, harvesting in morning (leaves are turgid, plant recovers better), not removing more than 1/3 of leaves at once (leave enough for photosynthesis), removing outer/older leaves first (center/new leaves keep growing). I follow these practices religiously—plants produce way longer with proper harvesting versus haphazard grabbing.
When to harvest each vegetable type for optimal flavor and yield:
Lettuce: when leaves are 4-6 inches (baby), 6-8 inches (full size), before bolting
Spinach: before bolting (once flowering starts, turns bitter)
Arugula: young leaves (2-4 inches) are mild, older leaves (5-6 inches) are spicier
Kale: outer leaves anytime after plant has 5-7 leaves total
Microgreens: when first true leaves appear (7-14 days)
Radishes: when shoulders emerge from soil (25-35 days), don't wait too long (they get woody)
Herbs: regularly (every 1-2 weeks encourages bushiness)
Succession planting schedules create continuous harvests instead of feast-then-famine. Method: plant small amounts every 1-3 weeks instead of everything at once. Example: lettuce takes 6 weeks. Plant one container every 2 weeks = harvest every 2 weeks continuously. I maintain rolling plantings of lettuce (plant 2 containers bi-weekly), radishes (plant 1 container weekly), and microgreens (plant 2 trays weekly). Always something ready to harvest.
Staggering plantings for continuous harvest requires discipline and tracking. I keep a simple calendar: note what I plant and when. Two weeks later, calendar reminds me to plant next succession. Without tracking, I'd forget and have gaps in production. Even simple notes on phone calendar work. The system ensures I plant regularly, which ensures I harvest regularly.
Replanting frequency depends on plant lifecycle. Fast crops (microgreens): replant weekly or bi-weekly. Medium crops (lettuce, arugula): replant every 2-3 weeks. Slow crops (kale, chard): single planting lasts 3-6 months with cut-and-come-again harvesting. Herbs: rarely replant (perennials last years, annuals last 6-12 months). I'm constantly replanting microgreens and lettuce. Herbs and kale I planted once and are still going a year later.
Extending the productive life of plants through proper care: regular harvesting (stimulates new growth), consistent fertilizing (provides nutrients for continuous production), removing flower buds (prevents bolting/flowering which ends leafy production), maintaining ideal temperatures (prevents stress), and good light (adequate light supports ongoing photosynthesis). I've kept lettuce plants producing for 10-12 weeks through these practices versus typical 6-8 weeks.
Knowing when to start over: plants eventually decline (pest damage, disease, old age, bolting). Signs it's time: severe yellowing/deterioration, bolted to seed (lettuce gets bitter), heavy pest infestation (easier to replace than treat), or slow growth despite good care (just worn out). I pull declining plants without guilt and immediately replant. Fresh plants outperform declining plants dramatically. Starting over beats trying to revive dying plants.
Common Mistakes and How to Avoid Them
Learning from these mistakes saves months of frustration.
Starting with difficult vegetables sets beginners up for failure. Difficult for low-light: tomatoes (need very high light, 8+ hours), peppers (similar to tomatoes), fruiting vegetables generally, and basil (needs more light than most herbs). Easy for low-light: lettuce (almost foolproof), microgreens (very easy), arugula (fast and forgiving), Asian greens (tolerant and productive). I started with lettuce, microgreens, and green onions—all succeeded, building confidence. Friends who started with tomatoes got discouraged when nothing fruited.
Overwatering is the most common failure, killing more indoor plants than all other causes combined. Signs: constantly wet soil, yellowing leaves, moldy soil surface, fungus gnats, mushy stems. Causes: watering too frequently, no drainage holes, poor drainage, too-large container for plant size. Fix: water only when top 1-2 inches of soil are dry, ensure drainage holes, improve soil drainage, right-size containers. I killed probably 30% of my first plants through overwatering before learning to check soil moisture before each watering.
Using garden soil leads to compaction, drainage problems, and plant failure. Garden soil in containers: compacts (eliminating air), drains poorly (roots rot), is heavy (indoor issues), contains pests/diseases. Always use potting mix designed for containers. I tried garden soil once—complete disaster. Plants struggled, soil turned brick-hard, drainage failed. Never again. This is non-negotiable: potting mix only.
Overcrowding containers creates competition and stunted growth. Proper spacing: lettuce 4-6 inches apart, herbs 6-8 inches, radishes 2-3 inches. Beginners often plant too densely thinking "more plants = more production." Actually: proper spacing = healthy plants = more total production. I've overcrowded containers trying to maximize space—all plants stayed small. Properly spaced plants in same size container produced more total yield.
Insufficient light causes stretching, weak plants, and poor growth. Signs: stems stretching toward light (etiolation), very pale leaves, slow growth, leggy weak stems. Prevention: match plants to available light, supplement with grow lights if needed, position in brightest available spots, or choose shade-tolerant vegetables only. I've had basil stretch to 2 feet tall and produce almost nothing in low light—it needed more light than I had available.
Forgetting to fertilize results in yellowing, stunted plants after 4-8 weeks. Container plants deplete nutrients quickly (limited soil, frequent watering leaches). Reminder: fertilize every 1-2 weeks with diluted liquid fertilizer or use slow-release granules. I set phone reminders to fertilize bi-weekly—prevents forgetting. Before reminders, I'd forget for weeks and wonder why plants yellowed.
Wrong container sizes for plant types: too shallow for roots, too small for mature size, too large for young plants. Depth requirements: know them (leafy greens 6-8 inches, carrots 12+ inches). Width requirements: match to plant count and mature size. I've grown carrots in too-shallow containers (deformed roots), herbs in too-small pots (root-bound and stunted), and seedlings in too-large containers (overwatering problems). Right-sizing matters enormously.
Giving up too soon before plants establish or mature. Many vegetables: slow to germinate (parsley 2-3 weeks), slow initial growth (first few weeks), or reach production gradually. Impatience kills attempts. I've seen beginners give up after 2 weeks saying "nothing's happening" when seed packet said 6 weeks to maturity. Give plants the time they need. Microgreens (7-14 days) are great for impatient people. Carrots (60-75 days) require patience.
Real-World Indoor Garden Examples
Seeing real examples helps visualize what's possible.
Small apartment kitchen herb garden (my first setup): space was 2 feet of kitchen counter near north window. Setup: four 6-inch pots (parsley, chives, mint, cilantro), basic potting mix, hand-watering every 3-4 days, liquid fertilizer bi-weekly. Investment: $25 total (pots $12, soil $6, plants $7). Results: continuous fresh herbs for cooking, saved $15-20 monthly on store-bought herbs, looked attractive on counter. This simple starter setup launched my indoor growing obsession.
Basement microgreens operation (friend's setup): space was 4x8 feet of basement with zero natural light. Setup: two wire metro shelves (4 shelves each), fluorescent shop lights under each shelf (8 lights total), 40 microgreen trays in rotation, coco coir growing medium. Investment: $200 initial (shelves $120, lights $60, trays $20). Results: 2-3 pounds microgreens weekly, started selling surplus to friends and local restaurant, paid for setup in 2 months. Proves low-light basement growing works with artificial lighting.
North-facing window vegetable setup (my current setup): space was 6-foot north-facing window with no direct sun. Setup: window box with lettuce and arugula, four 8-inch pots on sill (various greens), three hanging planters (pea shoots), all natural light (no grow lights). Investment: $40 (containers and soil). Results: continuous salad greens March-November (8-9 months), 3-5 servings of greens weekly, complete success with natural north light only. Proves shade vegetables truly work in low-light.
Grow light shelf system on $100 budget: space was 2x4 feet of wall space. Setup: three-shelf wire shelf ($30), two LED strip lights ($40 for both), twelve 4-inch containers ($15), potting mix ($8), seeds ($7). Total: $100. Planting: lettuce, spinach, arugula, microgreens, herbs. Results: 15-20 containers producing on 8 square feet floor space, year-round growing regardless of outdoor season, harvests 2-3 times weekly. This is my recommended beginner complete setup—everything needed in one $100 investment.
Year-round salad green production (intensive setup): space was dedicated spare bedroom (10x10 feet). Setup: five wire metro shelves with lights (30 square feet growing space), 60+ containers in rotation, mix of mature greens and microgreens, timer-controlled lights, organized succession planting schedule. Investment: $800 (shelves $300, lights $350, containers $100, supplies $50). Results: complete salad green self-sufficiency (never buy lettuce), surplus for friends/family, enormous grocery savings ($100+ monthly), year-round regardless of season/weather. Proves indoor growing scales from hobby to serious food production.
Maximalist approach (40+ containers, my current total): spread across apartment in every available spot. Setup: window gardens (10 containers on sills), kitchen counter herbs (5 containers), basement shelf system (25 containers with lights), living room decorative edibles (5 containers). Investment: accumulated over 3 years (~$400 total). Maintenance: 1-2 hours weekly. Results: 60-80% of consumed salad greens, all fresh herbs, continuous year-round harvests, enormous satisfaction and grocery savings. Shows that indoor growing can scale to significant household food production.
Minimalist approach (5 containers, maximum value): space was any apartment with one window. Setup: five containers chosen strategically: 1 lettuce (continuous harvest), 1 arugula (fast turnover), 2 microgreen trays (rotated weekly), 1 herb (parsley or chives). Investment: $15 total. Maintenance: 15 minutes weekly. Results: fresh greens 2-3 times weekly, one fresh herb, cost-effective ($15 setup pays for itself in 1-2 months), beginner-friendly. This is the absolute minimum viable indoor garden—proves you can grow meaningful food with tiny investment.
Before and after transformations I've witnessed: Friend's dark apartment before = buying $20 weekly in greens/herbs that wilted in fridge. After (with $60 north-window garden) = fresh greens daily, zero grocery spending on greens/herbs, $80+ monthly savings. My basement before = unused dark space. After (with $250 shelf/light setup) = productive year-round growing area, microgreens supply, 30+ containers. The transformations prove that low-light indoor growing converts unused, unproductive spaces into food-producing assets.
Conclusion
After covering everything from science to specific vegetables to complete growing systems, let me bring this back to the essential truth: you absolutely can grow fresh vegetables indoors in low-light conditions. It's not theoretical or aspirational—it's practical and achievable.
The core message is that low-light doesn't mean no vegetables, it means choosing the right vegetables. Leafy greens, microgreens, herbs, and some root vegetables thrive in conditions that would never support tomatoes or peppers. Work with your actual light instead of fighting it, and you'll be amazed at what produces.
Start with just 2-3 easy vegetables. My recommendations for absolute beginners: one container of loose-leaf lettuce, one or two trays of microgreens (pea shoots or radish), and one herb (parsley or chives). These three will succeed in almost any low-light conditions, build your confidence, and provide real food. Total investment: under $20. Time to first harvest: 1-4 weeks depending on what you chose.
Remember that fresh food year-round is genuinely achievable through indoor growing. Outdoor gardens are seasonal—you get massive harvests for a few months, then nothing. Indoor low-light gardens produce continuously year-round. The per-week yield is lower but the annual total can actually be higher because you're harvesting 52 weeks instead of 16-20 weeks.
I encourage you to share your indoor growing success in the comments. What vegetables have you grown successfully indoors? What has failed? What's your light situation and what works for you? The collective experience of indoor growers helps everyone learn and improve.
Final encouragement: don't let limited light stop you from growing food. I've proven across multiple apartments, basements, and windowless spaces that vegetables grow in surprisingly low light. Your north window, shaded east window, or even a bright room with no direct sun can produce real food. The limiting factor isn't light—it's starting.
Your indoor vegetable garden is waiting. Plant some seeds today and see what grows. You might be as surprised as I was when "impossible" lettuce started sprouting in my dark north-facing apartment window. Start small, learn constantly, harvest continuously, and enjoy the freshest vegetables you've ever tasted—grown right in your home regardless of how much light you have.
Now go plant something!