How to Grow Microgreens on Your Kitchen Counter: The Complete Beginner's Guide
Learn exactly how to grow microgreens on your kitchen counter — from choosing seeds to harvesting in 7 days. Real tips from someone who's been growing microgreens at home for years.
TINY PLOT BEGINNERS: YOUR FIRST HARVEST STARTS HERE
Introduction
Here's a fact about microgreens that genuinely stopped me in my tracks the first time I read it: research published by the USDA found that microgreens contain up to 40 times higher concentrations of nutrients than their mature counterparts. Forty times. The tiny seedling you harvest at one inch tall can pack more vitamin C, vitamin E, beta-carotene, and other essential nutrients per gram than the full-grown plant it would have become. For something you can grow on your kitchen counter in a week, that's a pretty extraordinary nutritional payoff.
I started growing microgreens about six years ago in a tiny apartment kitchen with exactly zero counter space to spare. I was skeptical that it would be worth the effort — I imagined complicated equipment, daily fussing, probably a lot of mold. Instead I discovered the most forgiving, fastest, most immediately satisfying food-growing experience I've ever had. My first tray of radish microgreens was ready to eat nine days after I planted the seeds. Nine days. I'd grown food from scratch in under two weeks on my kitchen counter with a plastic tray and some potting mix. I was immediately hooked.
Here's what nobody tells you when they're talking up microgreens: they're not just nutritious and fast. They're genuinely delicious in a way that changes how you cook. Fresh pea shoots with that sweet, verdant flavor. Radish microgreens with their spicy kick. Sunflower shoots with their nutty richness. These aren't garnishes you scatter on a plate to look fancy — they're ingredients with real flavor impact that make everything they touch better. And growing them yourself, continuously, on your counter, costs a fraction of what you'd pay for the sad little plastic clamshells at the grocery store.
This guide covers everything — varieties, equipment, the exact step-by-step process, watering technique, harvesting, succession planting, and all the troubleshooting you'll ever need. Let's grow something delicious.
Why Microgreens Are the Perfect Kitchen Counter Crop
Let me make the full case for microgreens as a kitchen counter staple, because I think most people who haven't tried growing them underestimate how different the experience is from other forms of indoor food growing. Microgreens aren't just a small, fast version of regular vegetable growing. They're a fundamentally different category — one where the usual constraints of indoor food production (space, light, time, equipment) barely apply.
First, let's clear up what microgreens actually are, because the terminology gets confused. Sprouts are germinated seeds grown entirely in water or air, with no growing medium, harvested at the seed-leaf stage before they develop true leaves. Baby greens are young plants harvested at the early true-leaf stage, typically grown in soil or growing medium and harvested at two to four inches tall. Microgreens sit between these two — they're grown in a shallow growing medium, harvested after the seed leaves (cotyledons) have fully emerged but before or just as the first true leaves develop, typically at one to three inches tall. That specific growth stage is where the extraordinary nutritional density research points — those cotyledon leaves are packed with the concentrated energy and nutrients the plant stored in the seed, mobilized into the first leaves before the plant can produce energy through photosynthesis. It's a nutritional window that closes as the plant matures.
The speed of microgreens is their most immediately compelling practical advantage. We're talking seven to fourteen days from seed to harvest for most varieties — some fast-movers like radish are ready in as little as six days under good conditions. Compared to the weeks or months required to grow mature vegetables, this turnaround is extraordinary. It means feedback is rapid — if something goes wrong, you know within days and can adjust on the next tray. It means rewards are immediate — the gratification of growing your own food doesn't require months of waiting. And it means mistakes are cheap in terms of time — a failed tray costs you a week and a few dollars, not a whole growing season.
The cost comparison between store-bought and home-grown microgreens is one of the most compelling economic arguments for growing anything yourself at kitchen scale. A small clamshell of microgreens at a farmers market or health food store typically costs four to eight dollars and contains maybe an ounce or two of greens. A kilogram of quality radish microgreen seeds costs roughly fifteen to twenty-five dollars and contains enough seeds for dozens of trays — each tray producing three to four ounces of finished microgreens. The per-ounce cost of home-grown microgreens, once you have your basic equipment, is roughly five to ten cents compared to three to five dollars at retail. It's genuinely one of the most cost-effective ways to access high-quality, fresh, nutritious food available to anyone.
The Best Microgreen Varieties for Beginners
Variety selection matters more in microgreens than beginners usually expect, and getting it right from the start — by choosing varieties that germinate reliably, grow vigorously, and reward beginners with rapid, dramatic results — makes the difference between a first experience that creates a lasting habit and one that creates discouragement.
Radish microgreens are my number one recommendation for the absolute first tray, no exceptions. They germinate faster and more uniformly than almost any other microgreen variety — often showing roots within twenty-four hours of planting and full cotyledon emergence within four to five days. They grow vigorously with minimal fuss. They're resistant to the mold issues that plague more sensitive varieties. And the flavor — peppery, bold, slightly spicy — is genuinely delicious and versatile in cooking. The visual appearance of ready-to-harvest radish microgreens — bright green cotyledons on vivid pink or purple stems, depending on the variety — is beautiful. 'China Rose' radish produces gorgeous magenta stems that make a visually stunning tray. 'Daikon' radish produces a milder flavor. Any radish variety works for microgreens and all of them reward beginners immediately.
Sunflower microgreens are my second most enthusiastic recommendation and probably my personal favorite for flavor. The thick, substantial stems and large, meaty cotyledons give sunflower microgreens a satisfying texture and a rich, nutty flavor that's unlike anything else in the microgreen world. They take slightly longer than radish — typically ten to fourteen days to harvest — and they need pre-soaking to germinate well, but the growing process is reliable and the harvest is dramatic. A tray of mature sunflower microgreens at harvest is a genuinely impressive thing — dense, lush, chunky, and beautiful. The flavor works brilliantly in sandwiches, grain bowls, and anywhere you want something with substance rather than delicacy.
Pea shoots — the microgreens of snow peas, sugar snap peas, or regular peas — are the sweet, delicate counterpart to radish's spice and sunflower's nuttiness. They taste like fresh peas distilled into a tender shoot — sweetly vegetal, clean, and genuinely delicious raw. They grow tall relative to other microgreens — often reaching three to four inches at harvest — with attractive curling tendrils that look beautiful on a plate. They need soaking before planting and take ten to fourteen days to reach harvest size. Pea shoots are a revelation the first time you taste them fresh from the tray and they consistently convert skeptics into committed microgreen growers.
For medium-difficulty varieties worth trying once you've had success with the beginner crops: broccoli microgreens have a mild, slightly earthy flavor and are one of the most nutritionally dense options — high in sulforaphane, a compound studied extensively for its health-protective properties. Kale microgreens are similar in character to broccoli and equally nutritious. Mustard microgreens bring significant heat — more intense than radish — in an attractive, feathery-leaved package. Amaranth microgreens are visually extraordinary — deep magenta-pink stems and leaves that look almost artificial — with a mild, slightly beet-like flavor. These varieties germinate well but are somewhat more sensitive to mold and require more careful moisture management than the beginner trio.
What to avoid as a complete beginner: carrot and herb microgreens like basil and cilantro germinate slowly and unevenly, making them frustrating starting points. Wheatgrass requires a specific juicing context to be useful and a different approach than most microgreens. Any variety you can't find specifically labeled for microgreen use — many vegetable seeds are treated with fungicides or other coatings inappropriate for food at the microgreen stage and should be avoided entirely.
Equipment and Supplies You Actually Need
One of the most refreshing things about microgreens as a food crop is the minimal equipment requirement. I'm going to be deliberately honest here about what's actually necessary versus what's marketed to beginners as essential — because the microgreen supply market can make simple growing feel complicated and expensive when it genuinely isn't.
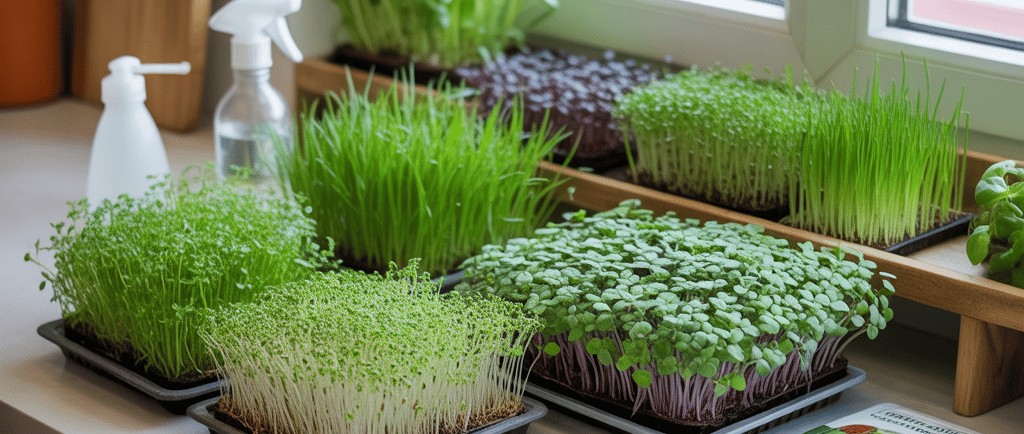
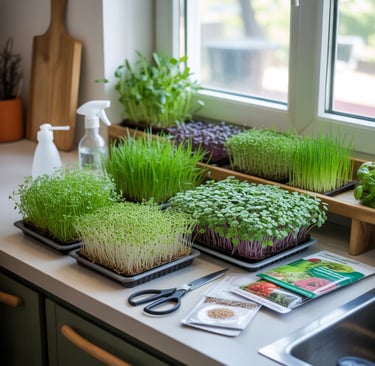
Growing trays are the primary piece of equipment and the choice between sizes and configurations has real practical consequences. The standard horticulture 1020 tray — ten inches wide by twenty inches long, roughly the size of a standard baking sheet — is the industry standard for microgreen growing and what most guides and suppliers are calibrated for. It fits neatly on a kitchen counter, holds enough growing medium for a substantial harvest, and is available everywhere for under two dollars each. I use 1020 trays as my standard and recommend them to most beginners for that reason. Smaller trays — half-size 1020s, five-by-five inch trays, even repurposed food containers — work perfectly well for smaller harvests or for trying new varieties without committing to a full tray. For the bottom-watering method I'll describe later, you need two trays — one with drainage holes that holds the growing medium and plants, and one without holes that sits underneath to hold water.
Growing medium is the surface your seeds germinate in and your roots grow through, and the options have different practical implications for beginners. Standard potting mix works well for microgreens and is the most accessible option for someone starting without specialty supplies — just make sure it's fine-textured without large chunks, and avoid mixes with slow-release fertilizer pellets that aren't appropriate for the microgreen growing timeframe. Coco coir — compressed coconut fiber — is my personal preference for microgreen growing. It's clean, lightweight, has excellent moisture retention and drainage, supports vigorous root development, and is reusable between crops with proper cleaning. Hemp fiber mats are a soilless option favored by growers who prioritize cleanliness and reusability — seeds germinate on the mat's surface and roots thread through it, producing clean harvests with no growing medium in the cut stems. Hemp mats are more expensive per tray than coco coir or potting mix but produce aesthetically cleaner results.
Seeds for microgreens need to be specifically sourced as microgreen seeds for one critical reason: vegetable seeds sold for growing mature crops are sometimes treated with fungicide coatings or other treatments that are safe for mature plant production but inappropriate for food harvested at the seedling stage. Always buy seeds explicitly sold as microgreen seeds or certified untreated seeds from a supplier who confirms their appropriateness for microgreen use. Reputable suppliers include True Leaf Market, Johnny's Selected Seeds, Mumm's Sprouting Seeds, and several others — buying in larger quantities (bulk ounces or pounds rather than small packets) reduces the per-tray seed cost dramatically and is worth doing once you've established which varieties you grow regularly.
A spray bottle is the only watering equipment strictly necessary for small-scale microgreen growing — a fine-mist spray bottle for initial seeding moisture and a gentle rinse over seedlings in early stages. Once you move to bottom watering (which I'll explain in detail in the watering section), you don't even need a spray bottle for most of the growing process — just a measuring cup or small pitcher to add water to the bottom tray. A kitchen scale is genuinely useful for consistent seed density across trays — measuring seeds by weight rather than volume gives much more consistent results — but you can manage without one, especially for larger-seeded varieties where eyeballing coverage is easier.
Setting Up Your Microgreen Growing Station
The physical setup of your microgreen growing station on your kitchen counter determines how sustainable and enjoyable the practice is as an ongoing habit. A setup that's convenient to access and maintain becomes a genuine kitchen staple. One that's awkward, takes up too much space, or creates mess becomes something you gradually abandon. Getting the setup right from the beginning makes the difference.
Location on your counter matters primarily for two reasons: light availability and temperature consistency. Microgreens don't need much light during germination — they're actually covered during this phase — but once they move to the light phase, they benefit from as much bright indirect light as possible if you're not using a grow light. A counter near your brightest window, ideally a south or east-facing one, gives natural light microgreens their best chance. Away from heat vents and cold drafts keeps temperatures in the consistent moderate range microgreens prefer. If you're in a kitchen where counter space is genuinely at a premium, a small shelf or rolling cart positioned near a window is an excellent alternative that doesn't sacrifice valuable counter real estate.
Light requirements for kitchen counter microgreens are more modest than for most other food crops, which is one of the reasons they're so accessible as a countertop crop. During germination and the blackout phase — the first three to five days for most varieties — no light is needed at all. Once the blackout period ends and trays move to light, microgreens that will be harvested within a week or two can do surprisingly well in moderate indirect light near a window. The cotyledons that constitute the harvested portion are loaded with nutrients regardless of light intensity — what light primarily affects is the length and color of the stems, with more light producing shorter, more vividly colored stems and less light producing taller, paler ones. A bright window in most apartment kitchens is sufficient for aesthetically acceptable microgreens. A dedicated LED bar light positioned four to six inches above the trays produces dramatically more uniform, colorful, compact growth and is worth adding if you grow microgreens regularly.
Temperature sits in an interesting middle position for microgreens — they're more tolerant of temperature variation than most food crops, but temperature does affect germination speed and growth rate significantly. Most microgreen varieties germinate best and grow most vigorously at temperatures between 65°F and 75°F (18°C to 24°C). This is the range most kitchens maintain naturally, which is part of why kitchen counters are such practical microgreen growing spots. Avoid locations near ovens or toasters that create heat spikes, or near windows that get cold drafts in winter — consistency matters more than hitting an exact temperature.
Organizing multiple trays for succession growing — the practice of starting a new tray every few days so you always have one ready to harvest — is something worth thinking through before you start, because the physical setup you build should accommodate two to four trays in different growth stages simultaneously. A simple wooden shelf, a small baker's rack, or a tiered plant stand near a window creates the vertical space for multiple trays without consuming horizontal counter space. I have a three-tier shelf next to my kitchen window that holds up to four 1020 trays and takes up a footprint of roughly twelve by twenty inches on the floor — essentially nothing. The whole setup is intentional and visible enough that it functions as a bit of kitchen decor as well as a food production system.
The Complete Step-by-Step Growing Process
This is the section I wish someone had given me before my first tray — a clear, sequential walkthrough of exactly what to do and when to do it, without the vagueness that characterizes a lot of microgreen guidance. Follow these steps and your first tray will work.
Step one is seed soaking, and whether you need it depends on your variety. Large-seeded microgreens — sunflowers, peas, corn, beets, chard — benefit significantly from soaking for six to twelve hours before planting. Soaking softens the seed coat, activates germination processes, and dramatically improves germination speed and uniformity. Place the seeds in a jar, cover with two to three times their volume of clean room-temperature water, and let them soak on your counter. After soaking, drain and rinse the seeds thoroughly — they'll have swelled noticeably and possibly show tiny root tips beginning to emerge. Small-seeded microgreens — radish, broccoli, kale, mustard, amaranth — don't need soaking and can be planted directly from the packet.
Step two is preparing your tray and growing medium. Fill your drainage-holed tray with growing medium to about three-quarters full — roughly an inch to an inch and a half deep. For coco coir, pre-moisten the coir before filling — dry coco coir is hydrophobic and takes time to absorb water, so mixing it with water until evenly moist before filling saves trouble later. For potting mix, pre-moisten similarly. Level the surface of the growing medium — a flat, even surface is important for even seed coverage and even germination. A smooth piece of cardboard or the flat bottom of a second tray pressed lightly onto the surface does this well.
Step three is seeding, and getting density right is the single most common beginner mistake. Most beginners underfill — there's a natural instinct to give seeds space to grow, but microgreens are grown at extraordinarily high density, far closer together than mature plants would ever be planted. The goal is a single layer of seeds covering the entire surface of the growing medium — seeds touching each other but not piling on top of each other in multiple layers. For radish seeds, this means covering the surface so almost no growing medium is visible between seeds. For sunflower seeds, which are larger, it means a dense, tile-like layer with seeds just touching. Measuring by weight is the most consistent approach — roughly one to two ounces of small seeds per 1020 tray, two to four ounces for large seeds like sunflower.
Step four is the blackout period — a phase that surprises new growers because it seems counterintuitive to cover germinating seeds in darkness. The blackout period serves several purposes: it mimics the underground conditions that seeds naturally germinate in, encouraging strong downward root development before upward shoot growth. The darkness also causes seedlings to push harder toward light, developing stronger stems. The cover creates a humid microclimate that supports germination. After seeding, mist the seeds thoroughly with a spray bottle, place a second tray over the seeded tray as a lid (weighing it down slightly helps seeds stay in contact with the growing medium), and set it aside at room temperature. Check once daily to ensure the growing medium hasn't dried out — mist lightly from the top if needed. The blackout period lasts until you see germination starting to push against the cover tray — typically three to five days for most varieties.
Step five begins when you lift the cover and move the tray to light. At this point the seedlings are yellow or pale — they haven't had light to produce chlorophyll — and will begin greening up within twelve to twenty-four hours of light exposure. Begin bottom watering at this stage rather than top watering — I'll explain this in detail in the next section. Check and water daily. Over the next four to ten days (depending on variety) the seedlings grow rapidly, develop their cotyledon leaves, green up fully, and approach harvest size.
Step six is harvest, and I'll cover the exact technique in detail in the harvesting section — but the basic step is using clean, sharp scissors to cut the stems just above the growing medium surface when the first set of cotyledons is fully open and before the first true leaves develop. Cut, wash, eat, and start the next tray you've been succession-planting alongside this one. That's the complete cycle.
Watering Microgreens — Top vs. Bottom Watering
Watering technique is where the difference between successful and unsuccessful microgreen growing is often made, and it's an area where a lot of beginners go wrong because the instinct — water from the top, like any other plant — is actually the approach most likely to cause the most common microgreen problem, which is mold.
Top watering microgreens is necessary during the seed preparation and early germination phase — before seedlings emerge and while you're still in the blackout phase, gentle top misting is appropriate because there's no other way to deliver moisture. Use a fine-mist spray bottle and mist evenly across the surface of the seeded tray until the growing medium and seeds are visibly moist but not waterlogged. The critical word is gentle — any watering with force during early germination can disturb seeds, displace them from the growing medium surface, and create uneven germination patterns.
Bottom watering is the method that transforms microgreen growing from mold-prone to mold-resistant, and it's the approach I recommend switching to as soon as seedlings have emerged from the growing medium — typically after the blackout period ends. Bottom watering works exactly as it sounds: instead of adding water to the top of the tray where it sits on foliage and stem surfaces creating conditions mold loves, you add water to a solid tray sitting underneath the drainage-holed growing tray. The growing medium wicks moisture upward through capillary action, keeping roots and the lower part of the growing medium moist while the surface where the stems emerge stays relatively dry. Dry stem bases and foliage surfaces mean dramatically reduced mold pressure — the single biggest quality-of-life improvement in microgreen growing.
The practical execution of bottom watering is simple: pour a small amount of water — roughly half an inch — into the solid bottom tray each day, allow it to be fully absorbed over the following hour or two, and then tip out any remaining water that hasn't been absorbed. Never let the growing tray sit in standing water for extended periods — this creates waterlogged conditions at the root zone that inhibit oxygen uptake and promote rot. The daily rhythm becomes check-pour-check: check the bottom tray, pour fresh water if it's dry, check again an hour later to ensure full absorption.
How often to water at each growth stage is something that varies with the stage of growth, the growing medium used, and your specific environmental conditions. During the blackout germination phase, the moisture retained by the covered tray is usually sufficient for the full period without additional watering — check once daily and mist only if the surface has visibly dried. Once in the light phase and bottom watering, once daily is the right baseline for most varieties and most growing media in most apartment environments. In warm, dry conditions your growing medium may dry out faster and need twice-daily bottom watering. In cooler, more humid conditions it may stay adequately moist with every-other-day watering. The check is simple: lift the growing tray and feel the weight — light means dry and needing water, heavier means still moist.
Signs of overwatering in microgreens are important to recognize because overwatering is far more damaging than underwatering at this growth stage. Yellowing stems at the base, mushy or translucent stem tissue, and mold growth on the growing medium surface are all indicators that conditions are too wet. Back off watering immediately, ensure the drainage holes aren't blocked, and improve air circulation around the trays. Signs of underwatering are wilting stems and a growing medium surface that's clearly dry and pulling away from the tray edges — water more frequently and ensure the growing medium is wicking properly.
Harvesting and Using Your Microgreens
Harvest is the payoff — and with microgreens, the window between "ready" and "past peak" is shorter than for most other food crops. Knowing exactly when and how to harvest determines whether you get the best possible nutrition, flavor, and shelf life from your trays.
The visual indicator of harvest-readiness for most microgreens is cotyledon development — when the seed leaves (the first leaves that emerge from the seed) are fully open and have developed their characteristic shape and color, harvest time has arrived. For most varieties this happens between seven and fourteen days after planting. The presence of the first true leaf — the second set of leaves that emerges after the cotyledons — is a signal that you've slightly passed the optimal harvest window for peak nutritional density, though the microgreens are still perfectly edible and delicious. The practical check: look down at your tray and if most of the cotyledons are fully open and clearly green, you're ready. If they still look folded or haven't fully expanded, wait another day.
Harvesting technique is simple but the details matter for both the quality of the harvest and cleanup. Use clean, sharp scissors or a sharp knife — dull blades crush stems rather than cutting cleanly, and crushing releases moisture that accelerates spoilage. Cut just above the surface of the growing medium — low enough that you're getting maximum stem length, high enough that you're not scooping up growing medium with your harvest. Cut in sections across the tray rather than all at once — working in sections lets you control the cut height more consistently. A full 1020 tray of radish or broccoli microgreens will fill a large mixing bowl when cut and produces typically three to four ounces of fresh microgreens.
Washing harvested microgreens is important — not just for cleanliness but for refreshing the cut stems and improving the visual crispness of the final product. Submerge the harvested microgreens in a bowl of cold water, swish gently to remove any growing medium particles or seed hulls, lift out and drain in a colander, then spin dry in a salad spinner or pat gently with paper towels. The cold water wash also seems to improve the textural crispness of microgreens that might have gotten slightly wilted during harvest. Make sure they're genuinely dry before storing — moisture on stored microgreens accelerates decay.
Storage of harvested microgreens is best done in the refrigerator, in an airtight container lined with a paper towel to absorb any residual moisture. Under these conditions, most microgreens stay fresh and crisp for five to seven days — some hardier varieties like sunflower can stretch to ten days. Some varieties — particularly basil and amaranth — are more sensitive and best used within three to four days. The general principle is that microgreens stored on the stem — uncut in their tray — last significantly longer than harvested microgreens, so if you want maximum freshness, harvest trays incrementally over several days rather than all at once.
Using microgreens in cooking is where the investment in growing them pays daily dividends in flavor and nutrition. Pea shoots are transcendent in spring rolls, dumplings, and any Asian-inspired dish. Radish microgreens bring heat and crunch to tacos, grain bowls, and avocado toast. Sunflower shoots make sandwiches substantially more interesting and add richness to salads. Broccoli and kale microgreens blend invisibly into smoothies while adding a concentrated nutritional payload. Amaranth microgreens are a stunning visual garnish for plated dishes. The varieties you grow should be chosen as much for how you actually cook as for ease of growing — growing things you'll genuinely use in your kitchen is what makes the practice sustainable and rewarding long-term.
Succession Planting — Never Running Out of Microgreens
The single operational upgrade that transforms microgreen growing from occasional project to kitchen staple is succession planting — the practice of starting new trays on a regular schedule so that as one tray is harvested, another is days from ready. Once you have this rhythm established, fresh microgreens are a constant presence in your kitchen rather than an occasional treat, and the setup essentially runs itself.
The basic math of microgreen succession planting is simple. If your chosen variety takes ten days from planting to harvest, and you want microgreens available every three to four days, you need to start a new tray every three to four days. Three trays on a rotating schedule — one just planted and in the blackout phase, one in the light and growing phase, one at or near harvest — gives you continuous availability with minimal gaps. The trays rotate through positions: harvest the oldest, move the middle tray to where the old one was, start a new tray in the freshest position. With this three-tray rotation running consistently, you essentially always have microgreens ready or nearly ready.
The number of trays to keep going simultaneously depends on how much you cook with microgreens and how quickly you consume a tray's harvest. A single 1020 tray produces three to four ounces of microgreens at harvest. If you use a handful of microgreens on your lunch sandwich and a small pile on dinner a few times a week, one tray per week is probably sufficient — meaning one new tray planted every seven days, with two or three trays at different stages. If you're using microgreens more heavily — daily smoothies, regular cooking, sharing with household members — you might want two trays per week and a more compressed succession schedule.
Staggering varieties adds dimension to the succession system beyond just quantity management. Instead of always rotating through the same variety, running parallel successions of two or three different varieties ensures you have flavor variety in your harvest alongside continuous availability. My current rotation runs radish and sunflower in a regular alternating succession, with a third occasional rotation of whatever I'm in the mood to try — broccoli in winter, pea shoots in spring, amaranth when I want something spectacular on a plate. The parallel variety succession is the system I'd recommend to anyone who's been growing microgreens for a month or two and wants to expand the practice.
Scaling up from a hobby rotation to a more serious kitchen staple status is a natural progression for many growers. Once you're consistently running three to four trays and consuming them reliably, adding a dedicated grow light rather than relying entirely on window light makes the system more reliable across seasons. Buying seeds in bulk quantities — half-pound or one-pound bags of your most-used varieties — dramatically reduces the per-tray seed cost. Building or buying a small dedicated shelf system creates a more organized, efficient growing station. These investments are small in absolute terms and pay back quickly in reduced grocery costs and daily access to fresh, nutritious food.
Troubleshooting Common Microgreen Problems
Every microgreen grower encounters problems — the growing conditions and compressed timeline mean issues that develop slowly in longer-cycle crops can appear quickly and obviously in microgreens. The good news is that the fast turnover also means recovery is fast — if a tray fails, a new one can be started immediately, and the learning from a problem tray informs better practice on the next one.
Mold is the most feared microgreen problem and the one that most discourages beginners who encounter it on their first or second tray. The white, fuzzy growth that appears on stems or growing medium surfaces looks alarming but is often misidentified — the white, hair-like root hairs that develop on the lower stems of most microgreens are frequently mistaken for mold. True root hairs are fine, uniform, and appear on stem surfaces in a consistent pattern. True mold is cottony or fuzzy in texture, irregular in distribution, often slightly colored (grey, green, or white), and has a musty smell. Causes of genuine mold include overwatering (wet foliage surfaces create ideal mold conditions — the argument for bottom watering), inadequate air circulation, too-high seed density creating crowded humid conditions, and temperature extremes. Prevention through bottom watering and adequate seed spacing resolves most mold issues. Treatment of active mold can be attempted by reducing watering, improving air circulation with a small fan directed near the trays, and continuing to monitor — but a heavily molded tray is usually worth discarding and starting fresh rather than trying to save.
Damping off is a fungal disease that kills seedlings at the soil line — they emerge normally and then suddenly collapse, with a characteristic pinched or rotted appearance at the base of the stem. It's caused by the same conditions as mold — too wet, too little air circulation, often in conjunction with poor quality or insufficiently sterile growing medium. Prevention is essentially the same: bottom water rather than top water once seedlings emerge, ensure air circulation, use fresh growing medium for each tray rather than reusing old medium without sterilization. Damping off spreads from affected seedlings to neighbors quickly and a tray showing significant damping off is typically worth discarding entirely.
Leggy, pale growth — seedlings that are tall, thin, and pale rather than short, sturdy, and deeply colored — indicates insufficient light. This is a common problem when growing on windowsills that don't receive adequate light, or during the winter months when day length and light intensity both drop significantly. The stem elongation is the plant's response to reaching for light — it's not unhealthy exactly, but it produces a less nutritious, less visually appealing, less flavorful microgreen. Solutions include moving trays to a brighter location, supplementing with a grow light, or accepting that window-grown microgreens will be somewhat taller and paler than light-grown ones. Seeding density that's too low can also produce leggy results — individual seedlings with too much space grow taller and less robustly than densely seeded trays where plants support each other's upright growth.
Uneven germination — patches of the tray where nothing came up while other areas are densely germinated — has a few potential causes. Old or low-quality seeds with reduced viability germinate unevenly across the tray. Uneven watering creates dry spots where germination doesn't occur. Uneven seeding with gaps in coverage obviously produces gaps in germination. And some seeds — particularly the larger ones like sunflower — need the extra step of pre-soaking that's easy to forget on a first attempt. Check your seed source and freshness, ensure even watering during the germination phase, double-check seed density when planting, and soak large-seeded varieties consistently.
Slow growth compared to expected timelines is usually one of two things: temperature or variety-specific timing. If your kitchen is cooler than the 65°F to 75°F ideal range — possible in older, poorly insulated apartments in winter — germination and growth will be noticeably slower than the standard timelines suggest. Moving trays to a warmer location, or being patient with extended timelines in cool conditions, addresses the temperature cause. Some variety pairs are simply slower than others — radish at seven to nine days versus beet at twelve to sixteen days — and understanding the expected timeline for your specific variety prevents mistaking normal variation for a problem.
Conclusion
Growing microgreens on your kitchen counter is the closest thing to instant gratification that food growing offers — and the combination of speed, nutritional density, minimal equipment, and genuinely excellent flavor makes it one of the most consistently rewarding growing practices available to anyone, regardless of space, light, or gardening experience.
Start this week. Seriously — today, if you can. Order a packet of radish microgreen seeds, grab a small tray or even a repurposed food container, pick up a bag of potting mix or coco coir, and plant your first tray tonight. You'll see germination within twenty-four to forty-eight hours. You'll harvest in nine to ten days. You'll taste something you grew yourself from scratch in under two weeks. That experience — the combination of ease, speed, and genuine food quality — is what creates the habit that keeps trays rotating on kitchen counters for years.
Drop your first harvest photos, your favorite variety discoveries, your questions, or your succession planting setups in the comments below. Microgreen growing has one of the most welcoming communities in food growing precisely because the barrier to entry is so low and the rewards are so immediate — everyone starts at the same place and everyone has something worth sharing within a few weeks of beginning. Now go find a tray and some seeds. 🌱