How to Grow Vegetables Indoors for Beginners: Everything You Need to Start Today
Learn how to grow vegetables indoors for beginners — from choosing the right crops to setting up grow lights. Real tips from someone who started with zero experience and a sunny windowsill.
TINY PLOT BEGINNERS: YOUR FIRST HARVEST STARTS HERE
Introduction
Indoor gardening has grown by over 50% in the last five years — and honestly, after you taste your first bowl of salad made entirely from stuff you grew on your kitchen counter, you'll completely understand why. I started growing vegetables indoors about nine years ago in a cramped apartment with one decent south-facing window and absolutely zero idea what I was doing. My first attempt was a disaster. My second was slightly less of a disaster. By my third try, I was hooked — and eating fresh lettuce in January, which felt like a genuine superpower.
Here's what I wish someone had told me at the very beginning: indoor vegetable growing is not complicated, but it is different from outdoor gardening. Different rules, different challenges, different rhythms. The people who struggle with it — and I was absolutely one of them — usually struggle because they're applying outdoor gardening logic to an indoor environment where that logic just doesn't hold up. Once you understand how indoor growing actually works, it clicks into place pretty fast.
This guide is written specifically for beginners. Not "beginners who already know a lot about plants" — actual beginners, starting from scratch, maybe feeling a little intimidated. I'm going to walk you through everything from picking the right vegetables to setting up your space to troubleshooting the problems that will inevitably come up. No jargon, no overwhelming complexity. Just real, practical advice from someone who learned all of this the hard way so you don't have to. Let's grow something!
Why Growing Vegetables Indoors Is Worth It (Even If You've Never Grown Anything)
I remember the first time I ate a salad made entirely from lettuce I'd grown myself on a windowsill in February. It was genuinely one of those small but meaningful moments. Outside it was grey and cold and miserable, and inside I had this little patch of green life producing actual food. That feeling — I don't know, it's hard to explain — but it made everything feel a little more possible. That's the thing about indoor vegetable growing that nobody really warns you about: it gets under your skin in the best way.
The most obvious advantage is the year-round growing thing. Outdoor gardening is seasonal — you're at the mercy of your climate, your frost dates, your weather. Indoor growing doesn't care what month it is. Right now, in the middle of January, I've got lettuce, herbs, and microgreens going strong on my kitchen shelves. That's fresh food that doesn't have to travel across the country to reach my plate, and it's available every single week of the year. Once you experience that, going back to buying sad plastic-wrapped grocery store lettuce feels like a step backward.
The cost savings are real, too, though I'll be honest — they take a little time to materialize. The initial setup (containers, soil, maybe a grow light) costs something upfront. But once you're up and running, a packet of lettuce seeds that costs two dollars can produce more salad greens than you could eat in weeks. Herbs especially are a massive money saver — a small pot of basil costs five dollars at the grocery store and lasts maybe a week. Growing your own, you've got fresh basil available every day for the cost of a seed packet.
And then there's the mental health angle, which honestly might be the most underrated benefit of all. Studies have consistently shown that tending to plants reduces stress, improves mood, and gives people a sense of purpose and accomplishment. I'm not going to pretend indoor gardening is therapy — but I will say that the fifteen minutes I spend checking on my plants every morning is genuinely one of the best parts of my day. There's something grounding about nurturing living things and watching them respond. If you're someone who spends a lot of time staring at screens — and who isn't these days — having some living green things to tend to is really good for you.
The biggest barrier most people have is the idea that you need outdoor space to grow food. You don't. A sunny windowsill is enough to start. A corner with a grow light is enough. A shelf in your kitchen is enough. Indoor growing meets you exactly where you are, with whatever space you have. That's a pretty remarkable thing.
The Best Vegetables to Grow Indoors as a Beginner
This is probably the most important section in this entire guide, and it's the thing I got wrong for my first couple of seasons. I kept trying to grow what I wanted to eat — big tomatoes, bell peppers, cucumbers — without considering whether those crops were realistic for my setup. They weren't. And I kept failing and getting frustrated and almost giving up. The truth is, some vegetables are just much better suited to indoor growing than others, and starting with the right ones makes the difference between success and discouragement.
Lettuce is my absolute top recommendation for beginners. Full stop. It grows fast — you can be harvesting in as little as three to four weeks from planting — it doesn't need as much light as fruiting vegetables, it thrives in containers, and it tastes incredibly good fresh. Loose-leaf varieties like 'Black Seeded Simpson' or 'Oakleaf' are especially good because you can harvest outer leaves continuously rather than waiting for a whole head. I've kept lettuce plants going for months with the cut-and-come-again method, and they just keep producing.
Spinach is another winner for beginners. Similar light requirements to lettuce, grows quickly, and is incredibly nutritious. Baby spinach harvested fresh and thrown into a smoothie or salad is genuinely delicious in a way that store-bought spinach rarely is. It does prefer cooler temperatures, so keep it away from heat vents. Radishes are the speed demons of the vegetable world — some varieties are ready to harvest in as little as 25 days from planting. They're not a huge caloric contribution to your diet, but they're incredibly satisfying to grow for exactly that reason. Fast results build confidence.
Microgreens deserve a special mention because they're possibly the perfect beginner crop. You're basically just sprouting seeds and harvesting the tiny seedlings when they're one to two inches tall. No special equipment needed, no long wait times — most microgreens are ready in seven to fourteen days. They're nutritionally dense (some studies suggest they have significantly higher nutrient levels than mature vegetables), they're delicious on sandwiches and salads, and they're easy to grow in a shallow tray on any windowsill. Sunflower, pea shoots, radish, and broccoli are great microgreen varieties to start with.
Herbs — basil, chives, parsley, mint, cilantro — are also excellent beginner choices that provide huge practical value relative to the space and effort they require. And then there are green onions, which might be the easiest thing you can possibly grow indoors. Stick the root ends of store-bought green onions in a glass of water on a windowsill and they'll regrow. It costs literally nothing and works almost every time. Great first win for a total beginner.
Now, what to avoid at first: big tomatoes, cucumbers, zucchini, corn, melons — anything that needs pollination, produces large fruit, or requires significant space and light. These can be done indoors with more advanced setups, but as a beginner they'll frustrate you. Cherry tomatoes are the exception if you have a good grow light, but I'd still recommend getting your feet wet with leafy greens first.
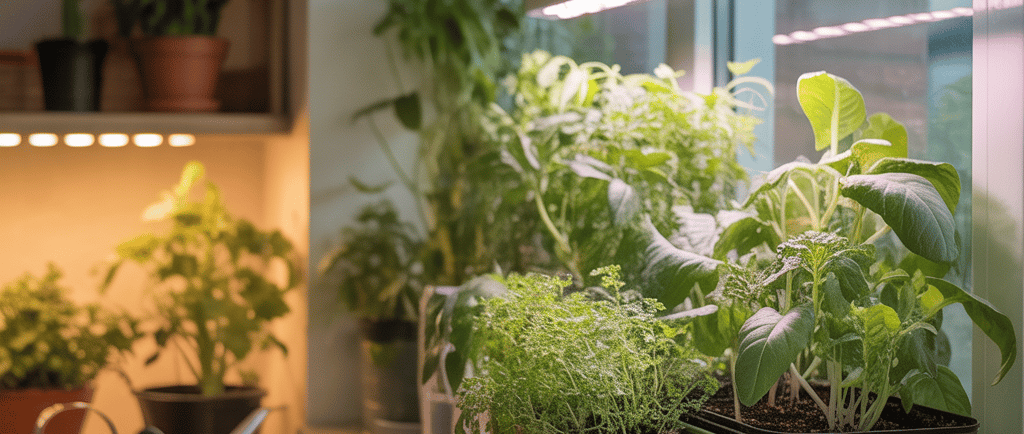
Understanding Light for Indoor Vegetable Growing
Light is the thing that makes or breaks indoor vegetable growing, and it's the area where most beginners have the biggest misunderstanding. Here's the hard truth I wish someone had told me earlier: your indoor light is almost certainly much dimmer than it looks to your eyes. Human eyes adapt to light levels — we walk into a "bright" room and our pupils adjust and it looks plenty bright. But plants don't adapt. What looks bright to you might be genuinely dim for a vegetable that's used to growing under full sun.
A south-facing window is your best friend for indoor vegetable growing in the northern hemisphere. It receives the most direct light throughout the day and is warm enough to keep most vegetables happy. East-facing windows get gentle morning sun and work reasonably well for lettuce and herbs. West-facing windows get afternoon sun — workable for many crops. North-facing windows get the least light and are honestly challenging for most vegetables, though microgreens and some herbs can manage.
Here's a rough way to assess your window: on a clear day, hold your hand about a foot above a white piece of paper near your window and look at the shadow. A sharp, defined shadow means bright light — good for most vegetables. A soft, fuzzy shadow means medium light — okay for lettuce and herbs, challenging for fruiting plants. No visible shadow means low light — you'll struggle with most vegetables and should seriously consider a grow light.
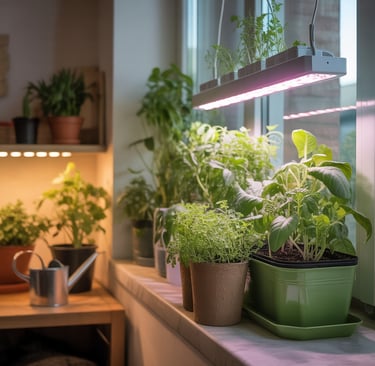
Grow lights changed everything for me. I resisted them for years because they seemed complicated and expensive, but modern LED grow lights are neither of those things. You can get a decent LED grow light for indoor herbs and greens for twenty to forty dollars, and it will reliably provide what a mediocre window can't. Full-spectrum LED panels are the standard recommendation now — they're energy efficient, they don't produce much heat, and they provide the range of light wavelengths that plants actually need. Look for lights with both blue spectrum (for leafy growth) and red spectrum (for flowering and fruiting).
For timing, leafy greens and herbs generally want twelve to fourteen hours of light per day. Fruiting vegetables like tomatoes and peppers want fourteen to sixteen hours. The easiest way to manage this is a simple outlet timer — set it and forget it. I have mine set to come on at 6am and go off at 8pm. Consistent light schedules are better for plants than irregular ones, and timers take all the guesswork out of it.
Containers, Soil, and Setup for Indoor Vegetable Gardens
Getting your physical setup right before you start planting saves a lot of headaches later. I learned this after flooding my kitchen counter twice because I hadn't thought through my drainage situation, and after losing a whole tray of seedlings because I used the wrong soil. These are avoidable mistakes, and I'll help you avoid them.
Container size should match what you're growing. Lettuce, spinach, and herbs do fine in containers that are six to eight inches deep — they have relatively shallow root systems. Radishes need at least eight to ten inches of depth because the root (the part you eat) needs room to develop. Green onions are fine in almost anything. If you ever want to try cherry tomatoes or peppers indoors, you're looking at five-gallon containers minimum. For beginners starting with greens and herbs, wide, shallow containers actually work great — you can fit more plants and they're lighter and easier to manage.
Material-wise, plastic containers are practical for indoor growing — they're lightweight, affordable, and hold moisture well, which is helpful indoors where you're not fighting evaporation from sun and wind. Self-watering containers are genuinely excellent for beginners because they have a water reservoir that wicks moisture up to the roots as needed — much more forgiving of irregular watering schedules. I have a few of these and they've saved plants during busy weeks when I wasn't checking daily.
Soil — always use a high-quality indoor potting mix, never garden soil or outdoor potting soil. Garden soil compacts badly in containers, drains poorly, and can harbor pests and diseases that are much more problematic indoors than outside. A good indoor potting mix is light, fluffy, and well-draining. I look for mixes that contain perlite or vermiculite, which improve aeration and drainage. Some mixes are formulated specifically for vegetables and contain a starter fertilizer charge — these are great for beginners because they give plants a nutrient head start.
Drainage is the thing most beginners overlook until it causes a problem. Every container must have drainage holes, and those holes need somewhere for the water to go. If you're using saucers under your containers, empty them after watering — don't let pots sit in standing water. I use a layer of pebbles or gravel in my saucers to elevate the pots slightly above any collected water. Alternatively, place your containers on a waterproof tray lined with something that catches drips. Protecting your floors and furniture from water damage is just as important as protecting your plants from root rot.
Watering Indoor Vegetables — Getting It Right
Watering is where most beginners go wrong indoors, and the mistake is almost always watering too much rather than too little. I know that feels counterintuitive — you want your plants to thrive, so you give them water, right? But indoors, without the evaporation caused by sun, wind, and warm outdoor air, soil stays moist much longer than you'd expect. Overwatered roots can't breathe, they start to rot, and the plant declines in ways that actually look like it needs more water — wilting, yellowing — so you water more, and the problem spirals.
The only reliable way to know if your plants need water is to check the soil. Stick your finger about an inch into the soil. If it feels moist at that depth, don't water. If it feels dry, water thoroughly. For most indoor vegetables, this means watering every two to four days depending on your container size, soil type, temperature, and humidity. Smaller containers dry out faster. Terracotta pots dry out faster than plastic. Warmer, drier rooms dry out faster than cool, humid ones. There's no universal schedule — you have to read your specific situation.
When you do water, water thoroughly. Pour water slowly and evenly over the soil surface until it flows freely from the drainage holes at the bottom. This ensures the entire root zone gets moisture and prevents dry pockets forming in the soil. Shallow, frequent watering encourages shallow roots and inconsistent moisture levels. Deep, thorough watering on an as-needed basis is much better for plant health.
Room temperature water is ideal — cold water can shock plant roots, especially for warm-loving plants like basil and peppers. I keep a small watering can filled and sitting out, which means the water is always room temperature and also lets any chlorine in tap water dissipate overnight. If you're in an area with heavily chlorinated tap water, letting it sit for an hour or two before using it on your plants is a small thing that might make a real difference.
A moisture meter is a genuinely useful tool for beginners — it's a small probe you stick into the soil that gives you a reading of how moist or dry the soil is. They're inexpensive (usually five to ten dollars) and take all the guesswork out of watering decisions. I'd honestly recommend one for any beginner who's worried about getting the watering balance right. It builds confidence and helps you learn what your specific setup needs over time.
Fertilizing Your Indoor Vegetable Garden
Here's something that surprised me when I first got into indoor gardening: potting mix doesn't feed your plants forever. Most mixes contain enough starter nutrients to support plants for about four to six weeks. After that, you need to start feeding. This is something I didn't know for embarrassingly long, and I kept wondering why my plants looked great initially and then slowly started looking tired and pale. Nutrients — that was the answer.
Container plants in general need more regular fertilizing than in-ground plants because nutrients wash out of containers every time you water. There's no surrounding soil ecosystem continuously generating nutrients the way there is in the ground. You are the nutrient delivery system for your container plants, which sounds like a lot of responsibility but is actually pretty simple once you set up a routine.
For leafy greens and herbs, a balanced liquid fertilizer works really well — something with roughly equal ratios of nitrogen, phosphorus, and potassium, like a 10-10-10 or similar formulation. Liquid fertilizers are my preference for indoor growing because they act fast and you can control the dosage easily. I dilute mine to half the strength recommended on the bottle — indoor plants are in controlled environments and don't need to be pushed as hard as outdoor plants. Full strength can actually burn roots in containers.
For any vegetable that produces fruit — tomatoes, peppers — the fertilizer needs shift as the plant moves from vegetative growth to flowering and fruiting. Early on, a bit more nitrogen supports leaf and stem development. Once flowers appear, you want less nitrogen and more phosphorus and potassium to support fruit development. Too much nitrogen at the fruiting stage gives you lots of leaves and very little fruit. Fertilizers labeled "tomato fertilizer" or "bloom booster" are formulated for this shift and are worth using if you venture into fruiting crops.
Signs of underfeeding: pale or yellowing leaves, slow growth, small leaves, general lack of vigor. Signs of overfeeding: brown leaf edges (fertilizer burn), crusty white deposits on the soil surface (salt buildup from fertilizer), dark green but soft and weak-looking growth. If you see fertilizer burn, flush the soil thoroughly with plain water to wash out excess salts. A simple monthly feeding with diluted liquid fertilizer is usually enough for most beginner indoor setups — mark it on your calendar so you don't forget.
Temperature, Humidity, and Air Circulation Indoors
Most people assume their indoor environment is automatically fine for plants because, well, it's fine for people. And it's mostly true — the range of temperatures comfortable for humans overlaps pretty well with the range most vegetables prefer. But there are a few specific situations where indoor conditions can work against your plants, and knowing about them in advance saves a lot of frustration.
Most common indoor vegetables are happiest between 60°F and 75°F (15°C to 24°C). Lettuce, spinach, and other cool-season crops actually prefer the cooler end of that range — around 60°F to 68°F. They'll survive warmer temperatures but may bolt (go to seed) faster and develop a bitter flavor. Basil and other warm-loving herbs want the warmer end — they'll sulk and turn black if they get too cold. Keep basil away from air conditioning vents and cold windows in winter. Keep lettuce away from heat vents and warm spots.
The biggest temperature issue indoors is usually draft exposure. Cold drafts from windows in winter can stress plants significantly, even if the average room temperature is fine. In summer, air conditioning vents blasting cold air directly onto plants is similarly problematic. The fix is simple: just keep plants away from direct draft exposure. A few inches away from a cold window or an AC vent usually makes a big difference.
Humidity is where indoor environments often fall short for plants. Home heating systems in winter dry out indoor air significantly — sometimes to desert-like humidity levels. Most vegetables prefer humidity in the 40% to 70% range, and dry air can cause leaf edge browning, stressed growth, and increased pest problems (spider mites love dry air). Grouping plants together naturally raises the local humidity around them through transpiration. A small humidifier near your growing area in winter is genuinely helpful if you live in a dry climate or run a lot of heat.
Air circulation is something almost no beginner thinks about, and it matters more than most people realize. Still, stagnant air encourages fungal diseases like damping off and powdery mildew, and it means carbon dioxide near your plants gets depleted faster. A small fan running on low, not blowing directly on plants but creating gentle air movement in the room, makes a real difference. It strengthens stems too — plants that experience gentle movement develop stronger, sturdier stems than those that just sit in still air their whole lives. I run a small USB fan near my indoor garden on a timer and it's made a noticeable difference in plant health.
Common Problems Beginners Face (And How to Solve Them)
Every beginner indoor gardener hits problems. That's just the reality of growing living things in an imperfect indoor environment. The important thing is to know what the most common problems look like and how to address them before they kill your plants. I've dealt with all of these at some point, and none of them are as scary as they seem when you know what's actually happening.
Leggy, stretched-out seedlings — where the plant grows tall and spindly with lots of space between leaves rather than compact and bushy — is almost always a light problem. The plant is literally stretching toward more light than it's getting. The fix is more light: move the plant closer to your light source or upgrade to a grow light. If you're using a grow light, make sure it's close enough — most LED grow lights for small plants should be six to twelve inches away from the plant canopy. I've seen people put their grow light two feet above their plants and wonder why they're getting leggy seedlings. Distance matters.
Yellowing leaves can mean several different things, which makes it confusing. Lower leaves yellowing on an older plant is often just normal aging — those leaves are done. Yellowing spreading to new growth usually means a nutrient deficiency, typically nitrogen — start fertilizing if you haven't been. Yellowing with moist soil that takes a long time to dry out is often overwatering and possibly root rot — ease back on watering and check the roots if possible. Yellow leaves with dry soil means underwatering. Pattern matters: even yellowing suggests nutrients, while spotty or blotchy yellowing might indicate disease or pest damage.
Fungus gnats are the most common pest in indoor gardens, and they are genuinely annoying. They're those tiny flies you see hovering around your soil. The adult flies are mostly harmless but irritating. The larvae, which live in the soil, can damage roots — especially of seedlings. They thrive in moist, organic soil, which means overwatering is usually contributing to a fungus gnat problem. The fix: let the top inch of soil dry out between waterings (larvae can't survive in dry soil), use yellow sticky traps to catch adults, and consider watering from the bottom so the soil surface stays drier. Serious infestations can be treated with Bacillus thuringiensis israelensis (BTi), a natural biological control that's safe for edible plants.
Poor germination — seeds not sprouting, or sprouting and then collapsing — is usually one of a few things. Old seeds lose viability, so always use fresh seeds from a reputable source. Too-cold temperatures slow or prevent germination — most vegetable seeds germinate best at 65°F to 75°F. Too-deep planting prevents sprouting — most small seeds should be planted no deeper than two to three times their diameter. And damping off — where seedlings sprout and then collapse at the soil line — is a fungal disease promoted by wet conditions and poor air circulation. The prevention is exactly what you'd expect: don't overwater, ensure good drainage, and keep some air movement going.
Harvesting Your Indoor Vegetables and Keeping Plants Productive
Harvesting is the payoff for all the attention and care you've put in, and there's a real skill to harvesting in a way that keeps your plants producing rather than ending their productive life prematurely. This is something I figured out gradually, and getting it right means the difference between a plant that gives you one harvest and one that gives you weeks or months of continuous production.
For lettuce and other leafy greens, the cut-and-come-again method is your best friend. Instead of harvesting the whole plant at once, harvest individual outer leaves while leaving the central growing point — the crown — intact. New leaves will continue to grow from the center and you can harvest from the same plant repeatedly. I've kept single lettuce plants going for eight to ten weeks this way, harvesting a handful of leaves every few days. The key is never taking more than about a third of the plant at one time — take too much and you stress the plant.
Herbs are similar — harvest by cutting stems back to just above a leaf node (the point where leaves branch off the stem), and the plant will branch from that point and become bushier. Regular harvesting actually encourages more growth. The mistake I made early on was being too precious about harvesting — trimming just a tiny bit because I didn't want to hurt the plant. But herbs actually respond better to confident, generous harvesting. Basil especially — pinch off flower buds as soon as they appear, because once basil flowers it puts all its energy into seed production and the leaves lose flavor.
Microgreens are a one-and-done crop — you harvest the whole tray when the seedlings reach one to two inches tall, usually seven to fourteen days after planting. Use scissors to cut just above the soil line. The tray is then finished — microgreens don't regrow the same way herbs do. But because they grow so fast, you can have a new tray started before the previous one is even finished. I keep two or three trays going at different stages so I always have microgreens ready to harvest.
Succession planting is the strategy that keeps your indoor garden continuously productive. Instead of planting everything at once and then having a big harvest followed by nothing, plant small amounts every two to three weeks. A small pot of lettuce planted today, another in two weeks, another in four weeks — by the time the first pot is winding down, the second is at peak production and the third is just getting going. Once you get this rhythm going, you'll have a steady supply of fresh greens literally every week. It took me a while to build this habit but it's honestly transformed how much I get out of my indoor garden. When that first bite of fresh, homegrown food hits in the middle of winter, you'll know every bit of the effort was completely worth it.
Conclusion
If there's one thing I want you to take away from this guide, it's this: anyone can grow vegetables indoors. Anyone. You don't need a green thumb, a fancy setup, years of experience, or even a particularly great window. You need a willingness to learn, a little patience with yourself when things go wrong, and the right information — which you now have.
Start small. Seriously. One pot of lettuce. A tray of microgreens. A couple of herb seedlings on your windowsill. Get comfortable with the basics before you scale up. Learn how your specific space behaves — how fast things dry out, how your light changes through the seasons, what your plants look like when they're happy versus stressed. That knowledge is earned through doing, and it compounds quickly. A few months from now you'll be troubleshooting problems I haven't even mentioned in this guide and figuring them out yourself, because you'll actually know your plants.
I'd love to hear how it goes for you. Drop a comment below — whether it's your first harvest, a problem you can't figure out, a variety you've tried that worked brilliantly, or even a spectacular failure you want to commiserate about. We've all been there, and we're all still learning. Now go plant something! 🌱