How to Grow Tomatoes in Containers: The Only Guide You'll Ever Need
Learn exactly how to grow tomatoes in containers step by step — from picking the right pot to harvesting juicy tomatoes, even if you've never grown anything before.
CONTAINER TINY PLOTS: CROPS, SOIL & CLEVER HACKS
Introduction
Did you know that container gardening has exploded by over 30% in the last decade? Yeah, I was honestly shocked when I read that too. More and more people are realizing you don't need a huge backyard — or honestly any yard — to grow your own food. I started growing tomatoes in containers about twelve years ago on a tiny apartment balcony, and let me tell you, the first time I bit into a tomato I grew myself, it ruined store-bought tomatoes for me forever.
Here's the thing — growing tomatoes in containers isn't some complicated science experiment. But it's also not as simple as just throwing a plant in a pot and hoping for the best. I've killed more tomato plants than I'd like to admit. I've overwatered, under-fertilized, picked the wrong pot, bought the wrong variety... you name it, I've done it wrong at least once. And that's exactly why I wrote this guide.
Whether you've got a sprawling patio or just a tiny sunny windowsill, you can grow delicious tomatoes in containers. In this guide, I'm going to walk you through everything — from picking the right pot to harvesting your first ripe tomato — in plain, no-nonsense language. No gardening degree required. Let's dig in!
1: Why Growing Tomatoes in Containers Is a Game-Changer
I remember the first time someone told me I could grow tomatoes in a pot. I literally laughed. Like, really? In a bucket? I thought you needed a big garden plot, a tiller, maybe a tractor — okay, maybe not a tractor, but you get my point. Turns out I was completely wrong, and growing tomatoes in containers has become one of my absolute favorite things to do every summer.
The biggest win? Space. Or really, the lack of space you need. I've grown beautiful tomato plants on a second-floor balcony that was maybe 6 feet wide. Got more tomatoes than I could eat. Container growing means that if you've got a sunny spot — a patio, a balcony, a driveway, even a fire escape if that's what you're working with — you're already in business. It's genuinely kind of mind-blowing once you try it.
Another thing I didn't expect was how much control you have. When tomatoes are in the ground, they're at the mercy of your soil, your drainage, whatever pests live nearby. In a container? You control everything. The soil mix, the drainage, the nutrients — it's all up to you. That sounds like more work, but honestly it means fewer nasty surprises. My in-ground tomatoes used to get hit with all kinds of soil diseases. My container tomatoes? Way cleaner track record.
And here's a tip that took me years to figure out: you can move container plants. Sounds obvious, but think about it. If there's a weird cold snap coming, bring them inside. If one spot isn't getting enough sun, roll them over a few feet. I've literally extended my growing season by weeks just by dragging my pots closer to a south-facing wall in September. That kind of flexibility is something an in-ground garden just can't give you, no matter how fancy your setup is.
Container growing is also just more beginner-friendly in a lot of ways. You're working with smaller spaces, smaller quantities of soil, and more manageable plants (if you pick the right variety — more on that later). It's way less overwhelming than staring down a huge garden plot and not knowing where to start. If you're brand new to growing your own food, starting with a couple containers of tomatoes is honestly one of the best decisions you can make.
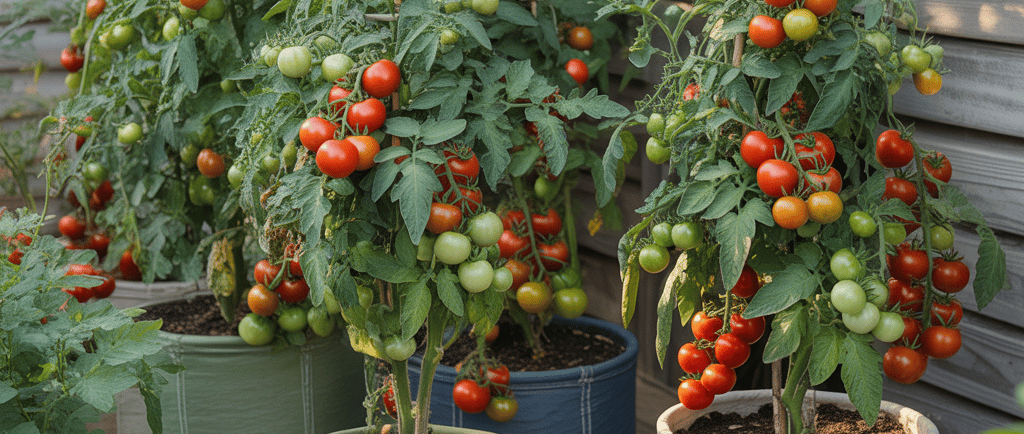
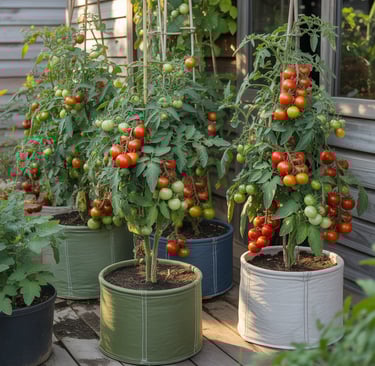
2: Choosing the Right Container for Tomatoes
Okay, so I once planted a tomato in a pot that was way too small. Like, embarrassingly small. It was this cute little terracotta pot, maybe 8 inches across, and I thought it would be fine. Spoiler alert: it was not fine. The plant got about a foot tall, looked sad and stressed all summer, and produced exactly four tomatoes. Four. I could've cried.
Size matters more than almost anything else when it comes to containers for tomatoes. For most standard tomato varieties, you want a minimum of a 5-gallon container. But honestly? Go bigger if you can. A 10 to 15-gallon pot is where tomatoes really start to thrive. The more root space they have, the better they grow, the more fruit they produce. I know big pots are kind of bulky and heavy, but trust me on this one.
Now, what kind of container should you use? This is where people get way overthought about it. Here's the real deal from my experience. Fabric grow bags are my personal favorite — they're cheap, lightweight, and they actually air-prune the roots, which sounds fancy but basically just means healthier root growth. Plastic pots are totally fine and hold moisture better, which is great if you tend to forget to water (no judgment, I've been there). Terracotta is gorgeous but dries out fast, so you'll be watering constantly in summer. And wood looks beautiful on a patio — I've used old wine barrels — but it can rot over time.
One thing that is absolutely, 100%, non-negotiable: drainage holes. Your container must have drainage holes. I cannot stress this enough. Tomatoes that sit in waterlogged soil will get root rot and die. It's not a maybe — it will happen. If you fall in love with a container that doesn't have holes, drill some yourself. I've drilled holes in everything from decorative ceramic pots to plastic storage bins. Where there's a will, there's a way.
One last thing worth mentioning — self-watering containers are actually really cool for tomatoes. They have a built-in reservoir at the bottom and wick water up as the plant needs it. I was skeptical at first, but the consistency of moisture they provide is something tomatoes absolutely love. If you're the type of person who travels in summer or just forgets to water regularly, a self-watering container could honestly save your whole season.
3: The Best Tomato Varieties for Container Gardening
This is the mistake I see beginners make the most. They go to the garden center, grab a big beautiful beefsteak tomato plant, stick it in a container, and then wonder why it turns into a wild, overgrown jungle that barely produces fruit. Believe me, I did exactly this. That plant took over my entire balcony railing, needed constant staking, and gave me maybe a dozen tomatoes. Not ideal.
The key is understanding the difference between determinate and indeterminate tomatoes. Determinate varieties grow to a set height (usually 2–4 feet), produce all their fruit at roughly the same time, and then kinda... stop. They're compact, manageable, and perfect for containers. Indeterminate varieties just keep growing and growing all season — they can get 6, 8, even 10 feet tall if you let them. Some indeterminate varieties can be grown in containers, but they need big pots and serious staking, so they're generally not the best starting point.
For containers, here are my personal go-to varieties. Patio Tomato is kind of a classic — it's bred specifically for containers, stays compact, and produces a solid amount of decent-sized tomatoes. Tumbling Tom is super fun if you want something that cascades over the edges of a hanging basket or a tall pot — cherry tomatoes just tumbling off the plant. Better Bush is one I grew last year and was genuinely impressed by — determinate, sturdy, great flavor. Celebrity is another solid all-rounder that does well in pots.
But honestly? If you're a beginner, just start with cherry tomatoes. Any kind. Cherry tomatoes are more forgiving, produce fruit earlier in the season, and just seem happier in containers than big slicing tomatoes. I grew Sun Gold cherry tomatoes in a 10-gallon fabric pot one summer and couldn't keep up with how many tomatoes that plant gave me. It was insane. My kids were eating them like candy right off the plant.
One more thing — always check the plant tag or seed packet for the mature height and whether it's determinate or indeterminate before you buy. I can't tell you how many times I've seen those little labels ignored and then watched people struggle all summer with a plant that was totally wrong for their container setup.
4: Soil, Fertilizer, and Nutrients for Container Tomatoes
Here's something that took me way too long to learn: you cannot use regular garden soil in containers. I know, I know — soil is soil, right? Wrong. Garden soil in a pot becomes dense, compacted, and drains terribly. The first year I tried container gardening I literally just dug up dirt from my yard and used that. My plants looked like they were being punished for something. They barely grew. I couldn't figure out what I was doing wrong.
What you want is a high-quality potting mix — not potting soil, potting mix. Look for something that's light, fluffy, and contains ingredients like perlite, vermiculite, or coconut coir. These materials help with drainage and aeration, which is everything when you're growing in a container. I usually go for a mix specifically labeled for vegetables or containers. Brand doesn't matter as much as the ingredient list. If it looks and feels light and airy, you're on the right track.
I also add a few extras to my potting mix that I've found make a real difference. A couple handfuls of compost mixed in adds organic matter and gives plants a nice nutrient head start. Some people swear by adding a slow-release granular fertilizer right into the mix at planting time — I've tried this and it does help reduce how often you need to fertilize later. Worm castings are another thing I've added that seems to make plants happier, though I honestly couldn't tell you exactly why. It just works.
For fertilizing, container tomatoes need more regular feeding than in-ground plants because nutrients wash out every time you water. A balanced fertilizer (something like 10-10-10) is good early in the season to support leaf and root growth. Once flowers start appearing, switch to a fertilizer that's lower in nitrogen and higher in phosphorus and potassium — something labeled "tomato fertilizer" or "bloom booster." Too much nitrogen once plants are flowering just gives you lots of lush green leaves and not much fruit. Been there, was frustrated about it.
Watch your plants closely for signs of nutrient deficiency. Yellowing lower leaves can mean nitrogen deficiency. Purple tints on leaves can indicate phosphorus issues. And if the edges of leaves start looking scorched or burnt, potassium might be the problem. These things sound complicated but once you've seen them a couple times, you start to recognize them pretty quickly.
5: Watering Your Container Tomatoes the Right Way
Watering is honestly where most people go wrong with container tomatoes — including me, for a long time. I used to water on a schedule: every day at 7am, rain or shine, hot or cold. Seemed responsible, right? Nope. Some days that was way too much, some days not enough. My plants were stressed and confused and I couldn't figure out why they weren't thriving.
The trick is to water based on what the plant and soil actually need, not a fixed schedule. Here's how I check: stick your finger about an inch into the soil. If it feels dry at that depth, it's time to water. If it still feels moist, hold off. Simple as that. In hot summer weather, containers can dry out fast — sometimes I'm watering daily or even twice a day during heat waves. In cooler, cloudier weather, I might go two or three days between waterings.
When you water, water deeply. Don't just sprinkle a little on top. Water until it flows freely out of the drainage holes at the bottom. That's how you know the entire root zone is getting moisture. Shallow watering encourages shallow roots, and shallow-rooted plants are weaker and more stressed. I water slowly and let it soak in rather than just dumping water on as fast as possible.
Overwatering and underwatering actually look kind of similar on the surface — wilting, sad-looking plants — which makes it confusing. But there's a clue: check the soil. Soggy soil = overwatering. Bone dry soil = underwatering. Overwatered plants often have yellowing leaves and a kind of mushy base to the stem. Underwatered plants look more crispy and the soil pulls away from the edges of the pot. Once you've seen both, you'll be able to tell them apart pretty easily.
One thing I started doing a few years ago that's made a huge difference: I put a thin layer of mulch on top of the soil in my containers. Just an inch or two of straw or wood chips. It slows evaporation so the soil stays moist longer between waterings. In summer when I'm watering once or twice a day anyway, it's less of a factor, but in spring and fall it really helps. Plus it looks kind of nice and keeps things tidy.
6: Sunlight, Placement, and Temperature Tips
Tomatoes are sun worshippers. Full stop. They want as much direct sunlight as they can get, and the minimum you can really get away with is about 6 hours of direct sun per day. 8 hours is better. More than that? Even better. When I moved into my current place, the first thing I did was stand in the backyard at different times of day and just watch where the sun was hitting. Sounds nerdy but that kind of observation saves you a lot of heartache later.
The best spots for container tomatoes are typically south- or west-facing areas. A south-facing wall or fence that reflects heat is actually fantastic — tomatoes love warmth. I once had a container sitting against a white brick wall that faced south, and those plants grew like absolute maniacs. The reflected heat and light from that wall gave them a serious boost. If you're working with a balcony, try to figure out which direction it faces before you decide where your pots go.
Heat, though, can become a problem in midsummer — especially for containers, which heat up faster than in-ground soil. When temperatures consistently hit above 90°F (about 32°C), tomato plants can actually stop setting fruit. The blossoms just drop off. It's super frustrating to watch — I had a whole summer where my plants looked lush and healthy but barely produced fruit because of extreme heat. If you're in a hot climate, consider moving containers to a spot that gets afternoon shade during the hottest part of the day.
One of the best things about growing in containers is how easily you can respond to weather changes. Cold snap coming? Move the containers inside or into a garage for the night. Unexpected heatwave? Roll them to a shadier spot for a few days. Last fall I kept my tomatoes producing well into October just by moving them against a warm south-facing wall and covering them on cool nights. That kind of control is something in-ground gardeners genuinely envy.
Speaking of extending the season — if you're in a northern climate, you can actually start your container tomatoes earlier in spring because you can bring them inside if there's a frost risk. I start hardening my plants off in April, even though my last frost date is mid-May. I just keep an eye on the forecast and bring them in when needed. Got tomatoes several weeks earlier than my neighbors who planted directly in the ground. That's a win I'll take every single year.
7: Staking, Pruning, and Supporting Your Plants
The first summer I grew indeterminate tomatoes in containers, I didn't stake them. I thought, you know, they'll be fine, they'll hold themselves up. They did not hold themselves up. By July I had this sprawling, tangled mess of a tomato plant flopped over the edge of the pot, lying half on the ground, stems cracked and damaged. Some of the tomatoes were resting on the ground and had rotted. It was a mess and I felt like an idiot. Lesson learned the hard way.
Even compact, determinate varieties benefit from some kind of support as they get loaded with fruit. The weight of the tomatoes can snap branches right off if there's nothing holding the plant up. For container growing, I like tomato cages for smaller determinate varieties — just drop the cage over the plant when it's young and it grows right up through it. Easy. For bigger indeterminate varieties in large containers, I usually go with a sturdy bamboo stake or a heavy-duty metal stake, tying the main stem up as it grows.
Now, pruning suckers — this is something a lot of beginners skip because it feels wrong to remove healthy growth from your plant. I get it. It felt weird to me at first too. But suckers are those little shoots that sprout in the "crotch" between the main stem and a branch. If you let them grow, they become full branches, the plant gets enormous and bushy, and all that energy goes into leaves instead of fruit. For indeterminate varieties, I remove suckers when they're small — just snap them off with your fingers. For determinate varieties, you generally don't need to prune as aggressively, or at all.
The single biggest pruning mistake I see people make is waiting too long to remove suckers. When they're tiny — like an inch long — they snap off cleanly and the plant barely notices. When they've grown to 6 inches or more, removing them is a bigger deal and can actually stress the plant. I do a walk-around of my plants every few days during the growing season specifically to check for suckers. Takes maybe two minutes. The difference in fruit production is absolutely worth it.
One more thing about support: make sure whatever you're using is actually sturdy enough. I've had flimsy dollar store tomato cages collapse under the weight of a loaded plant. Not fun. Spend a few extra bucks on decent quality cages or stakes. The kind with three or four legs that push into the soil are much more stable than the traditional three-ring cages, which have a tendency to tip over in containers because there's nothing to really anchor them.
8: Common Problems and How to Fix Them
Let me tell you about blossom end rot, because it broke my heart the first time it happened. I was so excited about these beautiful big tomatoes developing on my plant — and then the bottoms of them started turning black and mushy. I thought I'd done something terribly wrong, like infected my plants with some terrible disease. Panicked, Googled everything. Turns out it's super common and very fixable.
Blossom end rot is caused by a calcium deficiency in the developing fruit, which is usually triggered by inconsistent watering rather than actually lacking calcium in the soil. When moisture levels swing up and down, the plant can't absorb calcium effectively even if it's there. The fix? More consistent watering. Simple as that. Some people spray calcium solutions directly on the plants and some add crushed eggshells to the soil, and those things might help too, but the root cause is almost always watering inconsistency. Since I started mulching and checking soil moisture daily, I barely see blossom end rot anymore.
Yellowing leaves are another thing that will make you second-guess everything. Here's the thing — a few yellowing lower leaves on an older plant is totally normal. Those leaves are just aging. But if yellowing is happening all over the plant, spreading to newer growth, or if the leaves have weird patterns or spots, that's when you need to dig a little deeper. Could be nitrogen deficiency (even yellow, starting from the bottom), magnesium deficiency (yellow between the veins), or even a disease like early blight (yellow with brown spots). When in doubt, check the watering situation first — a huge percentage of leaf problems trace back to watering.
Pests. Ugh. Aphids are the worst little menaces in my opinion — tiny, clustering insects that suck the life out of your plant. I once went away for a long weekend in July and came back to find my plants absolutely covered in aphids. The good news is that a strong spray of water from a hose knocks most of them off, and they're actually pretty easy to control with insecticidal soap if you catch them early. Whiteflies and spider mites are sneakier — spider mites especially, because you might not notice them until you see fine webbing on your leaves. Check the undersides of leaves regularly; that's where these pests hide.
Cracking and splitting tomatoes is something I see a lot, and it's usually caused by irregular watering — specifically, getting a big drink of water after a dry spell. The tomato swells faster than the skin can stretch, and crack. Again, consistent watering is your best defense. If you notice a lot of cracking happening on ripe or near-ripe tomatoes, harvest them just before they're fully ripe and let them finish ripening indoors. They won't crack once they're off the vine.
9: Harvesting and Storing Your Container Tomatoes
There's nothing quite like the moment you harvest your first homegrown tomato. I still get genuinely excited about it every single year, and I've been doing this for over a decade. Something about growing something with your own hands and then eating it — it just hits different. The flavor of a homegrown tomato versus a store-bought one is honestly not even a fair comparison. It's like comparing a real taco to a Taco Bell taco. (I mean, Taco Bell has its place, but you know what I mean.)
Knowing when to harvest is something you learn through feel as much as anything. The obvious sign is color — tomatoes should be fully colored, whether that's red, orange, yellow, or whatever your variety is supposed to be. But color alone isn't always enough. A ripe tomato should give slightly when you squeeze it gently — not mushy, but not rock hard either. And if a tomato comes off the vine easily with just a gentle twist, that's a good sign it's ready. If you're pulling hard, wait another day or two.
Here's a tip that took me a few seasons to figure out: you can harvest tomatoes just before they're fully ripe and let them ripen indoors. Once a tomato has started changing color — what gardeners call the "breaker stage" — it will continue to ripen fine off the vine. This is actually really useful if you've got a lot of tomatoes ripening at once, or if weather conditions are messing with your outdoor ripening, or if pests are eating your ripe tomatoes before you can get to them. I've harvested tomatoes at the breaker stage and had them ripen beautifully on my kitchen counter over a few days.
Now, storing tomatoes — please hear me on this. Do not put fresh tomatoes in the refrigerator. Just... don't. Cold temperatures break down the texture and kill the flavor. A tomato that's been refrigerated loses that beautiful complexity and becomes kind of mealy and flat-tasting. Store your tomatoes at room temperature, stem side up, out of direct sunlight. They'll last several days to a week this way depending on how ripe they are when you bring them in.
At the end of the growing season, when frost is coming, go ahead and harvest any tomatoes that have started changing color — they'll ripen inside. Green tomatoes that haven't started turning yet can also be ripened indoors if you wrap them individually in newspaper and store them somewhere cool and dark. I've had green tomatoes harvested in September ripen into November this way. As for your containers, empty the old soil (compost it if you can), clean the pots out, and store them somewhere dry for next year. Already looking forward to next season before this one is even over — that's just how container tomato growing goes.
Conclusion
So there you have it — everything I know about how to grow tomatoes in containers, learned over years of trial, error, dead plants, surprise successes, and more tomatoes than I could give away. It's genuinely one of the most rewarding things you can do with a sunny spot and a little bit of effort. Whether you're working with a tiny apartment balcony or a sprawling patio, there's a container tomato setup that'll work for you.
Start simple. Grab one or two containers, pick a beginner-friendly variety like a cherry tomato or a Patio tomato, use a good potting mix, water consistently, and put them somewhere they'll get plenty of sun. You don't have to do everything perfectly the first time — honestly, some of my best gardening lessons came from mistakes. The important thing is to start, pay attention to your plants, and adjust as you go.
And hey — if you've got your own container tomato tips, tricks, or disaster stories, I'd genuinely love to hear them. Drop them in the comments below! Whether it's a variety you swear by, a watering trick that saved your season, or a pest battle you barely survived, share it. This kind of community knowledge is how all of us get better at growing our own food. Now get out there and grow something! 🍅