DIY Self-Watering Planters from Recycled Materials: Build Your Own for Almost Nothing
Learn how to make DIY self-watering planters from recycled materials — plastic bottles, buckets, storage totes, and more. Step-by-step builds that actually work, from someone who's made them all.
CONTAINER TINY PLOTS: CROPS, SOIL & CLEVER HACKS
Introduction
Conventional container gardens waste somewhere between fifty and seventy percent of the water applied to them — it either evaporates from the soil surface before roots can use it, or it drains straight through the container faster than roots can absorb it. Self-watering planters, which deliver moisture directly to the root zone from a reservoir below, use water dramatically more efficiently — some studies showing up to fifty percent less water consumption for equivalent plant growth. They also reduce watering frequency, extend the window between waterings from days to potentially a week or more, and produce better plant growth by delivering consistent moisture rather than the boom-and-bust cycles of manual top watering.
The problem is that commercial self-watering planters are expensive. A decent commercial self-watering container for a single tomato plant costs thirty to sixty dollars. A set of four for a serious balcony vegetable garden runs well over a hundred dollars. For apartment gardeners already investing in seeds, soil, and grow lights, that's a meaningful addition to the growing budget — and it's an addition you genuinely don't need to make, because a self-watering planter is one of the most buildable things in gardening. The mechanism is simple. The materials are things most people already have or can acquire for free. And the DIY version, built with twenty minutes of effort and materials from your recycling bin, works as well as or better than the commercial equivalent.
I've been building DIY self-watering planters for years — from the simplest two-liter bottle build for a single herb plant to full-size storage tote systems growing tomatoes and peppers through entire seasons. I've experimented with materials, refined the wicking systems, figured out what works and what doesn't, and grown genuinely impressive food crops from builds that cost essentially nothing. This guide is everything I know: the engineering principles that make self-watering systems work, the builds that perform best for different applications, the soil mixes that make sub-irrigation sing, and the maintenance practices that keep these systems running all season. Let's build something useful from something you were going to throw away.
How Self-Watering Planters Actually Work
The mechanism behind a self-watering planter is elegant in its simplicity, and understanding it properly helps you build better DIY systems and troubleshoot the ones that aren't performing as expected. The core principle is sub-irrigation — delivering water to plant roots from below rather than from above — through a passive wicking system that moves moisture from a reservoir into the growing medium at exactly the rate the plant needs it.
A basic self-watering planter consists of two zones: a growing zone where the plant's roots develop in potting mix, and a reservoir zone where water is stored until the plant needs it. Between these zones sits a wicking basket or wicking column — a small container of growing medium that maintains direct contact with both the reservoir water below and the main growing medium above. Capillary action — the same force that draws water up through a paper towel when you dip its edge in water — pulls moisture from the reservoir through the wicking medium and upward into the growing zone. As plant roots absorb moisture from the growing medium and as evaporation occurs from the soil surface, the wicking system continuously replenishes moisture from below. The plant receives a consistently moist root zone without any manual watering beyond periodically refilling the reservoir through a fill tube.
The water efficiency advantage of this system over top-watering is significant and mechanistically straightforward. When you top-water a container, water applied to the surface must saturate the entire soil column before the excess drains from the bottom — during which time the very act of saturating causes some water to drain before roots can use it, and evaporation from the wet soil surface immediately begins losing water to the air. In a self-watering system, the reservoir is enclosed and doesn't evaporate. Moisture enters the root zone directly from below rather than filtering from above. The only evaporation surface is the growing medium's surface — and in a mature planting where foliage covers most of that surface, even that loss is reduced. The result is a system that uses significantly less water to maintain equivalent soil moisture compared to top-watering.
Root health in sub-irrigated containers tends to be better than in top-watered ones for reasons related to moisture consistency and root zone oxygen. Top-watered containers cycle between wet immediately after watering — when oxygen in the root zone is temporarily displaced by water — and progressively drying as moisture depletes between waterings. This cycle creates stress, particularly for moisture-sensitive crops. Sub-irrigated containers maintain a more consistent moisture gradient — wetter at the bottom, where the wicking zone maintains continuous contact with the reservoir, and progressively drier toward the surface, where roots can access oxygen. This gradient closely mirrors the natural soil moisture conditions many vegetables evolved in and supports more vigorous, consistently productive root development.
Self-watering planters are not universally the right choice for every growing situation. They work best for crops with consistent moisture demands — tomatoes, peppers, lettuce, herbs, cucumbers — and in situations where regular manual watering is inconvenient or unreliable. They're less appropriate for plants that prefer to dry out significantly between waterings, like cacti and succulents, or for root vegetables like carrots where the soil moisture gradient from the sub-irrigation system can sometimes produce inconsistent results. And they require a specific soil mix — more on this in the soil section — that differs from standard top-watered container mixes.
Materials You Can Repurpose Into Self-Watering Planters
The range of materials that can be converted into effective self-watering planters is broader than most people initially realize, and the best materials for the job are often things sitting in your recycling bin right now. Understanding what each material offers and what its limitations are helps you match material to application.
Plastic storage totes are the single best DIY self-watering planter material for serious vegetable growing, and they've become a favorite among serious container gardeners for excellent practical reasons. They're available in any size from eight-quart to sixty-six-quart, they're made from food-safe HDPE plastic in most cases, they're rigid enough to hold significant soil volume without deforming, and their rectangular form makes efficient use of balcony and patio space. The two-tote system — a smaller inner tote sitting inside a larger outer tote, separated by a framework that creates a reservoir space — produces a large, high-performing self-watering planter for roughly the cost of two storage totes, which are often available for three to six dollars each at dollar stores and discount retailers. A sixteen to twenty-three-quart tote produces a self-watering planter large enough for a single tomato, two peppers, or a generous planting of salad greens.
Five-gallon buckets are the classic DIY self-watering material for good reasons — they're everywhere, they're free or nearly free from restaurants, bakeries, and home improvement stores, they're food-grade HDPE in many cases, and their depth makes them ideal for the deep-rooting crops that benefit most from self-watering systems. A double-bucket system — one bucket nested inside another with a reservoir space between them — produces a tomato or pepper planter that handles watering demands through hot summer weeks with minimal attention. Single-bucket builds with an internal wicking basket are simpler to construct and nearly as effective.
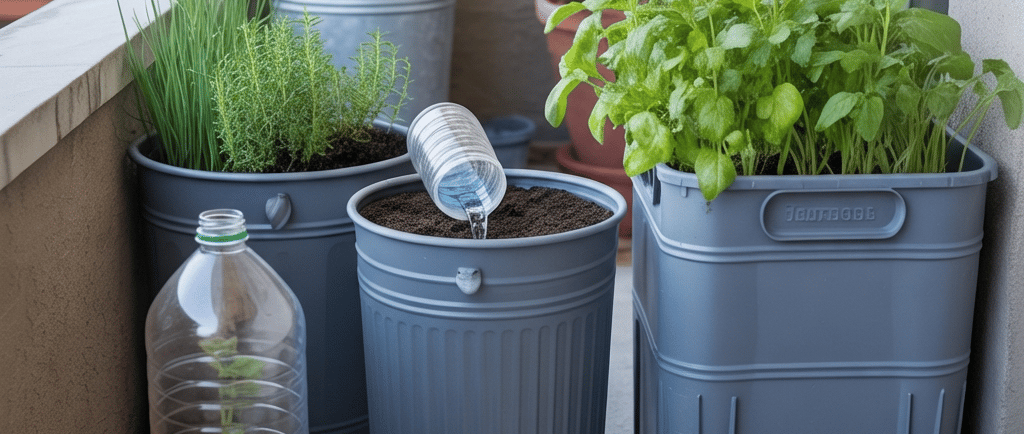
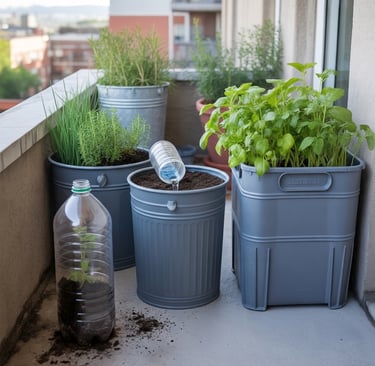
Two-liter plastic bottles are the gateway build for first-time DIY self-watering planter makers, and they're genuinely effective for herbs and smaller plants despite their modest size. The classic build cuts the bottle at its widest point, inverts the top half into the bottom half, threads a wick through the bottle cap, fills the top half with growing medium, and uses the bottom half as the reservoir. Completed in under five minutes with scissors and basic materials, a two-liter bottle self-waterer can keep a basil plant consistently watered for three to five days between reservoir refills — a genuine improvement over the daily watering that a small conventional herb pot requires. Large juice jugs, gallon water jugs, and similar containers scale this concept up for somewhat larger plants.
Styrofoam coolers and produce boxes — the foam containers that fruits, vegetables, and seafood are shipped in — make surprisingly good self-watering planters because Styrofoam is an excellent insulator that moderates root zone temperature in both hot and cold conditions, in addition to being completely waterproof and easy to cut and modify. Restaurant supply stores, farmers markets, and grocery store back areas are often willing to give these away. Their main limitation is that Styrofoam degrades over time under UV exposure — painting the exterior with exterior latex paint extends their life significantly. A medium-sized Styrofoam produce box converts into an effective self-watering planter in about twenty minutes and grows lettuce, herbs, and shallow-rooted vegetables beautifully.
The Classic Two-Container Self-Watering Planter Build
The two-container build is the foundational DIY self-watering planter design — the approach that demonstrates the principle most clearly and can be executed with the widest variety of available materials. Once you understand this build, every other variation is a modification of its core logic.
The system works by nesting a smaller container inside a larger one, with the smaller container holding growing medium and the larger container acting as the reservoir below. A wicking basket — a small cup or container filled with growing medium — connects the two zones, sitting in a hole cut in the bottom of the inner container with its base submerged in the reservoir water. A fill tube — a piece of PVC pipe or a second hole — allows you to add water to the reservoir without disturbing the growing surface. An overflow hole at the reservoir's maximum fill level prevents overfilling.
For a basic tote-based version of this build, you need two containers of different sizes where the smaller fits inside the larger with an inch or two of space below it — this space becomes the reservoir. Dollar store plastic bins, nested storage totes, or one container sitting inside a larger tote all work. You also need a wicking basket — a net cup, a cut plastic bottle section with drainage holes, or a solo cup with holes punched throughout — a piece of PVC pipe or tubing for the fill tube, a drill or sharp knife for cutting, and your growing medium.
Step one is cutting the wicking basket hole in the center of the inner container's base — sized to hold your chosen wicking basket snugly with its bottom extending approximately an inch below the inner container's base into the reservoir space. Step two is cutting or drilling the fill tube hole — near one corner of the inner container, sized for your fill tube to pass through at an angle. Step three is drilling the overflow hole in the outer container at the level you want the maximum reservoir depth — typically an inch below the bottom of the inner container. This hole allows excess water to drain rather than flooding the growing medium. Step four is assembling the system: place the wicking basket in its hole, thread the fill tube through its hole so it reaches the bottom of the reservoir, nest the inner container in the outer, and check that everything sits correctly with the wicking basket base in the reservoir space.
Fill the wicking basket fully with growing medium — pressing it in firmly to ensure continuous capillary contact from the base up through to the main growing zone. Fill the main growing zone with your soil mix, leaving a couple of inches of headspace. Fill the reservoir through the fill tube until water flows from the overflow hole — this confirms the reservoir is at the right level. Plant your seedlings or seeds, and you're done. The first watering waters from above to wet the full soil column and initiate the wicking connection — subsequent waterings go directly into the fill tube to top off the reservoir.
The Storage Tote Self-Watering Planter — Best for Vegetables
The storage tote self-watering planter is the build I recommend most enthusiastically for serious container vegetable growing because it combines significant soil volume — enough for tomatoes, peppers, cucumbers, and other large plants — with excellent reservoir capacity, straightforward construction, and a cost of under fifteen dollars in materials. It's the DIY self-watering planter that most closely rivals commercial alternatives in both performance and growing capacity.
The standard tote build uses a single large storage tote — typically a sixteen to twenty-three-quart tote for most vegetable applications — divided internally into a growing zone above and a reservoir below using a platform made from a cut piece of the tote's lid, a second smaller tote cut to size, or a piece of plastic mesh or grating. This platform sits approximately four inches from the base of the tote, creating a reservoir of four inches of depth below and the full remaining depth above for growing medium. The wicking basket sits in a hole cut in the platform, maintaining the capillary connection between zones.
Materials for this build: one large storage tote with lid, a drill and one-and-a-half-inch hole saw or sharp knife, a piece of PVC pipe or sturdy plastic tubing approximately eight inches long for the fill tube, a solo cup or net cup for the wicking basket, and a length of fabric or rope for supplementary wicking if desired. The lid material cut away when creating the platform can be repurposed as additional internal structural support.
The overflow hole positioning is the critical detail that determines the reservoir's functional depth. Drill this hole through the tote wall at exactly the height of your platform — at the boundary between growing zone and reservoir. Water poured in through the fill tube fills the reservoir until it reaches this hole, then drains rather than continuing to rise into the growing medium zone. Getting this height right prevents both underwatering — reservoir too shallow — and overwatering — reservoir level rising into the growing medium. Mark the position carefully and drill cleanly before assembling the system.
Best vegetables for storage tote self-waterers include essentially all the high-demand summer vegetables that benefit most from consistent moisture: tomatoes of any indeterminate variety that you're willing to stake in a container, peppers of all types, cucumbers trained up a trellis from the container, eggplant, basil in quantity, and any of the leafy greens in succession plantings. The large soil volume — ten to fifteen quarts of growing medium in a twenty-three-quart tote build — supports the root development that these productive plants need, and the reservoir capacity — four to six quarts — provides three to seven days between refills depending on plant size and weather conditions.
Plastic Bottle Self-Watering Planters — For Small Spaces
Plastic bottle self-watering planters are the entry point into DIY sub-irrigation and the build that most clearly demonstrates how simple and accessible this technology genuinely is. A two-liter bottle and five minutes is genuinely all you need to make a functional self-watering herb planter — and the results are good enough that many people never go back to conventional small pots for herbs after making their first bottle planter.
The classic two-liter bottle build requires only a bottle, scissors or a knife, a drill or nail for puncturing the cap, and a length of cotton rope or a strip of fabric for wicking. Cut the bottle approximately one-third from the top — creating a shorter funnel section with the bottle neck at its base, and a longer reservoir section from the base up. Puncture the bottle cap and thread the wick through it, knotting it inside so approximately three to four inches extends below the cap into the reservoir space. Invert the top section into the bottom section — the cap with the wick hanging down into the reservoir, the cut end facing up to hold growing medium. Fill the inverted top section with moist growing medium, burying the upper portion of the wick in the medium. Pour water into the reservoir section below until it nearly reaches the inverted neck. Plant your herb or seedling in the growing medium. The wick continuously draws water from the reservoir into the growing medium as moisture depletes.
The inverted bottle drip system is a variation that's simpler to construct but operates differently from true sub-irrigation. This system places an upright filled bottle — neck down — into the soil surface of a regular container, relying on atmospheric pressure to release water slowly as soil dries around the neck. It's not true wicking-based sub-irrigation — it releases water into the top of the soil rather than drawing it from below — but it does extend the time between manual waterings and is better than nothing for a plant that needs consistent moisture. For a true sub-irrigated bottle planter, the inverted-top-section-in-reservoir design is the correct approach.
Large water jugs, gallon juice containers, and two-and-a-half-gallon containers scale the bottle concept up significantly and produce bottle self-waterers capable of supporting a pepper plant, a significant basil bush, or several lettuce plants through a couple of weeks without reservoir refilling. The same inverted-section-in-reservoir principle scales directly — cut at approximately one-third height, wick through the cap, invert into the reservoir base. The larger reservoir capacity makes these more practical for vacation watering and for plants with higher moisture demands than a two-liter can support.
Five-Gallon Bucket Self-Watering Planter Build
The five-gallon bucket self-watering planter is the workhorse build of the DIY self-watering world — used by balcony vegetable gardeners, urban farmers, and container growing enthusiasts worldwide because buckets are genuinely everywhere, genuinely free, genuinely food-grade in many cases, and genuinely deep enough to support the root systems of the most productive container vegetables.
Restaurant supply buckets — used to hold pickles, icing, sauces, and various food service ingredients — are the most commonly available free food-grade five-gallon bucket source. Restaurants often have stacks of these they're happy to give away. Bakeries, delis, and grocery store bakery departments are other reliable sources. Craigslist and Facebook Marketplace free sections frequently feature five-gallon buckets. Home improvement stores sell new five-gallon buckets for three to five dollars if free sources aren't available. The buckets should be clean and food-grade — HDPE plastic, typically marked with the recycling symbol 2 on the base.
The double-bucket build uses two five-gallon buckets — one sitting inside the other, elevated on a platform that creates the reservoir space in the outer bucket below the inner bucket's base. The inner bucket has its base drilled with multiple holes to allow root access to the wicking zone, a central wicking basket hole for the main capillary connection, and a fill tube hole for reservoir access. The outer bucket has an overflow hole drilled at reservoir maximum height. This design produces a self-watering planter with roughly two gallons of reservoir capacity — enough to support a full-size indeterminate tomato plant for three to five days in hot summer conditions.
The single-bucket build is a simpler alternative that modifies one bucket internally rather than nesting two. A platform made from a circle of plastic mesh or a cut piece of another container sits four inches from the base of the bucket, creating a reservoir below and growing space above. The wicking basket sits in a central hole in the platform. A fill tube — a piece of PVC pipe cut to reach from above the soil surface down to the base of the reservoir — allows water addition without disturbing the growing medium. A hole drilled in the bucket wall at the platform height prevents overfilling. This single-bucket design is slightly simpler to construct and requires only one bucket, at the cost of slightly less reservoir capacity than the double-bucket alternative.
The wicking basket for bucket builds can be constructed from a smaller plastic container — a sixteen-ounce deli cup works well — with holes drilled or melted throughout its base and sides, filled with a fast-wicking growing medium. The basket should fit snugly in the hole cut in the platform, with its base extending an inch into the reservoir and its top level with the main growing surface. Pack the wicking basket tightly with growing medium before assembling the system to ensure continuous capillary contact.
Wicking Systems — The Heart of Every Self-Watering Planter
The wicking system is the component that determines whether a self-watering planter actually works or just looks like one, and understanding wicking in enough detail to troubleshoot and optimize it separates builders who get consistently good results from those who wonder why their system isn't performing as expected.
Capillary action — the physical force driving wicking — depends on the interaction between water molecules and the solid surfaces of the wicking medium. Water molecules are attracted to many solid surfaces through adhesion — the same force that makes water cling to glass — and to each other through cohesion. In a porous material like soil, these forces combine to pull water through tiny pore spaces against gravity, drawing moisture upward from a wet zone into a drier zone above it. The rate and height of capillary rise depend on pore size — smaller pores produce higher but slower capillary rise, larger pores produce lower but faster capillary rise. This is why the soil in a wicking basket needs to be fine-textured and tightly packed — the small pores it creates generate stronger capillary action than a loosely packed or coarse medium.
The best wicking materials for DIY self-watering planters are those with fine, consistent pore structure and good water affinity. Growing medium itself — particularly coco coir or a coco coir and fine compost mix — is the most practical wicking material because it serves double duty as both the wicking medium and the growing medium in the wicking basket. Cotton rope and fabric strips work as supplementary wicks — threaded through the wicking basket hole in addition to the growing medium basket, providing an additional capillary pathway from reservoir to growing zone. Synthetic rope, polyester cord, and similar materials wick less effectively than natural fibers because their water affinity is lower.
The wicking basket design affects performance significantly. A tightly packed, fully filled wicking basket — with growing medium pressed in firmly to eliminate air gaps — wicks better than a loosely filled one because it maintains continuous liquid contact from base to top without the air pockets that break capillary chains. The basket should be tall enough that its upper surface is fully integrated into the main growing medium — the interface between wicking basket and surrounding growing medium should be seamless, with roots able to grow continuously from one zone to the other.
Troubleshooting poor wicking performance starts with the most common causes. Dry wicking basket — if the basket dries out before the reservoir refill, the capillary chain is broken and the system stops wicking until the basket is rewetted from above. Top-watering the planter thoroughly at each reservoir refill prevents this. Wrong medium — coarse, chunky growing medium in the wicking basket creates air gaps that interrupt capillary flow. Use fine, tightly packed medium in the wicking basket even if you use a chunkier mix in the main growing zone. Air gap between basket and reservoir — if the basket's base doesn't maintain contact with reservoir water, wicking stops. Ensure the basket extends approximately one inch below the platform into the reservoir water.
Soil Mixes and Planting for Self-Watering Systems
Self-watering planters require a specific soil mix that differs meaningfully from standard top-watered container mixes — and using the wrong mix is the most common reason that an otherwise well-built self-watering planter underperforms. Understanding why the mix requirements differ and what an appropriate mix looks like makes the difference between a self-watering planter that runs flawlessly and one that develops waterlogging or poor wicking.
The problem with standard potting mix in sub-irrigated systems relates to pore size distribution. Standard potting mixes are formulated with relatively large pores — created by bark chunks and coarse perlite — that drain quickly under gravity. This is excellent for top-watered containers where excess water must flow through and out the bottom rapidly. In a self-watering system with no bottom drainage, those same large pores hold air rather than water, which interrupts the capillary chain from wicking basket to upper growing zone. The mix needs smaller, more consistent pore sizes throughout to maintain continuous capillary movement.
The ideal DIY self-watering planter mix uses a higher proportion of fine-textured ingredients than a standard mix: roughly fifty percent coco coir, thirty percent fine-textured compost, and twenty percent perlite. The coco coir provides excellent capillary properties and moisture retention. The fine compost provides nutrition and biological activity. The perlite provides enough aeration to prevent compaction and allow root oxygen access while its proportion is modest enough not to interrupt the capillary network. This mix wicks reliably from the reservoir through the full depth of a standard container and maintains the moisture gradient — wetter at the bottom, appropriately moist throughout — that self-watering systems are designed to create.
One adjustment worth making for the wicking basket specifically: fill it with pure coco coir rather than the full mix — coco coir wicks more reliably than a mixed medium and ensures the most critical capillary zone performs optimally. The main growing zone uses the full three-ingredient mix. This layered approach — pure coco coir in the wicking basket, mixed medium above — maximizes wicking reliability while maintaining appropriate growing conditions for roots in the main zone.
Fertilizing self-watering planters requires a different approach than fertilizing top-watered containers. Because water is delivered from below and doesn't flush through the growing medium the way top-watering does, soluble fertilizers applied to the surface can accumulate in the root zone and eventually cause salt buildup that damages roots. The preferred approach for self-watering planters is incorporating a slow-release fertilizer into the growing medium at planting — providing steady baseline nutrition through the season — and supplementing with liquid fertilizer applied through the fill tube at low concentration during active growth. Avoid high-concentration liquid fertilizer applications in self-watering planters.
Maintaining, Troubleshooting, and Upgrading Your DIY Planters
Once your self-watering planters are built, planted, and running, the ongoing maintenance is genuinely minimal — which is the point. But understanding the small maintenance tasks that keep them performing well, the problems that occasionally develop, and the upgrades that add functionality makes the difference between a system that runs flawlessly all season and one that requires frustrating troubleshooting mid-season.
Refilling reservoirs is the primary ongoing task, and how often it's needed depends on plant size, weather, and reservoir capacity. A young seedling in a cool spring week might not need reservoir refilling for ten days. A full-size tomato plant in peak summer heat might drink down a full tote reservoir in three days. The practical approach is checking reservoir level through the fill tube when you check on plants — a thin bamboo stake inserted into the fill tube to gauge water depth gives a quick reservoir level reading without disassembling anything. Refill when the reservoir is approximately one-quarter full rather than waiting until it's completely empty — maintaining some water in the reservoir keeps the wicking system continuously primed and prevents the capillary chain breakage that a fully dry reservoir causes.
Seasonal maintenance at the end of the growing season is important for systems you plan to reuse. Drain the reservoir completely before freezing temperatures arrive — water in an enclosed reservoir that freezes can crack plastic containers. Remove spent plants and their root systems, which often infiltrate the wicking basket and reservoir zone over a long growing season. Rinse the reservoir zone with clean water to remove mineral deposits and any accumulated organic matter. Refresh the growing medium following the end-of-season soil management practices described in the potting soil article — the mix in a self-watering planter depletes nutrients and can compact over a season and benefits from amendment or partial replacement before the next planting.
Root intrusion into the reservoir is a natural and mostly harmless phenomenon in well-functioning self-watering planters — roots follow moisture, and the reservoir is the wettest zone in the system. Some root presence in the reservoir is normal and doesn't impair system function. Dense root masses that fill the reservoir and block water refilling or the overflow hole are a problem that requires seasonal attention. At end-of-season cleanout, remove and discard root masses from the reservoir zone and ensure the overflow hole is clear before storing or replanting.
Upgrading a basic DIY self-watering planter with a water level indicator requires only a clear plastic tube — aquarium airline tubing works perfectly — connected through the container wall at reservoir level, creating a sight gauge that shows current water level without removing the fill tube. Tape the tube vertically to the outside of the container with its lower end connected to a hole at the base of the reservoir and its upper end open to air — water level inside the tube matches reservoir level exactly. This simple addition turns reservoir monitoring from a guess into a glance.
Scaling up to a bank of self-watering planters — multiple linked containers that share a common water supply — is the most ambitious upgrade and the one that creates the closest thing to a fully automated outdoor growing system without any electronic components. A drip line connected to a gravity-feed reservoir — an elevated bucket or barrel — and distributed to the fill tubes of each individual planter through adjustable drip emitters allows manual reservoir filling of the central tank to water all planters simultaneously. Add a mechanical timer to the supply line and the system waters itself entirely. Built from recycled containers, standard irrigation fittings, and an elevated food-grade barrel, this setup costs a fraction of commercial automated irrigation systems and performs comparably for the balcony or patio vegetable garden scale it's designed for.
Conclusion
A DIY self-watering planter built from recycled materials is one of those projects where the gap between the effort required and the value delivered is almost comically large. Twenty minutes. A two-liter bottle from your recycling bin. Five minutes of cutting and a length of cotton rope. And you have a functional self-watering herb planter that will keep a basil plant consistently watered for days at a time, produce noticeably better growth than a conventional pot, and cost you literally nothing beyond the soil and the plant.
Scale that principle up through the storage tote builds and the five-gallon bucket systems covered in this guide, and you have the infrastructure for a serious, water-efficient container vegetable garden assembled from materials that were heading for the recycling bin — at a cost that's genuinely close to zero compared to the commercial equivalent.
Start tonight if you have a two-liter bottle anywhere in your home. Cut it. Thread a wick through the cap. Fill it with growing medium. Put it back together. Fill the reservoir and plant a herb. That's your first DIY self-watering planter done — and once you see how it performs compared to a conventional small pot, the motivation to build the tote version for your tomatoes and the bucket version for your peppers tends to take care of itself.
Share your builds, your material variations, your wicking experiments, and your results in the comments below. The DIY self-watering planter community is one of the most practically inventive corners of container gardening — people have built these things from paint cans, wine boxes, laundry detergent containers, broken coolers, and half a dozen other materials I've never thought to try, and every creative build shared here adds something useful for the next person looking at their recycling bin with new eyes. ♻️