Container Gardening 101: How to Grow More in Less Space (Even in a Tiny Apartment)
New to container gardening? Learn how to grow herbs, veggies, and flowers in small spaces — balconies, windowsills, and tiny patios — with simple tips, beginner-friendly plant picks, and a starter plan you can set up today. No yard required.
TINY PLOT BEGINNERS: YOUR FIRST HARVEST STARTS HERE
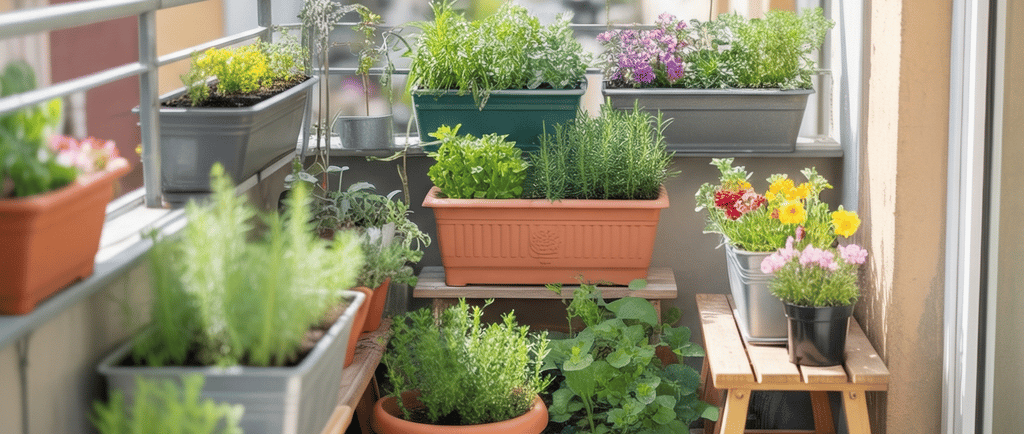
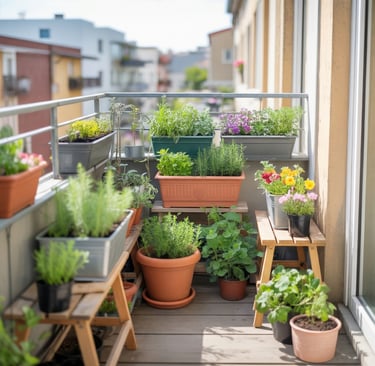
So you've been eyeing that sad, empty balcony of yours and thinking — could I actually grow something out there? Short answer: yes. Absolutely yes. And honestly, it's way more forgiving than you'd think.
I started container gardening a few years back with one sad little basil plant on a windowsill, and now my balcony is basically an edible jungle. No yard. No raised beds. Just pots, a watering can, and a whole lot of trial and error. I want to save you some of that error part.
This guide is for renters, apartment dwellers, anyone with a balcony the size of a bath mat, or even just a bright window. Let's get into it.
What Even Is Container Gardening?
At its core, container gardening just means growing plants in pots, bags, boxes, or really anything that holds soil — instead of planting directly in the ground. That's it. Simple concept, genuinely life-changing for city living.
The reason it works so well for urban spaces is flexibility. You can tuck containers onto a balcony, line them up on a windowsill, stack them on a fire escape where that's allowed, or even set up a little grow shelf indoors. Nothing is permanent. Nothing requires you to tear up grass or ask your landlord for permission to dig.
A few reasons I think container gardening kind of rules for renters and city folks:
You can move things around as the seasons change. You can take everything with you when you move. Pest problems are easier to contain and manage. You can start small — like, one pot small — and scale up only when you're ready. And there's something genuinely satisfying about eating a salad you grew on your own balcony, even a tiny one.
Step 1 — Choose Your Space First
Before you buy a single pot, go stand in your space for a minute and actually look at it. I know that sounds obvious, but this step gets skipped all the time and it's where most beginner mistakes are made.
What you're really doing is a quick space audit. Ask yourself: Is this a balcony, a windowsill, a front step, a corner of a shared patio? How much room do I actually have once the door is open and there's a chair out here? Stuff like that.
Then — and this is the big one — figure out your light situation.
Count the hours of direct sun your space gets on a clear day. Be honest about it. Morning sun is gentler; afternoon sun in summer can be brutal, especially on a balcony where heat bounces off the walls and railing. Which direction does your balcony or main window face?
Here's a rough way to match light to plants:
Full sun (6+ hours of direct sun): You're golden. Tomatoes, peppers, basil, thyme — the classics will all thrive here.
Part sun or bright indirect light: Think leafy greens, parsley, chives, most herbs, some flowers. You've got more options than you might think.
Low light: This is tricky for food, not gonna lie. Shade-tolerant foliage plants will do fine. Some herbs can survive indoors with a decent grow light, but you'll want to manage expectations.
Step 2 — Pick the Right Containers
Okay, containers. There are a lot of choices here and it can get overwhelming fast, so let me simplify it.
The most common options you'll be working with: plastic nursery pots, fabric grow bags, window boxes, rail planters that hang off your balcony railing, and repurposed stuff like buckets and colanders (yes, colanders work great — built-in drainage).
There's really two rules that matter above everything else:
Drainage holes are non-negotiable. I cannot stress this enough. Roots sitting in standing water will rot. End of story. If you fall in love with a pot that doesn't have drainage, drill a hole in the bottom or use it as a decorative outer sleeve.
Bigger is usually better. More soil means more moisture retention, which means you're not watering twice a day in a heatwave. Bigger containers are just more forgiving for beginners.
Here's a rough cheat sheet for sizing:
Herbs: 6–8 inch pots work great
Leafy greens: 8–10 inch pots or a window box
Tomatoes and peppers: You want at least a 5-gallon container — a standard bucket works perfectly fine
Step 3 — Use the Right Soil Mix
This one is important and also frequently gotten wrong. Do not use regular garden soil in your containers. I made this mistake once. The soil compacted into basically a brick, water wouldn't drain, roots couldn't breathe. It was a mess.
What you want is potting mix — specifically labeled for containers. It's designed to be lighter and drain better. Not the same thing as garden soil, even though they're often sitting right next to each other on the store shelf.
My go-to setup is simple: a good quality store-bought potting mix plus a handful or two of compost mixed in for nutrients. That's really all you need to start. If you're on a balcony or keeping pots indoors, look for a lightweight mix — it matters more than people realize when you're hauling bags of soil up three flights of stairs, and also for not overloading a balcony with unnecessary weight.
Step 4 — Start With Easy, Container-Friendly Plants
Look, I know it's tempting to go wild at the nursery. I've been there. But starting with plants that actually want to live in containers will make your first season so much better.
Herbs are probably the easiest entry point. Basil, chives, parsley, and thyme are all workhorses in a container setup. Just one note on mint — grow it in its own separate pot. Mint is aggressive and will take over everything given the chance.
Veggies for containers: Salad greens are arguably the best beginner vegetable — fast, easy, and you're harvesting in like 30 days. Radishes are similar. Bush beans, dwarf peppers, and patio tomato varieties (look for anything labeled "patio," "bush," or "compact") are all well-suited to life in a pot.
Flowers: Marigolds, nasturtiums, pansies, and calendula all do great in containers, and they're not just pretty — marigolds and nasturtiums are fantastic companion plants that help deter pests. Nasturtiums are also edible, which is a fun bonus.
Quick placement guide: anything on the herb and full-sun veggie list wants your sunniest spot. Salad greens and parsley will do well on a slightly shadier sill or balcony corner.
Step 5 — Watering and Fertilizing Basics
Containers dry out faster than in-ground beds. A lot faster. Especially on a balcony where sun and wind are working against you. This surprises a lot of beginners — you water in the morning, and by late afternoon the soil is dry again. That's normal.
The best rule I know: stick your finger about an inch into the soil. If it feels dry at that depth, water. If it still feels damp, leave it alone. It's not glamorous advice, but it genuinely works better than any schedule.
For feeding, containers need a bit more attention than in-ground plants because nutrients get washed out through that drainage hole every time you water. A balanced liquid fertilizer every two to four weeks during the growing season is all most container gardens need. Don't overthink it.
Step 6 — Vertical Space and Small-Space Tricks
When floor space is limited, go up. This was kind of a game changer for my balcony once I figured it out.
Wall planters and vertical pocket planters can turn a bare wall or fence into a growing surface. Rail planters hang off your balcony railing and use otherwise dead space. Tiered plant stands let you stack multiple pots in the footprint of one. Hanging baskets are great for trailing plants like nasturtiums or strawberries.
For vining plants — peas, beans, cucumbers — train them up a trellis leaned against the wall or zip-tied to your railing. You'll be amazed how much you can grow in a really small footprint with a little vertical thinking.
One more tip: group your containers together. It looks great, creates that mini urban jungle vibe, and makes watering way more efficient. Plants that are grouped together also create a little microclimate of humidity around them, which most of them seem to appreciate.
Step 7 — Common Beginner Mistakes to Watch Out For
These are the ones I see most often, and a few that I made myself:
No drainage holes. Already covered this, but it bears repeating because it's the #1 container gardening killer.
Overcrowding. It's so tempting to plant five things in one medium pot. Resist it. Plants need room for roots to grow and air to circulate between them.
Mismatching plants to light. Putting sun-loving tomatoes on a north-facing balcony that gets two hours of sun. It's been done. It doesn't go well.
Forgetting that balconies are intense. Balconies, especially higher ones, can get significantly hotter and windier than ground level. Soil dries out faster, plants can get stressed by wind, and some delicate things just won't thrive up there. Know your microclimate.
Your "Start Today" Mini Plan
Alright, if you want to just dive in and not overthink it, here's a simple starter setup that I'd genuinely recommend to anyone starting from scratch. It's been worked out through experience to be beginner-proof and actually useful.
Grab these four things and you'll have a functional, beautiful little container garden in an afternoon:
1 balcony window box → Fill it with a mix of salad greens (you can get a "cut and come again" blend). You'll be harvesting in a month.
2 medium pots (6–8 inch) → One with basil, one with parsley. Put these wherever you cook or eat most — you'll actually use them.
1 large pot (5-gallon) → Plant a compact patio tomato in the center, and tuck a nasturtium in at the edge so it trails over the side. Practical and gorgeous.
That's it. That's a real container garden. And once you've got that going and it feels easy, add more. The whole point is that it grows with you.
Happy growing. Your balcony is about to get a whole lot more interesting.
Loved this guide? Grab the printable guide.