20 Whimsical Fairy Garden Ideas for Container Gardening (Small Spaces Welcome)
Discover 20 creative fairy garden ideas for container gardening, perfect for balconies, patios, and windowsills. Learn how to choose plants, containers, and accessories so your miniature magical garden thrives
CONTAINER TINY PLOTS: CROPS, SOIL & CLEVER HACKS

I’ve always loved the idea of tiny worlds that feel alive, even if they’re smaller than a dinner plate.
Fairy garden ideas for container gardening hit that sweet spot between creative play and actual gardening—you get to design a little landscape, pick plants, and still feel like an adult “responsible gardener.”
For small spaces—like a balcony, patio, or even a kitchen window—fairy gardens are perfect because they’re self‑contained, portable, and forgiving.
You can start simple with a single pot, a few succulents, and a tiny house, then slowly layer in paths, fences, and fairy lights as you get more confident.
In this guide, I’ll walk you through:
Why fairy gardens work so well in containers,
How to pick the right pot and plants,
Easy themes you can copy,
And how to keep everything looking magical without turning into a high‑maintenance project.
Why Fairy Gardens Work Perfectly for Containers
Fairy gardens are actually built for containers. Instead of worrying about an entire yard, you focus on one pot, tray, or crate, which makes planning a lot less intimidating.
They’re small, but endlessly expandable
A basic fairy garden might be just a pot with a few plants and a tiny house nestled in.
As you grow more comfortable, you can add:
Paths,
Fences,
Miniature furniture,
And even tiny “water” features like a glass “pond.”
You can move them for light or weather
Containers let you chase the sun—or hide from it—by sliding the pot around the balcony or patio.
You can also bring fairy gardens indoors if storms roll in or if you want to enjoy them through the winter.
Easy to control soil, drainage, and space
Because everything is in one container, you can:
Choose a potting mix that suits your plants,
Add drainage materials like gravel or rocks,
And keep the scale small enough that you’re not over‑planting.
For beginners, this is huge—it means you can learn as you go without over‑committing to a huge garden bed.
Best Containers for Fairy Garden Containers
The right container sets the tone for your whole fairy world. A wide, shallow planter gives you room to “landscape,” while a tall, narrow pot will feel more like a fairy tower than a village.
Great options for fairy gardens
Wide, shallow planters – perfect for rolling hills, paths, and tiny houses.
Repurposed items – wooden crates, baskets, bowls, and vintage dishes.
Broken pots or “cracked” planters – these create a pretty “hillside” or cave‑like look.
Terrarium‑style glass containers – great for indoor fairy gardens with lid‑less jars.
How to think about drainage and size
Most fairy gardens do best with light soil and decent drainage, so look for:
At least one drainage hole, or
A way to add a gravel layer on the bottom if you’re using a fancy dish or basket.
If you’re using a pottery saucer or tray, you can:
Add a thin layer of pebbles,
Top with soil,
Then tuck in moss, plants, and accessories.
Easy Fairy Garden Themes You Can Copy
Themes are the fastest way to make your fairy garden feel like a real little world instead of a random collection of plants.
Forest‑in‑a‑pot
This is a great beginner theme.
Use moss as the “forest floor.”
Add tiny trees (dwarf or small‑leaf plants) and clusters of small ferns or air plants.
Stick in tiny mushroom figurines or pebbles painted like toadstools.
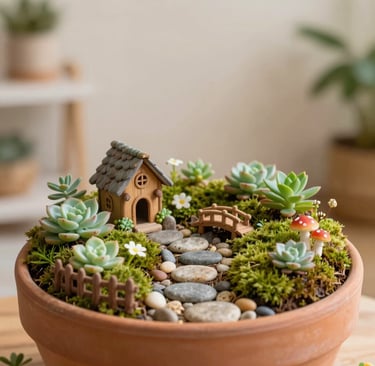
Woodland cottage scene
Lean into the classic fairy‑house vibe.
Place a mini fairy house in one corner.
Add a twig fence or tiny wall,
And a pebble path leading to the door.
Coastal or “beach” fairy garden
If you love the ocean, you can bring that vibe into a pot.
Use white pebbles for “sand,”
Add blue‑tinted glass or smooth stones as “water,”
Pair with tiny seaside‑style plants like succulents or small creeping ground covers.
Fairy‑garden party (teacup style)
This is a fun one for windowsills or small tables.
Use a teacup or small bowl as the container.
Add mini chairs or a tiny table (even doll‑house pieces work).
Surround with dwarf flowering plants or tiny moss clumps.
Fairy‑Friendly Plants for Containers
Plants are the “real” part of your fairy garden; they keep the whole thing alive and grounded.
Great plants to start with
Succulents – hens‑and‑chicks, rosettes, small “string‑of‑pearls” types.
Mosses – soft, low ground cover that looks like a meadow or forest floor.
Mini ferns – for shady, damp corners.
Small flowering plants – like tiny begonias, violas, or miniature marigolds.
How to match plants to light
Sunny balcony or patio? Go for succulents, low‑growing sedums, or small cacti.
Shadier spot? Use moss, ferns, and other shade‑loving ground covers.
Keep the plants small so they don’t quickly outgrow your fairy‑scale house and furniture.
Building a Layered, Multi‑Level Fairy Garden
Layering makes your fairy garden feel like a real landscape, not a flat top‑soil surface.
Creating hills and “hollows”
Pile soil into mounds at the back of the pot,
Leave it lower in the front so paths and houses stay visible.
Using tiered containers
Stack small pots or galvanized tubs to create levels.
Put taller plants in the back, lower plants in the front, so the view isn’t blocked.
Adding ledges and “terraces”
You can use flat rocks, pieces of slate, or even bricks to create little ledges.
Imagine a fairy “veranda” with a tiny bench looking out over the rest of the garden.
Secret Fairy Houses and Furniture
Houses and furniture are the heart of most fairy‑garden designs.
Placing the fairy house
Nestle it into a hill or against a rock so it feels like part of the landscape.
Angle it slightly so it looks like it’s peeking out from behind plants.
DIY furniture and details
Use sticks, popsicle sticks, and bottle caps for benches, tables, or “fairy rafts.”
Anchor them with a bit of clay or soil so they don’t tip when you water.
Keeping it “fairy‑made”
Aim for accessories that look like they were built from natural materials—twigs, leaves, stones, and bark—so the whole garden feels like a tiny ecosystem fairies would actually live in.
Fairy Paths, Bridges, and Fences
Paths tell the story of how fairies “move through” their world. Bridges and fences add structure.
Paths
Use pebbles, small stones, or crushed gravel to make winding paths.
Keep them narrow so they look like fairy‑scale walkways instead of roads.
Bridges
Mini bridges can span over a “stream” of blue glass or dark stones.
Lean one side of the bridge against a rock or raised edge so it looks like it’s anchored.
Fences
Use twigs tied together or tiny lattice strips as fences.
Or prop popsicle‑stick fences against the side of the pot.
Magical Fairy Garden Accessories
Accessories are where the “magic” factor really comes in.
Must‑have extras
Fairy lights – tiny string lights make the garden glow at dusk.
Mini signs – “Fairy Crossing” or “Mushroom Lane” add personality.
Tiny animals – deer, birds, or toad figurines look like wildlife in the forest.
Natural‑looking touches
Crystals or gemstones scattered around resemble fairy “treasure.”
Vintage glass jars or bottles can become fairy lanterns or “storage” in the garden.
Balcony, Windowsill, and Apartment Fairy Gardens
Fairy gardens are perfect for renters, apartment dwellers, and anyone with a tiny balcony or windowsill.
Balconies and patios
Use shallow pots on railings or tables so they don’t block the view.
Think about wind—heavy‑duty accessories or small rocks can help keep things stable.
Windowsills and small tables
A single pot or terrarium can sit on a windowsill without taking much space.
Since light is limited, choose shade‑tolerant plants and rotate them now and then.
Vertical fairy gardens
Hang baskets or wall‑mounted planters and design them like tiny fairy scenes.
Add a tiny ladder or rope reaching “up” the wall so it looks like a climbable path.
Simple Maintenance Tips for Container Fairy Gardens
The good news: fairy gardens are low‑maintenance, as long as you’re consistent.
Watering
Water lightly and often, not deeply.
Use a small watering can or spray bottle so you don’t blast the accessories.
Pruning
Trim back plants that are starting to “swallow” the fairy house or path.
Clip off any overgrown leaves or stems so the view stays clean.
Cleaning and tidying
Gently wipe dust off figurines and accessories.
Replace chipped or faded pieces when you want to refresh the look.
Seasonal updates
In spring, add fresh moss or flowering plants.
In fall, tuck in tiny pumpkins or dried leaves for a seasonal fairy vibe.
Conclusion
Fairy garden ideas for container gardening are perfect for small spaces, beginners, and anyone who wants to add a bit of whimsy without over‑complicating their gardening routine.
You can start with one simple pot, a few mini plants, and a tiny house or sign, then build up slowly as you feel more confident.
Just remember to:
Match the plants to your light and space,
Keep the layout easy to maintain, and
Choose accessories that feel natural instead of cluttered.
If you’ve tried a fairy garden in a container, I’d love to hear about it—share a photo or a short description in the comments or on social media and tell me what worked (and what didn’t).